
Summary of How To Save a Text In The EEPROM of The Arduino
This article explains how to use the internal EEPROM of an Arduino Pro-Mini (ATMEGA328) to store text data persistently. It details interfacing the board with a PC via a USB-to-TTL converter for serial communication, utilizing the Arduino IDE's `` and `` libraries. The project demonstrates writing user input to memory, displaying status on an LCD, and using an LED to indicate write progress and memory capacity limits.
Parts used in the Save Text In EEPROM Project:
- Arduino Pro-Mini Board
- ATMEGA328 Microcontroller
- USB to TTL Converter Board
- LCD Display
- LED
- Computer with USB Port
- Arduino IDE Version 1.0.3
A microcontroller might need to store its data like sensor value, or a particular count or image data for a long period of time. The most common type of memory used with the microcontroller based systems is EEPROM. The EEPROM stands for Electrically Erasable Programmable Read Only Memory which is a kind of Read Only Memory (ROM), which can be written and erased by means of electrically programming and hence the name. Once programmed the data it will remain in the memory for a very long time even if there is no power available. EEPROM memory is widely used in microcontroller systems where some particular data need to be retained each time the system is turned on and to save particular data before the system is powered off.
There are several EEPROM memory chips available which can be interfaced in a microcontroller based system with the help of serial communication protocols. Most of the microcontrollers also have small sized built-in EEPROM which can be used in small applications and hence the need for an external memory chip, circuit and code complexity can be avoided.
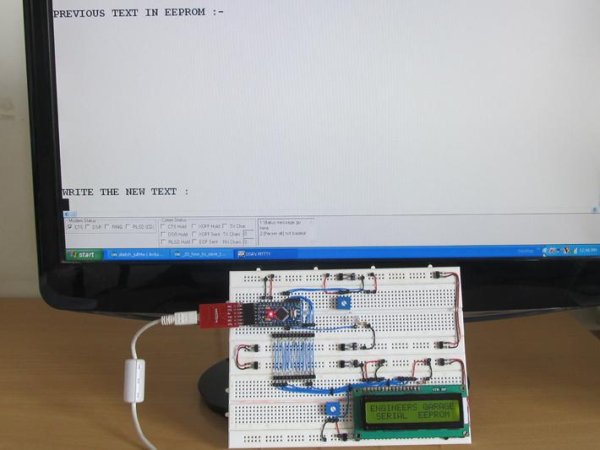 The serial communication protocols can be again used with those kinds of microcontrollers to connect the internal EEPROM with other devices or with the serial port of a PC.
The size of the data which can be saved in the internal EEPROM of a microcontroller is limited to a few kilobytes normally. Hence they are used to store some sensor values, counts or sometimes text like data from the GPS etc. This particular project demonstrates how to connect the internal EEPROM of the Arduino board with the serial port of a PC and save a text in it which can be read back even after the Arduino is powered off and turned on again.
The size of the EEPROM memory available in the Arduino board varies from one kind of board to another. The arduino board is built around an AVR microcontroller burned with arduino boot-loader providing all the necessary circuitry for the microcontroller to operate. The arduino board used in this project is the arduino pro-mini board which has an ATMEGA328 microcontroller having an internal EEPROM of size 1Kb. The pro-mini board also one set of Tx and Rx pins which can be used to connect the board with serial communication lines. In this project the pro-mini board is programmed using the Arduino IDE version 1.0.3 downloaded for windows.
The image of the Arduino pro-mini board and the Arduino IDE is shown in the following;
Since the arduino pro-mini board has no circuitary for interfacing it with the serial port or the USB port of the PC, an external USB to TTL converter board is required to connect it with the PC. This hardware helps in programming the arduino board and also helps in the serial communication with the PC through the USB port of the PC.
It is assumed that the reader has gone through the project how to get started with the arduino and done all the things discussed in it.
The Arduno IDE is very easy to start with and has lot of built in libraries and function for every simple and complex tasks. The Arduino IDE also has a library called <EEPROM.h> which provides functions to access the built-in EEPROM of the Arduino board’s microcontroller. The code written for this project also makes use of few functions from the <EEPROM.h> to read and write the built-in EEPROM. The functions are namely EEPROM.write() and EEPROM.read() and the details of those functions are already discussed in previous projects on how to read and write the EEPROM of the Arduino, how to test the EEPROM of the Arduino and how to save a sensor value in the EEPROM of the Arduino.
The Arduino IDE also provide some built-in functions which helps in the serial communication process. There is a function which helps to initialize the serial communication port with a particular baud rate and there are functions to send data to the serial port and read data from the serial port. The functions used in this projects are namely Serial.begin(), Serial.print(),Serial.println(), Serial.available(),Serial.read() and Serial.write(). The details of these functions and similar functions for the serial communication are already discussed in previous projects on how to do serial communication with the Arduino, how to send and receive serial data using arduino, how to do serial debugging with the Arduino.
The project also displays some text on the LCD with the help of the functions from the library <LiquidCrystal.h>. The important functions provided by the library <LiquidCrystal.h> are already used and explained in previous projects on how to interface an LCD, how to display sensor value on LCD, how to connect the LCD with the PC and how to make an LCD scrolling display.
In this project an LED is connected to the pin number 6 of the Arduino board which serves the purpose of indicating each data byte written by blinking once and also blinking continuously after the EEPROM runs out of memory. The LED is controlled by using the built-in functions of the Arduino IDE namely pinMode(),digitalWrite() and delay() which are discussed in the previous projects on how to get started with the Arduino, how to use digital input and output of the Arduino.
 THE CODE
The code written for this project configures the pin number 6 as output pin where an LED indicator is connected using the function pinMode(). The LCD is the initialized using the function lcd.begin() and generates an initial display in the 16*2 LCD screen.
The function Serial.begin() is then used to initialize the serial port with a baud rate of 9600. The code then reads the entire EEPROM memory using the function EEPROM.read() and send the data as previously saved text to the serial port using the function Serial.write(). The entire EEPROM memory is then cleared by writing it with white spaces using the function EEPROM.write() before the new text is read into. The code then waits till the user input text data bytes using the function Serial.available(). As the serial data is available it is written to the successive memory locations using the function EEPROM.write() along with blinking an LED connected to the pin number 6 for each data byte written using the function digitalWrite(). Once the EEPROM of the Arduino runs out of memory the LED is blinked continuously using the functions digitalWrite() and delay().
When the coding is finished one can verify and upload the code to the Arduino board as explained in the project how to get started with the Arduino. The Arduino board can then be connected to the PC using USB to TTL converter board and the previous text can be viewed or new text can be typed into using any serial monitoring software or using the Arduino IDE’s serial monitoring software itself as explained in the project how to do serial debugging with the Arduino.
For more detail: How To Save a Text In The EEPROM of The Arduino
- What is EEPROM?
EEPROM stands for Electrically Erasable Programmable Read Only Memory, a type of ROM that can be written and erased electrically. - How does the Arduino Pro-Mini connect to a PC?
An external USB to TTL converter board is required because the Pro-Mini lacks built-in circuitry for USB or serial ports. - Which library functions are used to access the built-in EEPROM?
The code uses EEPROM.write() and EEPROM.read() from the <EEPROM.h> library. - What is the size of the internal EEPROM in the Arduino Pro-Mini used in this project?
The ATMEGA328 microcontroller on the Pro-Mini board has an internal EEPROM size of 1Kb. - How is the serial communication initialized in the code?
The function Serial.begin() is used to initialize the serial port with a baud rate of 9600. - What happens when the EEPROM runs out of memory during writing?
The LED connected to pin number 6 blinks continuously to indicate the memory limit has been reached. - Can data remain in the EEPROM after the power is turned off?
Yes, once programmed, the data remains in the memory for a very long time even if there is no power available. - Which library is used to display text on the LCD?
The project uses functions from the <LiquidCrystal.h> library to display text on the screen.
