The Rural Hack Kit is the perfect electronic set to get started hacking farms, gardens, or even plants on your balcony.
Story
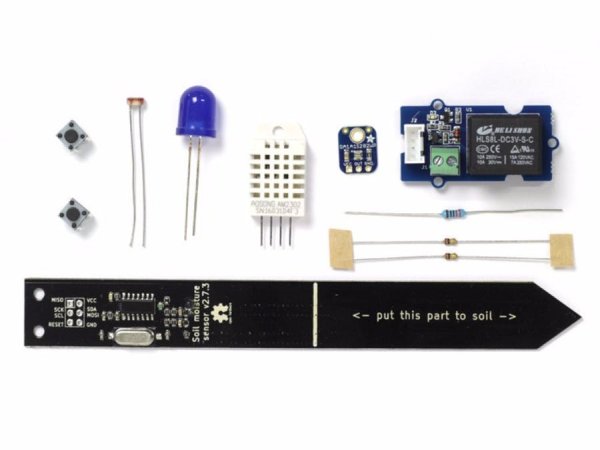
The Rural Hack kit.
The Rural Hack Kit is the perfect electronic set to get you started hacking your farm, garden, or plants on your balcony.
The kit includes the essentials for monitoring the environment of our green silent friends: an accurate soil moisture sensor, a precise digital light sensor module, and a temperature and humidity sensor.
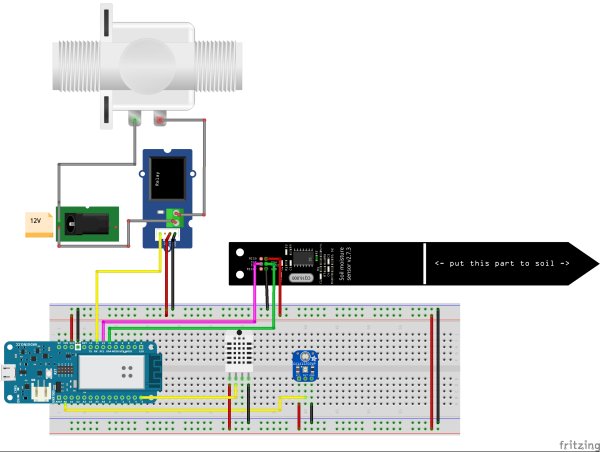
Moreover, to automate your greenhouse, the kit features a relay module that you can use to control a water valve, a fan, or a lamp.
KIT CONTENTS
- Humidity Sensor (DHT22)
- Log-scale Analog Light Sensor (Ga1a12s202 in its Adafruit’s Flavour)
- Soil Moisture Sensor (aka the slim chirp) from Miceuz
- Grove Relay Module from Seeed
- Resistors / pushbuttons / connectors
This is the first of a series of tutorial that will teach how to use the modules in the kit. In this tutorial we are going to learn how to connect the sensors and actuators to the Arduino, read their data, and interact with them.
In the next tutorials you will learn how to connect the sensor to cloud services and take care of your garden remotely.
DHT22 humidity and temperature sensor
Sensor Specs
The DHT22 is a digital sensor capable of reading environmental temperature and humidity.
- Low cost
- 3 to 5V power and I/O
- 2.5mA max current use during conversion (while requesting data)
- Good for 0-100% humidity readings with 2-5% accuracy
- Good for -40 to 80°C temperature readings ±0.5°C accuracy
- No more than 0.5 Hz sampling rate (once every 2 seconds)
- Body size 27mm x 59mm x 13.5mm (1.05″ x 2.32″ x 0.53″)
- 4 pins, 0.1″ spacing
- Weight (just the DHT22): 2.4g
Connections
Connecting to to the sensor is very easy. As shown in the picture connect
- the first pin to VCC on your board.
- The second pin is the data Out pin, connect that to any digital pin on the board.
- leave the third pin disconnected.
- connect the forth pin to ground.
Setup & test
Before you can try the sensor you need to install its library. Search for dht on the library manager and install the library.
Now you can just upload the test sketch that will get the data from the sensor and print them to the serial port.
#include <SimpleDHT.h>
// for DHT22,
// VCC: 5V or 3V
// GND: GND
// DATA: 6
int pinDHT22 = 6;
SimpleDHT22 dht22;
void setup() {
 Serial.begin(115200);
}
void loop() {
 // start working...
 Serial.println("=================================");
 Serial.println("Sample DHT22...");
 // read without samples.
 // @remark We use read2 to get a float data, such as 10.1*C
 //    if user doesn't care about the accurate data, use read to get a byte data, such as 10*C.
 float temperature = 0;
 float humidity = 0;
 int err = SimpleDHTErrSuccess;
 if ((err = dht22.read2(pinDHT22, &temperature, &humidity, NULL)) != SimpleDHTErrSuccess) {
   Serial.print("Read DHT22 failed, err="); Serial.println(err);delay(2000);
   return;
 }
 Serial.print("Sample OK: ");
 Serial.print((float)temperature); Serial.print(" *C, ");
 Serial.print((float)humidity); Serial.println(" RH%");
 // DHT22 sampling rate is 0.5HZ.
 delay(2500);
}
You can now open the serial monitor and you should be able to see the temperature and humidity value printed there.
I2C Soil moisture sensor
The soil moisture sensor provided with the kit is probably one of the most reliable and at the same time cheap sensor for DIY soil moisture measurement on the market.
Classic soil moisture sensor, (the one that look like a fork with two electrodes) measure resistance between the two electrodes planted in the soil; High resistance between the electrodes means that the soil is not conducting electricity therefore it is probably dry; low resistance means that the electricity is flowing easily between the two electrodes, that’s what happens when the sensor is in water or in a wet soil.
Read more: Rural Hack Kit