Summary of Robotic Hand With Wireless Glove Controlled | NRF24L01+ | Arduino
This article details the construction of a wireless robot hand controlled by a glove using Arduino and nRF24L01 modules. It covers hardware requirements, 3D printing specifications from the InMoov project, assembly techniques for servo motors and flex sensors, and specific wiring diagrams for both the receiver (hand) and transmitter (glove). The guide emphasizes power management to prevent communication issues and provides code availability for the system.
Parts used in the Wireless Robot Hand with Glove:
- 2x Arduino Board (Nano)
- 2x nRF24L01+ Transceiver
- 2x nRF24L01+ Adapter
- 5x MG996R Servo
- 5x 4.5 Inch Flex Sensor
- 5x 10k Resistor
- 2x 18650 3.7V Battery
- 1x 18650 Battery Holder
- 1x 9V Battery
- 1x 9V Battery Connector
- 1x Glove
- 1x String / Braid Line
- 3x Mini Breadboard
- Jumper Wires
- Rubber / Tire or Spring
- Steel Wire or Filament
- 3x Bolt (8mm diameter)

In this video; 3D robot hand assembly, servo control, flex sensor control, wireless control with nRF24L01, Arduino receiver and transmitter source code are available. In short, in this project we will learn how to control a robot hand with a wireless glove.
Step 1: Video Tutorial
With this tutorial video you can see the robotic arm assembly and more. I added a video because some parts of the robotic arm assembly are very detailed.
Step 2: Required Hardware and Tools
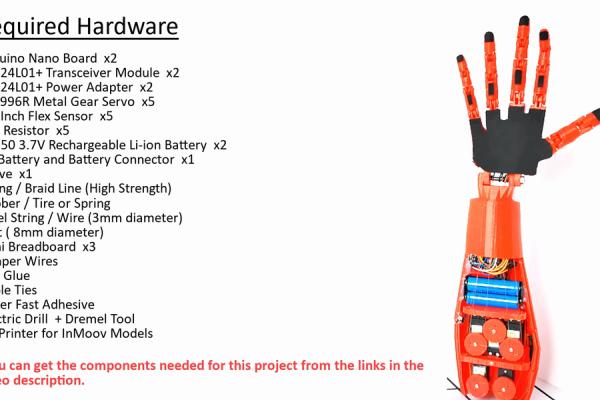
Required Hardware
2x Arduino Board (Nano) — http://bit.ly/2HaRyrj
2x nRF24L01+ Transceiver — http://bit.ly/2sCG7nd
2x nRF24L01+ Adapter — http://bit.ly/2soia3t
5x MG996R Servo — http://bit.ly/2kDLHlm
5x 4.5 Inch Flex Sensor — http://bit.ly/2J3hfQp
5x 10k Resistor — http://bit.ly/2xuM6jC
2x 18650 3.7V Battery — http://bit.ly/2LNZQcl
1x 18650 Battery Holder — http://bit.ly/2LihW5c
1x 9V Battery — https://goo.gl/xaD6Tf
1x 9V Battery Connector — https://goo.gl/fLjKL7
1x Glove — http://bit.ly/2xA6sYx
1x String / Braid Line — https://goo.gl/EhSdXM
3x Mini Breadboard — http://bit.ly/2J5hqL5
Jumper Wires — http://bit.ly/2J6de9E
1x Rubber / Tire or Spring
1x Steel Wire or Filament
3x Bolt ( 8mm diameter)
Required Tools (Optional)
Electronic Drill + Dremel Tool — http://bit.ly/2Li7NFF
Anet A8 3D Printer — http://bit.ly/2J18Ahn
PLA 22M 1.75mm Red Filament — https://goo.gl/35MSfn
Hot Glue Gun — https://goo.gl/2znyr6
Cable Ties — https://goo.gl/8FbDzU
Super Fast Adhesive — https://goo.gl/aGnizS
Screwdriver Wallet Set — https://goo.gl/i75Au5
Adjustable Solder — https://goo.gl/2oZhtu
Soldering Stand — https://goo.gl/2n8gds
Solder Wire — https://goo.gl/FC7W6o
Heat Shrink Tube — https://goo.gl/j2xcVf
Wire Cable Cutter — https://goo.gl/b96G4X
PCB Board — https://goo.gl/D1so5j
Screws Nuts Assortment Kit —https://goo.gl/EzxHyj
Step 3: 3D Models of the Hand and Forearm

The hand is part of an open-source project called InMoov. It’s a 3D-printable robot, and this is just the hand and forearm assembly.
For more information, visit the official InMoov website. You can visit the “Assembly Sketches” and “Assembly Help” pages in the InMoov website for more details on assembly.
Thanks to InMoov — http://inmoov.fr/ – http://inmoov.fr/hand-and-forarm/
Anet A8 3D Printer is used in this project. Models were printed at the lowest qulity.
All 3D parts used in this project
Step 4: Assembly of Parts

Assembly of robotic arm parts is very detailed and complex, so you can visit the “Assembly Sketches” and “Assembly Help” pages in the InMoov website for more details on assembly. it is explained very thoroughly on the InMoov website. Or you can watch the video I shared.
Consider this suggestion for the correct finger angle:
When assembling the fingers, make sure the parts are oriented correctly before gluing. Keep all servo motors at 10 or 170 degrees before attaching the servo pulleys to the servo motors. When mounting the servo pulleys, keep fingers in the closed or opened position (according to your servo angles). Then wrap around the servo pulley until the braid wires or strings becomes stretched.
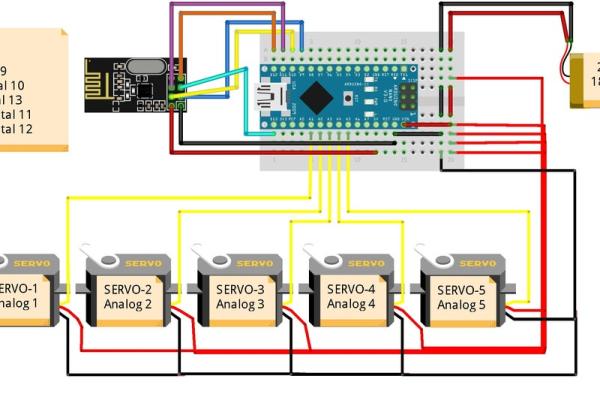
Step 5: Connections of Hand (Receiver)
- At this point, the servos should already be mounted into the forearm. To connect them to the power supply and Arduino, you can use a small breadboard.
- Remember to connect the negative on the breadboard to the Arduino’s GND. All the GNDs in a circuit need to be connected for it to work.
- I recommend using the power adapter for the nRF24L01+ module. Otherwise, communication may be broken due to insufficient current.
- If you encounter the these problems: vibration in servo motors, servo motors not working, communication breakdown and in similar situations, supply your Arduino board with external power (like USB).
- If you used different pins than pins shown in below, change them in codes.
- Connections of the Servo Motors:
Servo-1 connect to the analog 01 (A1) of the Arduino.
Servo-2 connect to the analog 02 (A2) of the Arduino.
Servo-3 connect to the analog 03 (A3) of the Arduino.
Servo-4 connect to the analog 04 (A4) of the Arduino.
Servo-5 connect to the analog 05 (A5) of the Arduino.
- Connections of the nRF24L01 Module:
VCC connect to the +5V of the Arduino.
GND connect to the GND of the Arduino.
CE connect to the digital 9 pin of the Arduino.
CSN connect to the digital 10 pin of the Arduino.
SCK connect to the digital 13 pin of the Arduino.
MOSI connect to the digital 11 pin of the Arduino.
MISO connect to the digital 12 pin of the Arduino.
Source: Robotic Hand With Wireless Glove Controlled | NRF24L01+ | Arduino
- How can I view the detailed robotic arm assembly?
You can watch the video tutorial at https://youtu.be/uEd2B7fS8Eg because some parts of the assembly are very detailed. - What is the best way to connect the GNDs in the circuit?
All GNDs in the circuit must be connected together, specifically connecting the negative on the breadboard to the Arduino's GND. - Does the nRF24L01+ module require an external power adapter?
Yes, it is recommended to use a power adapter for the nRF24L01+ module to prevent broken communication due to insufficient current. - Can I control the robot hand without a video tutorial?
The article states that the assembly is very detailed and complex, so watching the video or visiting the InMoov website assembly sketches is advised. - What angle should the servo motors be set to before attaching pulleys?
You should keep all servo motors at 10 or 170 degrees before attaching the servo pulleys to ensure correct finger orientation. - Which analog pins do the five servos connect to on the Arduino?
Servo-1 connects to A1, Servo-2 to A2, Servo-3 to A3, Servo-4 to A4, and Servo-5 to A5. - How do I fix vibration or communication breakdown issues?
If you encounter these problems, supply your Arduino board with external power, such as via USB. - What happens if I use different pins than shown in the connections?
If you use different pins, you must change them in the source code provided. - Where can I find more information about the 3D models used?
You can visit the official InMoov website to access Assembly Sketches and Assembly Help pages.