Summary of RFID Access Control System using Arduino
This article outlines an Arduino-based RFID access control system. It explains how RFID tags function across various applications and form factors before detailing a specific project that uses a pre-built reader to verify tag IDs against a database and unlock an electric strike plate for authorized users. The system integrates components like voltage regulators, relays, LEDs, and specific RFID modules (ID-12 or RDM630) to manage secure entry.
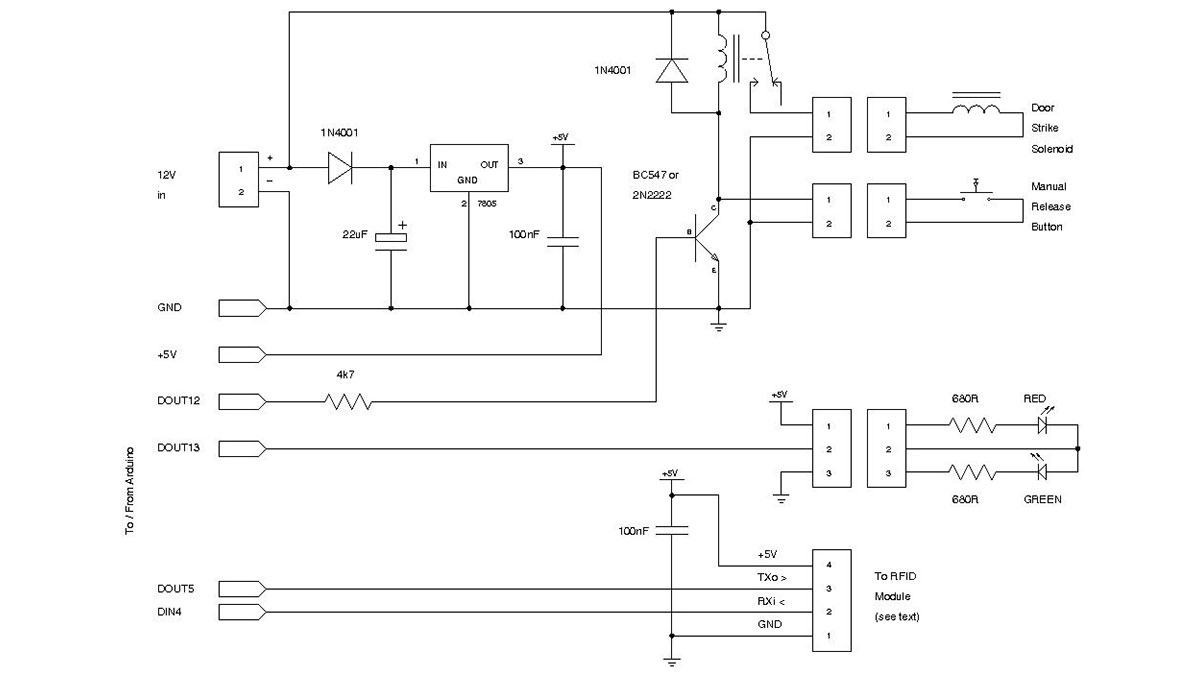
Parts used in the RFID Access Control System:
- Arduino Duemilanove, Arduino Pro, Seeeduino, or equivalent
- Prototyping shield
- 4-pin PCB-mount header with 90 degree bend
- 4-pin line-mount header socket
- 2-pin PCB-mount screw terminals
- 12V electric striker plate
- 12V single-pole, single-throw (SPST) or single-pole, double-throw (SPDT) PCB-mount relay
- LM7805 voltage regulator
- 100nF capacitors
- 22uF electrolytic capacitor
- 1N4001 or equivalent power diodes
- 680R resistors
- 4K7 resistor
- 100K resistor
- NPN transistor
- Red LED
- Green LED
- 12V 1A power supply
- Ribbon cable
- 125kHz RFID tag
- Small PVC box
- ID-12 RFID reader module
- ID-12 breakout board or custom PCB
- RDM630 125kHz RFID module
- Momentary pushbutton
- Lightweight two-core cable
RFID technology is used for a wide variety of applications including access control, package identification, warehouse stock control, point of sale scanning, retail anti-theft systems, toll-road passes, surgical instrument inventory, and even identifying individual sheets of paper placed on a desk. RFID tags are embedded in name badges, shipping labels, library books, product tags and boxes, installed in aircraft, hidden inside car keys, and implanted under the skin of animals or even people. RFID systems work on a wide range of frequencies, have a variety of modulation and encoding schemes, and vary from low-power passive devices with range of only a few millimetres to active systems that work for hundreds of kilometers.

RFID tags are produced in a wide variety of physical form factors to suit different deployment requirements. The most commonly seen form factor is a flat plastic card the same size as a credit card, often used as an access control pass to gain access to office buildings or other secure areas. The most common form by sheer number produced, even though you may not notice them, is RFID-enabled stickers that are commonly placed on boxes, packages, and products. Key fob tags are also quite common, designed to be attached to a keyring so they’re always handy for operating access control systems.
This project uses a pre-built RFID reader module to interrogate commonly-available passive tags, looks up the tag ID in an internal database, and release a lock using an electric strike plate if the tag is authorised.
| Qty | Description |
| General Parts | |
| 1 | Arduino Duemilanove, Arduino Pro, Seeeduino, or equivalent |
| 1 | Prototyping shield |
| 1 | 4-pin PCB-mount header with 90 degree bend |
| 1 | 4-pin line-mount header socket |
| 2 | 2-pin PCB-mount screw terminals |
| 1 | 12V electric striker plate |
| 1 | 12V single-pole, single-throw (SPST) or single-pole, double-throw (SPDT) PCB-mount relay |
| 1 | LM7805 voltage regulator |
| 2 | 100nF capacitors (marked “104”) |
| 1 | 22uF electrolytic capacitor |
| 2 | 1N4001 or equivalent power diodes |
| 2 | 680R resistors 1%: blue-gray-black-black-brown 5%: blue-gray-brown-gold |
| 1 | 4K7 resistor 1%: yellow-violet-brown-brown 5%: yellow-violet-red-gold |
| 1 | 100K resistor 1%: brown-black-black-orange-brown 5%: brown-black-yellow-gold |
| 1 | BC547, BC548, 2N222, or equivalent NPN transistor |
| 1 | Red LED |
| 1 | Green LED |
| 1 | 12V 1A power supply or plugpack |
| 20cm | Ribbon cable |
| 1 | 125kHz RFID tag |
| 1 | Small PVC box |
| For ID-12 reader | |
| 1 | ID-12 RFID reader module (www.id-solutions.com) |
| 1 | ID-12 breakout board or custom PCB, as explained in the text |
| For RDM630 reader | |
| 1 | RDM630 125kHz RFID module (UART version) from Seeed Studio |
| For optional manual-release exit button | |
| 1 | Single-pole, single-throw (SPST) momentary pushbutton |
| 1 | 2-pin PCB-mount screw terminal |
| 2m | Lightweight two-core cable, such as figure-8 speaker wire |
For more detail: RFID Access Control System using Arduino
- What is the primary function of this project?
The project interrogates passive tags, looks up the ID in a database, and releases a lock using an electric strike plate if authorized. - Can this system work with different types of RFID readers?
Yes, it supports either the ID-12 RFID reader module or the RDM630 125kHz RFID module. - How does the system determine if a tag is authorized?
The system looks up the tag ID in an internal database to decide whether to release the lock. - What component is used to physically open the door?
A 12V electric striker plate is used to release the lock. - Is an optional manual exit button included in the parts list?
Yes, a single-pole, single-throw momentary pushbutton can be added for manual release. - What type of power supply is required for the system?
A 12V 1A power supply or plugpack is needed to power the components. - Which voltage regulator is specified for this build?
The LM7805 voltage regulator is used in the circuit. - What physical forms do common RFID tags take according to the text?
Common forms include flat plastic cards, stickers on boxes, and key fob tags.