Summary of Retro LED Strip Audio Visualizer
Summary: A musician and EE student built a 40" x 20" Retro LED Strip Audio Visualizer prioritizing professional build quality and a large display. Using WS2811 addressable LED strips, an Arduino Uno for control, and vintage stereo components for audio input, the project features wood framing, acrylic diffusion, and standard power and mounting hardware. The post covers parts, prototyping, and practical tips like using trash bags for diffusion and thrift-shopping for stereo gear.
Parts used in the Retro LED Strip Audio Visualizer:
- WS2811 60 LEDs/m LED strip (5m, IP30, 12V)
- 9 x 3-pin JST connectors and receptacles
- DC 12V 20A (240W) power supply
- Power cord (3-prong)
- Arduino Uno (R3 used)
- TRRS breakout for aux input
- L7805 5V regulator
- 330 nF and 100 nF capacitors (per L7805 datasheet)
- 2 x 10kΩ resistors, 2 x 1kΩ resistors, 2 x 100 nF capacitors (audio input biasing)
- Stereo receiver with aux input (example: Panasonic RA6600)
- Speakers (wired set compatible with receiver)
- Logitech Bluetooth audio adapter
- RCA male to RCA male cable
- Aux cord (3.5mm)
- 2x6 lumber (8 ft)
- 40% light transmission acrylic sheet (~18" x 24" x 1/8")
- Wood stain (Minwax red mahogany recommended)
- Lacquer (semi-gloss spray used)
- 40 x 1/2" wood screws
- Scrap wood
- Gorilla glue
- Hot glue
- Solder and soldering wire
- Command strips (velcro style, 20 medium or 10 large)
In this post, we will talk about Retro-LED-Strip-Audio-Visualizer: As a musician and electrical engineering student, I love any project that intersects these two fields.
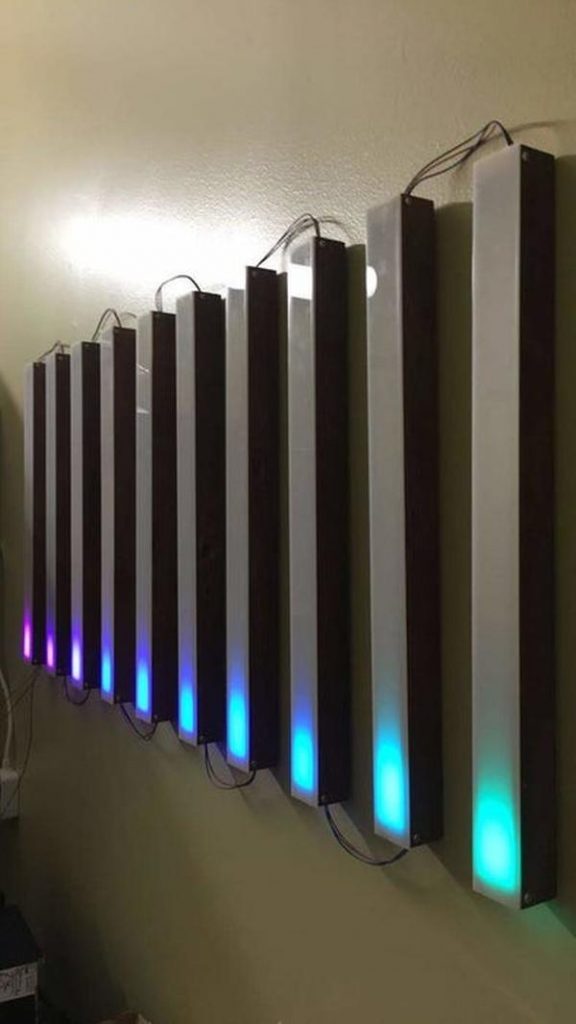
I’ve seen some DIY audio visualizers (here, here, here, and here), but each had missed at least one of the two goals I established for myself: professional build quality and a relatively large display (a wimpy 8*8 LED matrix would not suffice here!). With some vintage flair, and sitting at 40″ x 20″, this audio visualizer accomplishes both of those goals. Apologies in advance for vertical photos. A lot of them were taken for social media.
Retro LED Strip Audio Visualizer:
Step 1: Parts List
I had several of these parts lying around already. The links are purely for reference. Please don’t buy unnecessarily expensive components.
Electronics
- WS2811 60LEDS/m @ 5m, IP30 (Non-Waterproof), Addressable – These were cheaper then WS2812 at the time. You have some leeway here but make sure the dimensions are correct and that you can actually talk to the LEDs. Also, note that WS2811s are 12V while WS2812s are 5V.
- 9 x 3-Pin JST Connectors + Receptacles
- DC 12V 20A (240W) Power Supply – I initially planned on doing 2 LED strips, and wanted a blow-your-house-down speaker set. Each light strip is 90W in a worst-case scenario (I haven’t measured to confirm), which left me ~60W for speakers + amplifier. The 15A option was only $4 less anyway.
- Power cord (3 Prong)
- Arduino Uno – I had an R3 lying around so I used that. You may be able to find a cheaper option from one of the knockoffs or another vendor.
- TRRS Breakout – For aux input
- L7805 5V Regulator – Any 5V regulator that accepts a 12V input will work.
- 330 nF, 100 nF capacitors – per L7805 datasheet
- 2 x 10kR, 2 x 1kR, 2 x 100 nF capacitors – for audio input biasing
- Stereo Receiver – any vintage stereo receiver will work as long as it has aux input (3.5mm or RCA). I picked up a Panasonic RA6600 off craigslist for $15. I recommend checking Goodwill, Craigslist, and other thrift stores for similar.*
- Speakers – Not BT speakers. Just a speaker set. Pay attention to what impedance is compatible with your receiver. I found a set of 3 20W (=loud) speakers at Goodwill for $6, and that came with a “center” and two “front” speakers.
- Logitech BT Audio Adapter – this device can stream audio out to the stereo speakers and to your circuit
- RCA male to RCA male cable
- Aux cord
Hardware:
- 2×6 (8ft) – Not pressure treated. Should be ~$6 or less at HD or Lowe’s
- 40% Light Transmission Acrylic – I ordered 18″ x 24″ x 1/8″, and it was technically 17.75″ x 23.5″. Keep it in the wrapping when you go to laser cut.
- Wood Stain – You only need a small can. I used Minwax red mahogany and it came out very nice. I definitely recommend a dark tone. I originally tried provincial and it didn’t look as nice.
- Lacquer – First off, check out this video by Steve Ramsey and decide for yourself what works best. I got a spray can of semi-gloss (no gloss was available) and honestly, it didn’t do that much. But I also only did one coat due to time constraints.
- 40 x 1/2″ Wood screws – I had round head available to me but I recommend using flat top if you can. I don’t think that would interfere with the build quality but feel free to ask anyone more familiar with woodworking first.
- Scrap wood, gorilla glue, hot glue, solder, wire, and command strips (velcro style, 20 medium or 10 large)
* I plan on building a soundbar to make this project entirely “from scratch,” which will replace 9-13 above. I hope to update this instructable with that by the end of the summer.
Step 2: Prototyping
This section is not something you need to complete, but I do want to show what the project looked like as it went along.
Here, I taped down LEDs in the snake pattern and was experimenting with light diffusion via trash bag layered over top of itself (I highly recommend that as an alternative to the acrylic if you are trying to cut costs. Though you’ll have to attach it some different way).
A 10×10 setup worked for me, but you may prefer 8×12 or 7×14. Feel free to experiment. Before I had my stereo, I found an amplifier and hooked it up in my breadboard, and before that, I played audio from my laptop to the circuit for audio analysis and simultaneously hit “play” on my phone to hear it.
I’m a huge believer in measure twice, cut once. So whatever you do, follow that guide and you’ll be set.
Read Full Post- What LED strip was used?
WS2811 60 LEDs/m at 5m, IP30 (12V) addressable LED strip was used. - What microcontroller was used to control the LEDs?
An Arduino Uno R3 was used to control the LEDs. - What power supply is recommended?
A DC 12V 20A (240W) power supply was used in the project. - How was audio input handled?
Audio input used a TRRS breakout for aux input and a vintage stereo receiver with aux input. - What regulator is used to get 5V from 12V?
An L7805 5V regulator was used along with 330 nF and 100 nF capacitors per the datasheet. - Can Bluetooth audio be used with the stereo?
Yes, a Logitech Bluetooth audio adapter was used to stream audio to the stereo speakers and the circuit. - What material was used for diffusion?
40% light transmission acrylic sheet was used; layered trash bag was tested as a cheaper alternative. - Where did the builder source stereo gear?
The builder purchased a Panasonic RA6600 stereo receiver and thrift stores like Goodwill and Craigslist were recommended sources. - What wood was used for the frame?
2x6 lumber (8 ft) was used for the build frame. - What finish was applied to the wood?
Wood stain (Minwax red mahogany) and a spray lacquer (semi-gloss) were applied.