Summary of Raft Bird Repeller
This project builds a solar-powered raft bird repeller: a floating, waterproof unit with two retractable poles mounted on a spinning plate driven by a geared 12V DC motor. An Attiny85 microcontroller with a DS3231 RTC schedules daytime spinning to deter birds, powered by a 10W solar panel, charge controller, and 12V 7Ah SLA battery. The design emphasizes low power, waterproofing, and retrievability so the device can be stored when the raft is in use.
Parts used in the Raft Bird Repeller:
- 12V 7AH SLA Battery
- Charge Controller
- 10W Solar Panel
- Fuses (5A, 2A, 2A)
- On/Off Switch
- 12V / 5V Step Down Module
- Geared DC Motor 11 RPM
- Attiny85
- DS3231 RTC Module with coin cell
- Resistors (2x 4.7K, 10k, 100 Ohm)
- IRF540 Mosfet
- 2 Diodes
- 2x Telescopic Poles
- Waterproof Enclosure Box and vented enclosure for SLA battery
- 2x Stainless Steel Wire Rope Clips
- M4 Screws
- Circular piece of metal (spinning plate)
- Pololu 1083 Universal Aluminum Mounting Hub for 6mm Shaft Pair, 4-40 Holes
- Solar Panel Z Brackets for Mounting
- Wood and Screws
- 2 Plastic Cable Glands
- Optional: 3D printed rings
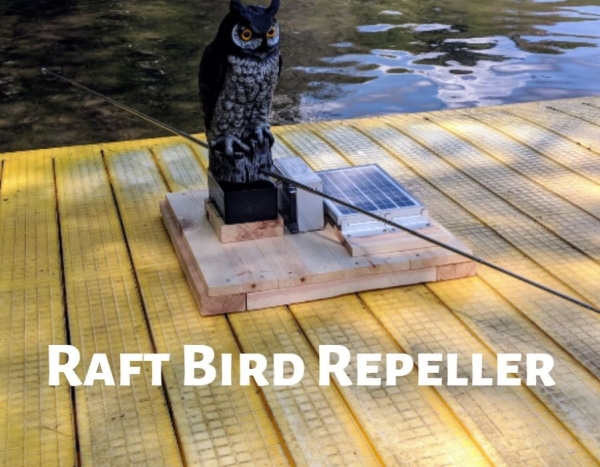
In this project I will show you how to build a solar-powered Raft Bird Repeller that will get rid of those pesky birds that poop on your raft.
Step 1: Intro
If you have ever been on a raft, you know just how relaxing and fun they can be to hang out on. One thing that is definitely not relaxing or fun is cleaning up the bird poop on them. This has been a problem as long as I can remember and my mom has tried every bird repeller device on the market from owls, sounds, bird barriers, and bird tape to no success. Mothers day was coming up and I decided to attempt to be a good son and give her a gift she has always wanted, no more bird poop on the raft.
After looking at all the bird repeller devices on the market today and reading their reviews, I came to realize that most of them do not work all that great or at least not for all types of birds. For my device, I figured if the birds were not physically able to sit and poop on the raft, that I would have near 100% no-poop success rate. I decided that if I could have two retractable poles mounted on a spinning plate connected to a relatively high torque dc motor then I could trigger the motor to spin on a timer and repel the birds away. I needed the device to be solar-powered and contain a microcontroller which I connected to a real-time clock so I could only enable the spinning mechanism during the day and reserve power for nighttime. I also needed it to be waterproof and float so if someone wanted to use the raft, they could retract the poles, attach it to the raft, and throw it in the water.
Please consider subscribing to my YouTube channel to support me and to see more stupid projects.
Step 2: Components Needed
The components needed for this project are below:
1. 12V 7AH SLA Battery
2. Charge Controller
3. 10W Solar Panel
4. Fuses (5A, 2A, 2A)
5. On/Off Switch
6. 12V / 5V Step Down Module
7. Geared DC Motor 11 RPM
8. Attiny85
9. DS3231 RTC Module with coin cell
10. Resistors (2x 4.7K, 10k, 100 Ohm)
11. IRF540 Mosfet
12. 2 Diodes
13. 2x Telescopic Poles (I reused old teachers pointer poles)
14. Waterproof Enclosure Box and some type of vented enclosure for SLA battery
15. 2x Stainless Steel Wire Rope Clips
16. M4 Screws
17. Circular piece of metal
18. Pololu 1083 Universal Aluminum MOUNTING HUB for 6mm Shaft Pair, 4-40 Holes
19. Solar Panel Z Brackets for Mounting
20. Wood and Screws
21. 2 Plastic Cable Glands
22. Optional: Access to 3D Printer for Rings
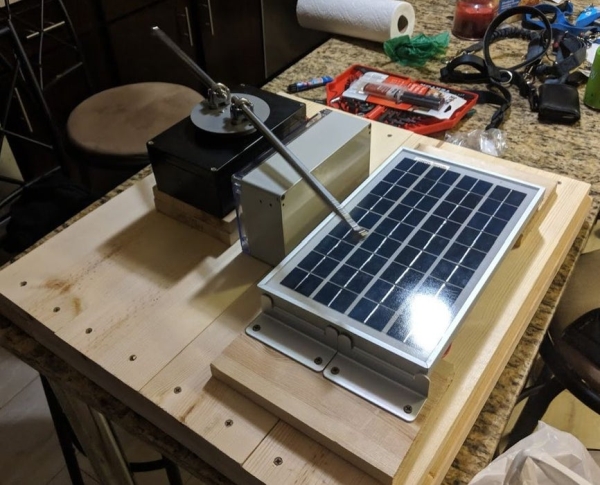
Step 3: Electronics
Now that you have gathered all of the required components, it is time to start assembling everything together. I would recommend wiring up everything on a breadboard first and then once everything is functioning properly go ahead and solder everything up on a perf board.
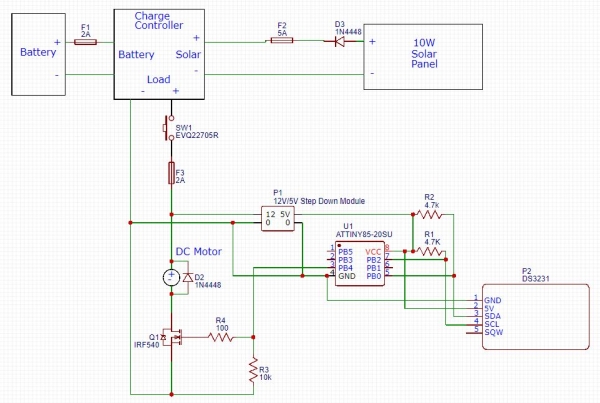
The microcontroller used for this circuit is the Attiny85 for its low power consumption. It also has 8k of program space, 6 I/O lines, and a 4-channel 10 bit ADC. It runs up to 20 MHz with an external crystal. This chip is only about $2 and is perfect for simple projects where an Arduino is overkill like this one.
The RTC used is the DS3231 which is a low-cost, extremely accurate I2C real-time clock (RTC) with an integrated temperature compensated crystal oscillator (TCXO) and crystal. The device incorporates a battery input, and maintains accurate timekeeping when main power to the device is interrupted. This will be crucial if for any reason the bird spinner cycles power, the timing of the dc motor turning on and off will be reserved by the RTC. I also just wanted to try out I2C on the Attiny85.
The plate with the two telescopic stainless steel poles is fairly heavy, so I knew that I needed a higher torque dc motor that would run off 12V and provide the speed that i was looking for to not injure the birds, but let them know this contraption wasn’t messing around.
Since mothers day was rapidly approaching I needed something quick that could drop 12V to 5V to power the Attiny85 and the RTC. I found a pre-built step down converter with 96% efficiency so that would obviously work much better than using a 7805 and losing power due to heat.
The main power for this project was from a 10W solar panel and a 12V 7AH SLA battery. I connected those up to a charge controller to handle powering the load and charging the battery.
Read more: Raft Bird Repeller
- What is the power source for the raft bird repeller?
The device is powered by a 10W solar panel charging a 12V 7AH SLA battery through a charge controller. - Which microcontroller is used in the project?
The Attiny85 microcontroller is used for low power operation and control. - How is the motor scheduled to run only during the day?
A DS3231 real-time clock module connected to the Attiny85 ensures the motor only spins during daytime to save power. - What motor is used to spin the poles?
A geared DC motor rated at about 11 RPM and suitable torque runs on 12V to spin the plate and poles. - How is 5V supplied for the Attiny85 and RTC?
A 12V to 5V step down module provides 5V power efficiently for the Attiny85 and DS3231. - How does the design ensure the unit is waterproof and floatable?
The project uses a waterproof enclosure box and designs the unit to float so it can be attached to and thrown in the water when needed. - Are telescopic poles used and why?
Yes, two telescopic poles are used so they can retract when the raft is in use and extend to prevent birds from landing. - What protective components are included for electrical safety?
Fuses (5A, 2A, 2A) and diodes are included along with a charge controller to protect the system.