Summary of Project: Gesture Controlled Mouse (Air Mouse) Using Arduino & Accelerometer
The article describes an AIR Mouse project, which is a gesture-controlled mouse using hand tilts detected by an MPU6050 accelerometer. The system consists of two circuits: a transmitter with an Arduino Nano that reads accelerometer data via I2C and sends it wirelessly using an ASK433 RF module, including two switches for left and right click functions; and a receiver using an Arduino Leonardo which supports HID to control a PC mouse. The transmitter is powered by a 9V battery and uses an antenna for wireless communication.
Parts used in the AIR Mouse Project:
- Arduino Nano
- Arduino Leonardo
- MPU6050 Accelerometer
- ASK433 RF Transmitter Module
- RF Receiver Module
- Two Switches (for Left Click and Right Click)
- 9V Battery
- Battery Connector/Switch
- Antenna (15 cm single core wire)
- Connecting wires and PCB/Breadboard
AIR Mouse is also called gesture-controlled mouse and it works based on hand gesture. In this project an accelerometer is used for measuring the tilt of hand in X and Y direction and moves the cursor according the tilt.
In the project two types of circuit are used, one is the transmitter circuit and other is the receiver circuit. Transmitter circuit makes use of MPU6050 series of accelerometer, which is connected to Arduino through I2C communication. The data is transferred to receiver Circuit using RF module, ASK433. Two switches are also used in transmitter circuit to work as Left Click and Right Click.
In the receiver side an Arduino Leonardo is used. The purpose of using Arduino Leonardo is that it supports HID (Human Interface Device). HID allows us to control the mouse and Keyboard of our PC or Laptop.
Circuit
In the project two circuits are used, one is the transmitter circuit and other is the receiver Circuit.
Transmitter Circuit
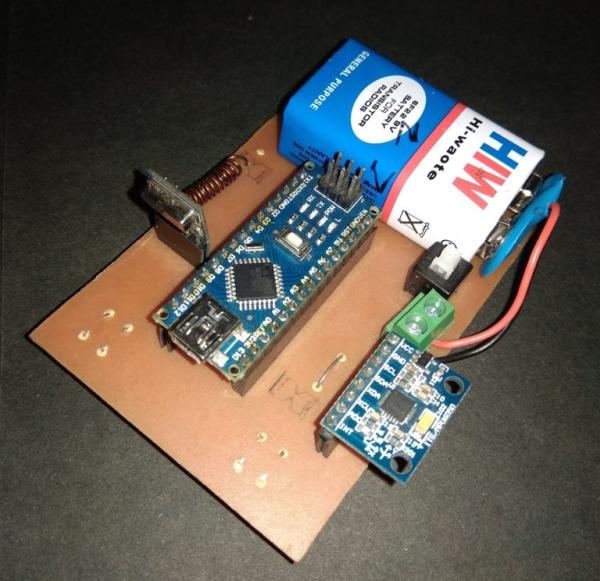
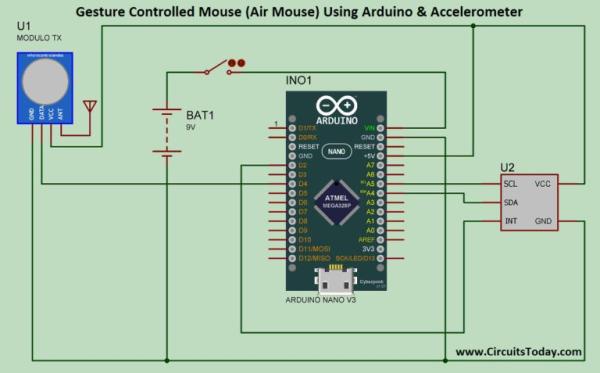
The transmitter circuit is placed in our hand. In this circuit, Arduino Nano is used which receives the data from accelerometer through I2C communication. MPU6050 is used in the transmitter circuit, which is accelerometer and supports I2C communication. SCL and SDA pins or accelerometer (MPU 6050) are connected to SCL and SDA pin of Arduino Nano, where SCL is A5 and SDA is A4 pins of Arduino. MPU 6050 have an INT pin, which is connected to interrupt (INT0) pin of Arduino that is D2.
Now data of accelerometer is transferred to receiver circuit using RF communication. For RF communication RF transmitter is used in transmitter side. Data pin of RF transmitter is connected to D4 pin of Arduino. An antenna is connected to ANT pin of RF transmitter. Antenna is nothing but only a 15 cm long single core wire.
Two switches are connected to D11 and D13 of Arduino that are Left Click and Right Click. This whole circuit is powered by 9-volt battery which is connected to Vin pin of Arduino through a switch.
If you are good in PCB Etching please use circuit provided below to build the project.
If you wish to build the circuit on universal PCB (ZERO PCB) or breadboard, use the design provided below.
Read more: Project: Gesture Controlled Mouse (Air Mouse) Using Arduino & Accelerometer