Secure OTA via Azure. Control via voice capable UWP app. Includes sample: room thermostat controlled via phone.
Things used in this project
Hardware components | ||||||
 |
| × | 1 | |||
 |
| × | 1 | |||
| × | 1 | ||||
 |
| × | 1 | |||
Software apps and online services | ||||||
 |
| |||||
| ||||||
 |
| |||||
| ||||||
| ||||||
Story
Overview
Our contribution has 2 parts.
Part 1: A collection of reusable components. They can serve as a framework for building various IoT projects that leverage useful features:
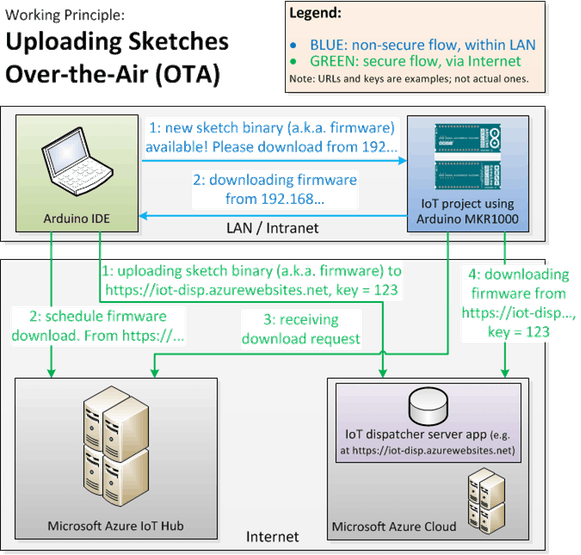
- Over-the-Air (OTA) programming of the Arduino MKR1000 (i.e. uploading the compiled binary code). Several methods are available: e.g. from within LAN or from Internet, securely, via Microsoft Azure IoT Hub.
- Universal Windows Platform (UWP) client app, with a nice user interface. It communicates securely with the board via Azure IoT Hub.
- Voice recognition (on the client app), via the Speech Recognition API provided by Microsoft Project Oxford. Spoken commands can be used to control the board via Azure IoT Hub.
Part 2: An use case / sample, built with the above components: a room thermostat, controlled via phone (UWP app). We have built it to serve as an example of how to use the components. And we went even further: we have installed it in our office, and as we are writing these lines, the office heating system is controlled by this very project.
Part 1: The Reusable Components for OTA
OTA Working Principle
We have developed the following components:
For Arduino IDE:
- a run-time library. It handles the firmware upload and copy mechanics.
- a custom “boards” package. It has a few linker related settings, needed by the library.
- an Arduino IDE plugin. It sends download signals and compiled binary sketches (a.k.a. firmware). It communicates with the board, Azure IoT Hub, the IoT dispatcher server app (cf. below).
To be installed on a third party server (e.g. such as Microsoft Azure Web Site):
- IoT Dispatcher, a PHP + MySQL application that stores and serves firmware.
UWP App Working Principle
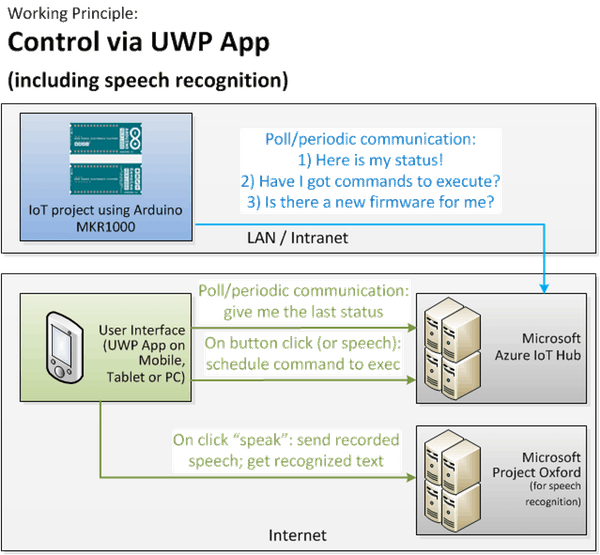
We have developed:
- An UWP client app, written in C#. It communicates with the board via Azure IoT Hub, and recognizes spoken commands via Microsoft Project Oxford. It can be used as starting point for various projects.
OTA DEMO
YouTube: uploading Arduino sketches OTA
Part 2: Use Case / Sample: Room Thermostat
As mentioned before, we developed the room thermostat to demonstrate how one can combine our components to build a real life project. In our case, we even put it into production, i.e. it controls the heating of our office.
The logic is simple:
- when the temperature drops below the preset temperature => the relay (i.e. heating) turns ON
- when the temperature is above the preset temperature => the relay/heating turns OFF
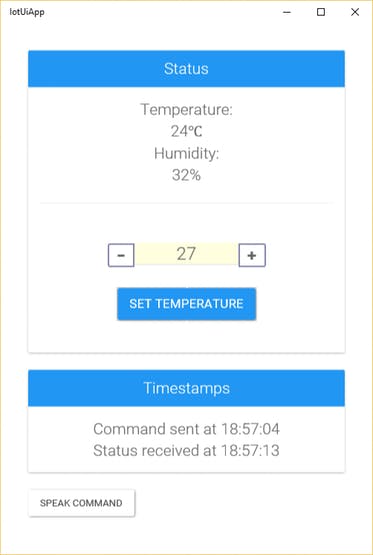
- the user interface/UWP client: shows the status, and sets the preset temperature (via text box or voice)
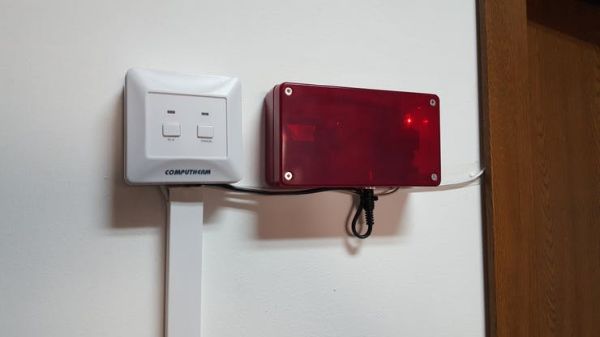
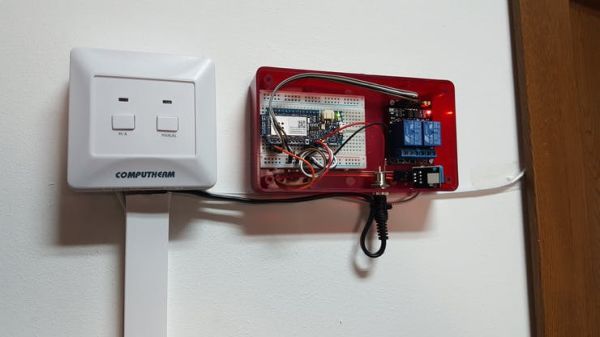
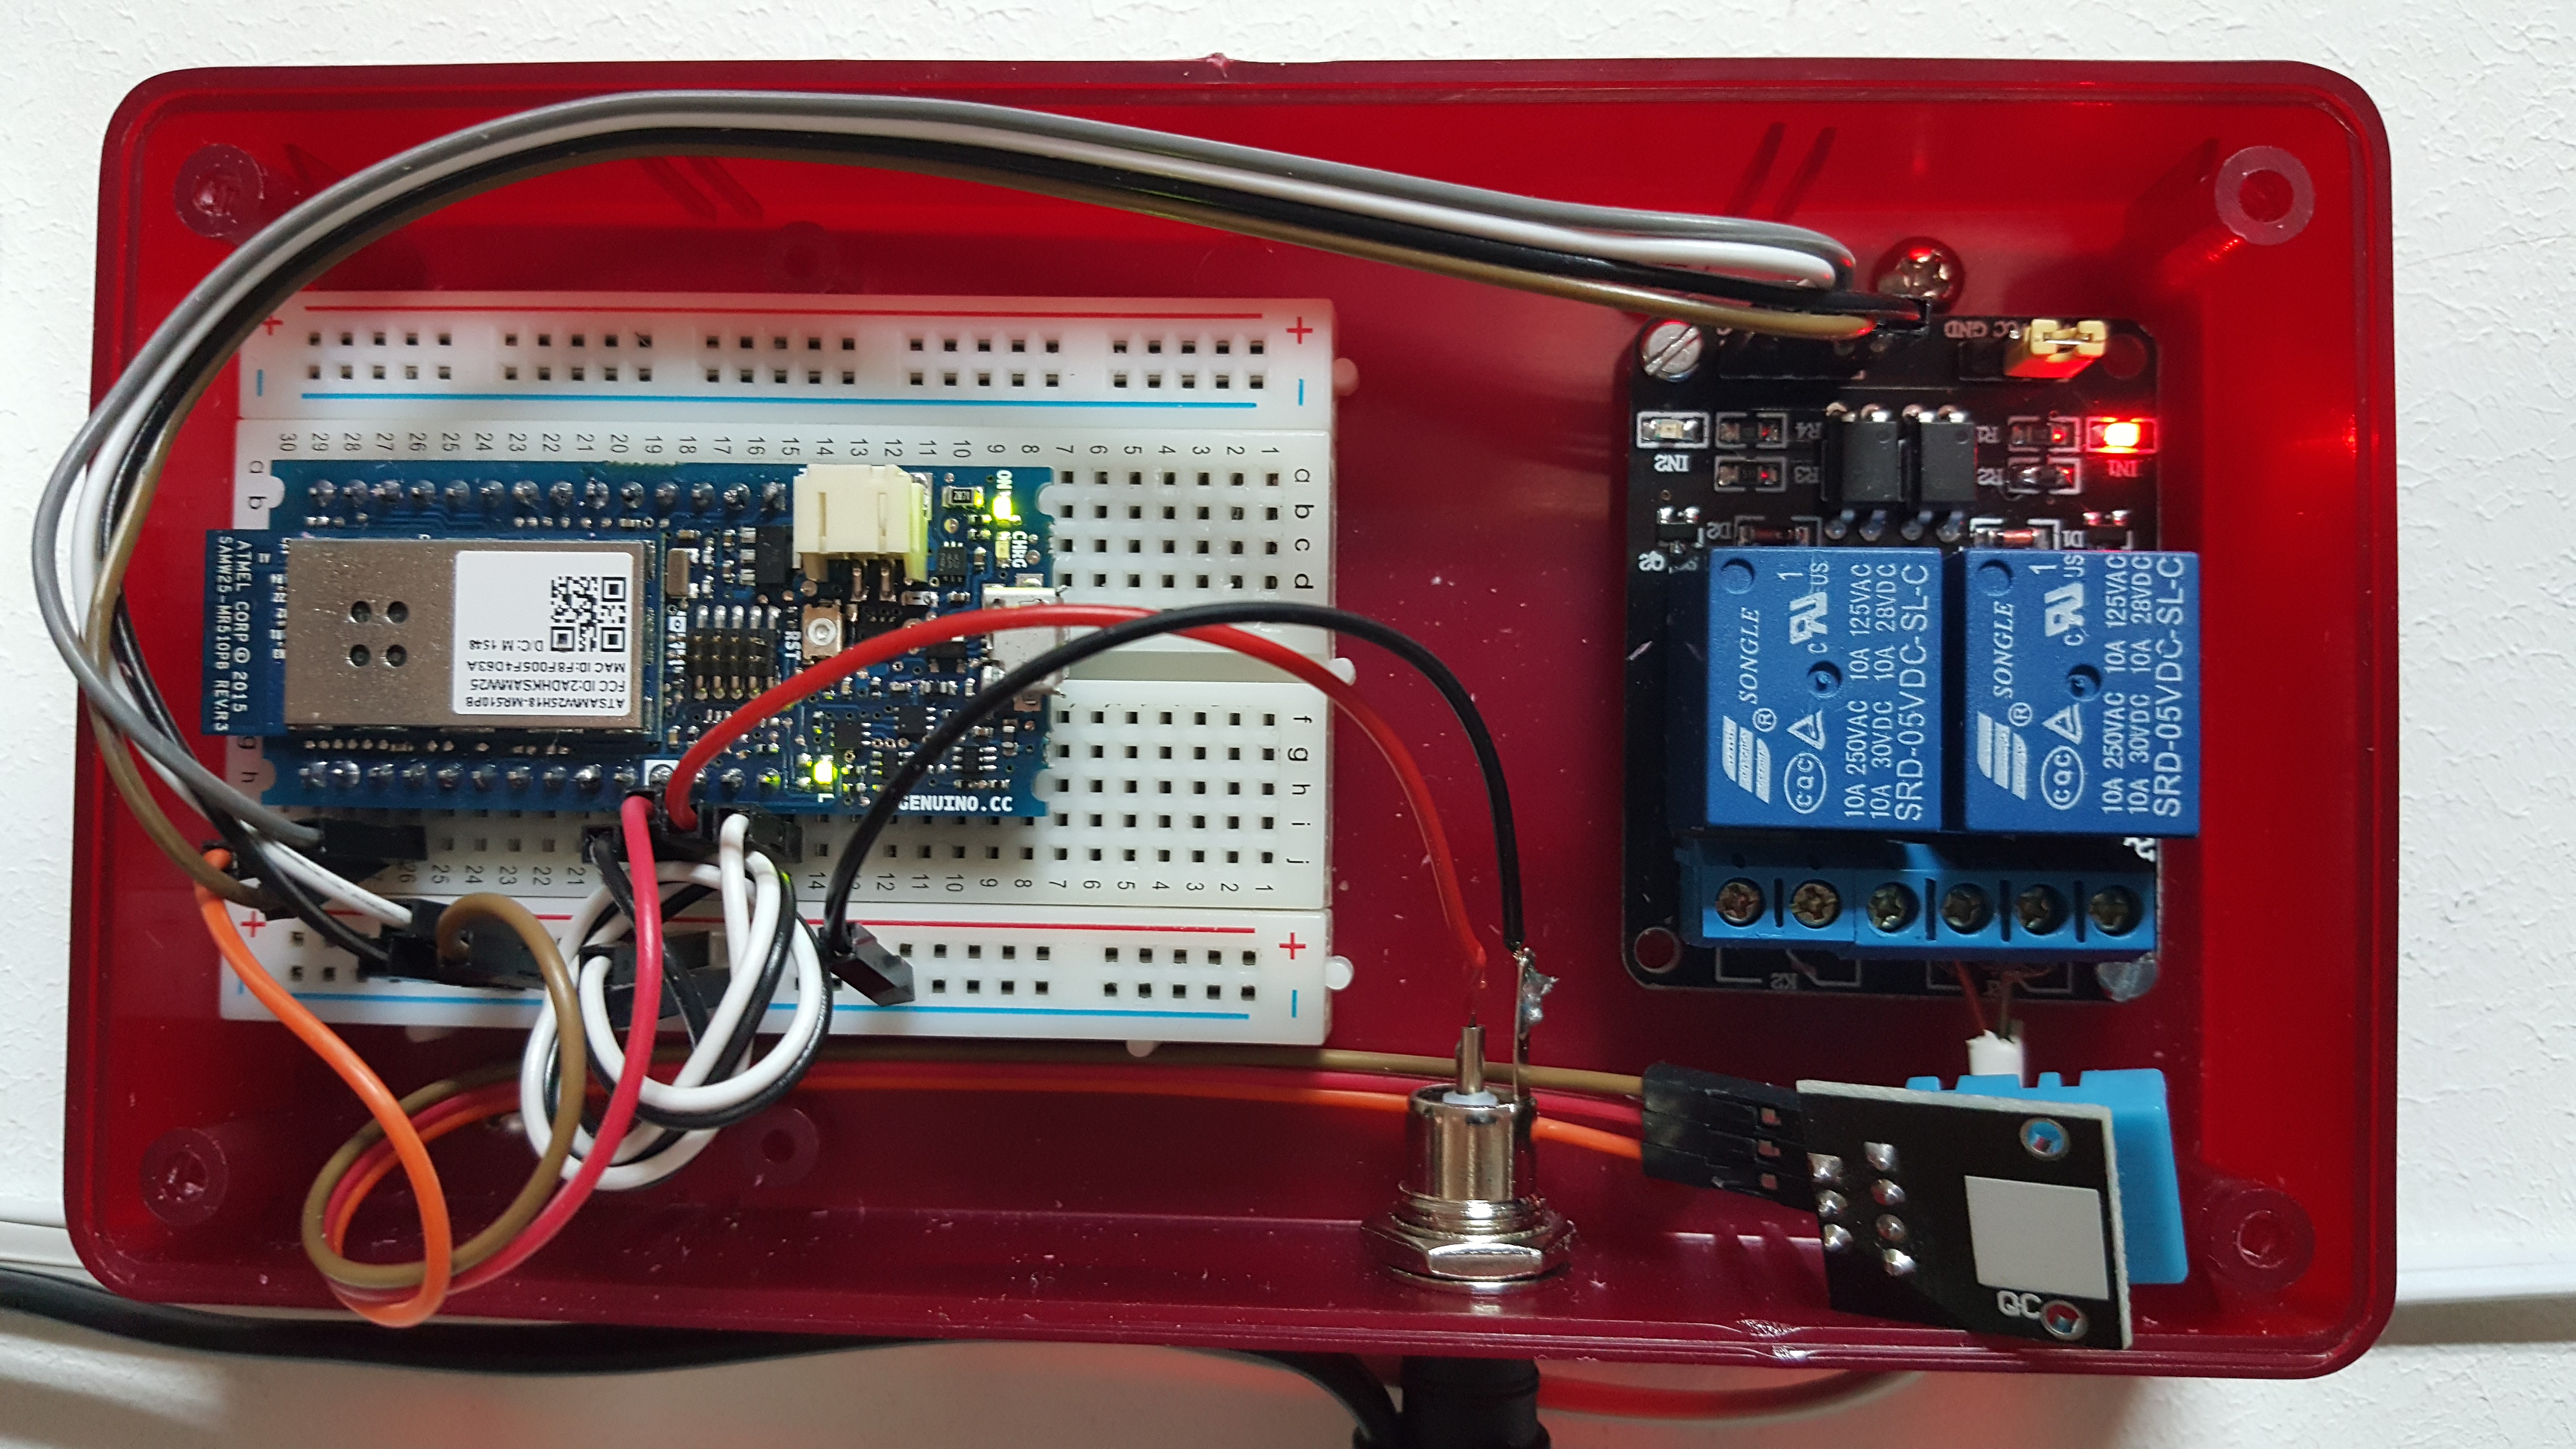
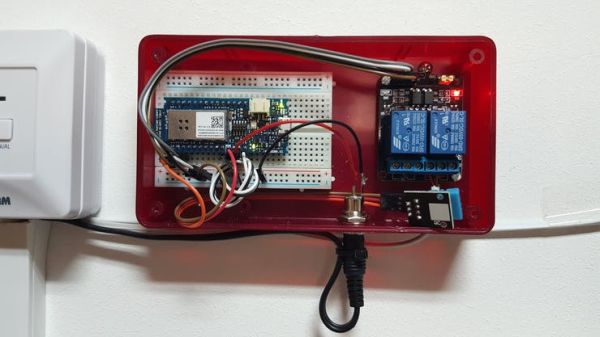 close up: mkr1000, relay board DHT sensor
1. Make the Project (Hardware)
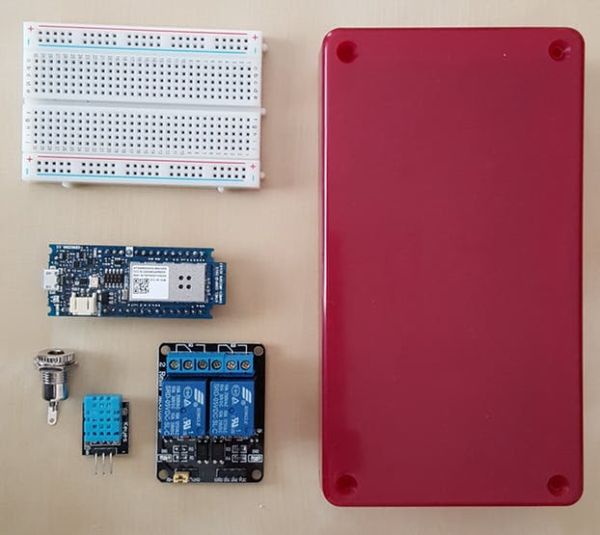
We don’t provide a Fritzing diagram, as we use a Beta MKR1000. Pin layout may change in the future.
2. Setup the Dev Environment for OTA and Azure IoT Hub
- Install Arduino IDE, at least version 1.6.7
- Install Arduino SAMD Boards. From Arduino IDE: Tools > Board: … > Boards Manager … > select “Arduino SAMD Boards”
- Download and unzip some libraries in: SKETCHBOOK_DIR (e.g. Documents/Arduino)/libraries: WiFi101, AzureIoT, RTCZero.
And now our components:
- Download and unzip the OTA run-time library in: SKETCHBOOK_DIR (e.g. Documents/Arduino)/libraries.
- Download our custom “boards” package. Create a directory: SKETCHBOOK_DIR (e.g. Documents/Arduino)/hardware/flower-platform. Unzip the downloaded file here.
- Download the Arduino IDE plugin. Create a directory: SKETCHBOOK_DIR (e.g. Documents/Arduino)/tools. Unzip the downloaded file here.
For secure OTA via Internet/HTTPS:
- Download IoT Dispatcher and install it on a PHP + MySQL server. E.g. we have instructions on how to deploy in the Microsoft Azure Cloud.
3. Test Drive OTA
There are 3 OTA upload methods.
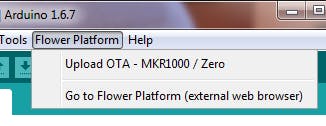
1) Try OTA via LAN: File > Examples > Arduino-FlowerOTA > WiFiOTA. Change the lines commented with “// CHANGE ME” accordingly, in order to configure the IP address, WiFi parameters, plain/ssl, server signature. Then Flower Platform > Upload OTA …
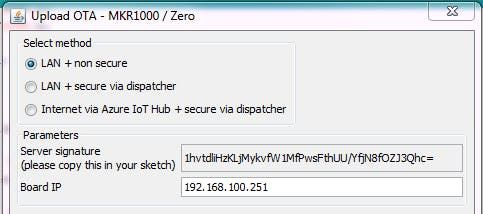
Make sure you use:
WiFiClient client;
and (cf. the “server signature” from the popup window).
ota.begin(&udp, &client, "1hvtdliHzKLjMykvfW1MfPwsFthUU/YfjN8fOZJ3Qhc=");
NOTE: for all the 3 methods, you need to do an initial upload via USB. After that, you can continue to use OTA, with the method of your choice.
2) Try OTA via secure dispatcher, using the same file:
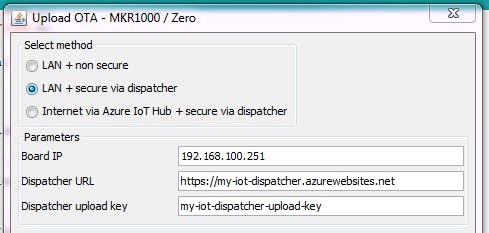
Make sure you use:
WiFiSSLClient client;
and
ota.begin(&udp, &client, "my-iot-dispatcher-upload-key"); // cf. configured within IoT Dispatcher (PHP)
3) Try OTA via secure dispatcher + Azure IoT Hub. File > Examples > Arduino-FlowerOTA > WiFiOTA-AzureIoTHub. Again: don’t forget to adjust the lines commented with “// CHANGE ME“.

4) Try the use case / sample: the room thermostat. It’s available here.
4. Test Drive the User Interface (UWP App w/ Azure IoT Hub and Speech Recognition)
The UWP project is available here. Visual Studio 2015 and Windows 10 are needed.
Make sure you change the connection parameters cf. your Azure account:
SendCloudToDevice.cs
    class SendCloudToDevice
    {
        // CHANGE ME: Please replace the constants below, with actual values (taken from your Azure Portal)
        private const string HOST = "???.azure-devices.net";
        private const string DEVICE_ID = "???";
        private const string DEVICE_KEY = "???";
        static string sharedAccessKeyName = "???";
        static string sharedAccessKey = "???";
ReadDeviceToCloud.cs
    class ReadDeviceToCloud
    {
        // Please replace the constants below, with actual values (taken from your Azure Portal)
        private static string ConnectionString = "???";
        private static string eventHubEntity = "???";
This code can serve as starting point for client apps for various project. You only need to adjust the user interface according to your project.
Future Steps
Boards such as the Arduino MKR1000, that have reasonable processing power and SSL communication capabilities, represent a huge step forward for the community of makers.
We are continuing the work started with this project, in order to develop Flower Platform IoT, an online service which would tremendously accelerate IoT projects:
- development: use of OOP components and graphical programming language (that can be mixed with hand written code);
- deployment: use of OTA.
Leveraging the Flower Platform, we plan to create a foundation that will focus on teaching young children to make and program IoT projects.
Schematics
Close up photo
Code