Summary of Program a mBot With Scratch And Arduino
Makeblock's mBot is an affordable, open-source educational robot designed for STEM learning and home use. This article details the assembly of a line follower version using specific mechanical parts and electronic modules compatible with Arduino and mBlock Scratch-based programming. The project emphasizes hands-on experience through simple assembly and code interaction to explore robotics concepts effectively.
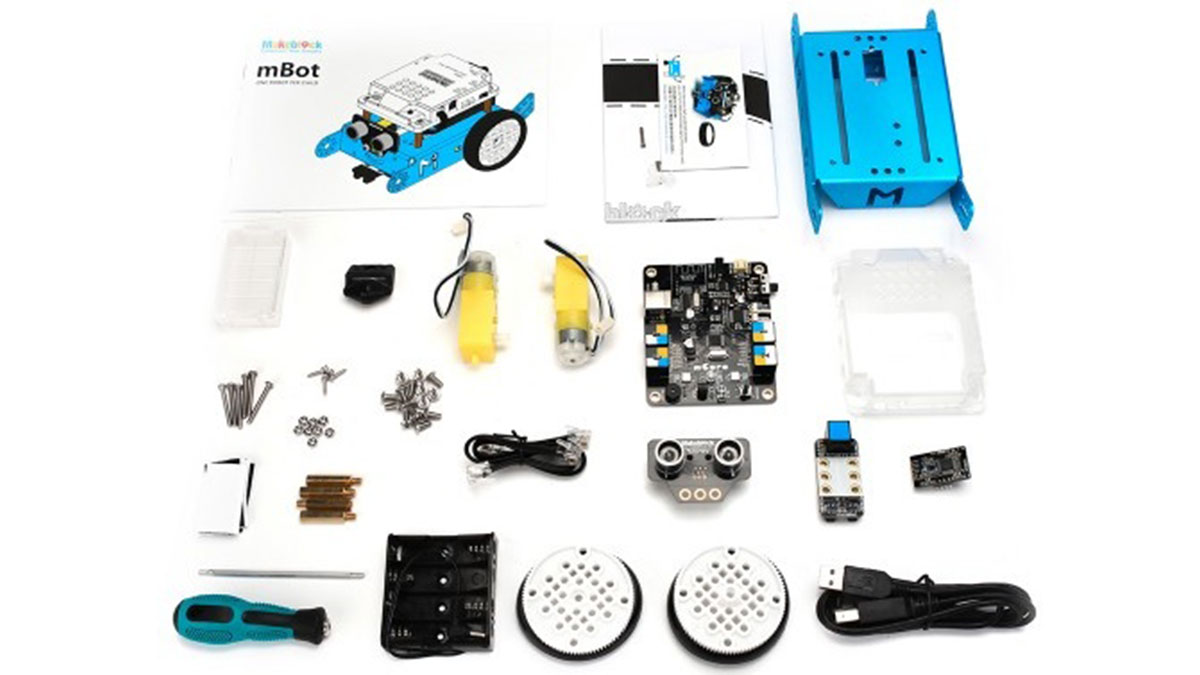
Parts used in the Line Follower mBot:
- Metal Base Plate
- TT Gear Motor
- Wheel
- Tyre
- Plastic Universal Wheel
- Magic Tape 20*30mm
- Brass Stud M4*25
- Socket Cap Screw M4*8
- Nut M4
- Nut M3
- Philip’s Head Screw M3*25
- Tapping Screw M2.2*9.5
- Arduino Based Control Board
- Me Ultrasonic Sensor V3.0
- Me Line Follower V2.2
- Me Infrared Controller
- Bluetooth module
- Battery Holder for (4) AA
- RJ25 Cable
- USB A-Male to B-Male Cable
Makeblock was founded in 2012 in Shenzhen as the world’s first open-source robot and programing platform. With more than 400 mechanical components, electronic modules, and software tools, the company is determined to bring meaningful STEM education opportunities and the maker mindset to the mass consumer market to make a real difference in society’s future with robotics.
Makerblock has a variety of products and one great product is mBot, a robot better fit education and home use. It is simple to use and affordable, you can get mBot for $24 or with bluetooth for $99.
The mBot is designed especially for mBlock Scratch-based language to help teachers and kids to have hands-on experience about robots and explore STEM education.
mBot overview
Makeblock keeps delivering tutorials about its products and the recent one was a line follower mBot on Insructables.
To do this project you need the following tools
Mechanical part list
- 1*Metal Base Plate
- 2*TT Gear Motor
- 2*Wheel
- 2*Tyre
- 1*Plastic Universal Wheel
- 1*Magic Tape 20*30mm
- 6*Brass Stud M4*25
- 14*Socket Cap Screw M4*8
- 6*Nut M4
- 4*Nut M3
- 4*Philip’s Head Screw M3*25
- 2*Tapping Screw M2.2*9.5
Electronic Modules List
- 1*Arduino Based Control Board
- 1*Me Ultrasonic Sensor V3.0
- 1*Me Line Follower V2.2
- 1*Me Infrared Controller
- 1*Bluetooth
- 1*Battery Holder for (4) AA
- 4*RJ25 Cable
- 1*USB A-Male to B-Male Cable
You only have to put each element in the right place and to tighten some screws. The image below shows how to assemble the pieces together.
The mBlock is a customized version of scratch. It is easy to use mBlock to interact with electronic modules. To make the project works, you should first program the Control Board (Compatible with Arduino) using this code of mBlock.
Read more: Program a mBot With Scratch And Arduino
- What is the mBot designed for?
The mBot is designed especially for mBlock Scratch-based language to help teachers and kids have hands-on experience about robots and explore STEM education. - How much does the basic mBot cost?
You can get the standard mBot for $24 or the version with Bluetooth for $99. - Can I program the mBot using Scratch?
Yes, you should first program the Control Board using the code of mBlock which is a customized version of scratch. - What type of control board does the mBot use?
The mBot uses an Arduino Based Control Board that is compatible with Arduino. - How many TT Gear Motors are required for this project?
The project requires 2 TT Gear Motors. - What cable connects the battery holder to the system?
The project list includes 4 RJ25 Cables for connecting components. - Does the mBot project require a USB cable?
Yes, the electronic modules list includes 1 USB A-Male to B-Male Cable. - What software tool is recommended for interacting with the electronic modules?
mBlock is easy to use to interact with electronic modules. - Where can I find tutorials for the mBot?
Makeblock keeps delivering tutorials about its products such as the recent one on Insructables. - Is the mBot suitable for home use?
Yes, it is a robot better fit for education and home use.