Summary of Plug and Play Arcade Buttons
This project creates a plug-and-play arcade controller using an Arduino Leonardo to act as a Human Interface Device (HID). It allows users to map physical buttons to keyboard inputs for controlling games or interactive projects without needing custom drivers. The guide covers hardware assembly, soldering, case design, and provides optimized code to handle button states and debounce issues effectively.
Parts used in the Plug and Play Arcade Buttons:
- Arduino Leonardo microcontroller
- USB to Arduino cable (Micro USB)
- 3x Arcade buttons
- Solderless breadboard
- 3x 10k ohm resistors
- 3x 220 ohm resistors
- Jumper wires
- 3 mm MDF material
- 2mm Plexiglas insert
- LEDs and LED holders
- Header pins
- Heat shrink tubing
I recently started using Arduino to make my projects. As a designer I love making custom interfaces for my games/interactive projects.
The one problem I came across in that using serial communication is quite complicated and prone to problems and bugs and I wanted a quick and easy solution to allow me to use external buttons to control my games.
As I wanted a plug and play device that you could use instantly with any computer, I bought an Arduino Leonardo. It’s almost identical to an Uno, but with a few differences. The main difference that I’ll be using to my advantage for this project is it’s ability to act as a HID. A HID, or human interface device is a USB protocol that allows your computer to recognize and accept input from keyboards and a computer mouse without having to install custom drivers for each device.
note: you can also use an Uno, if you update the firmware, as shown here.
Step 1: Materials
For this project you will need:
1x HID capable microcontroller (there are a few like Arduino micro, Due & leonardo, I’ll be using the Arduino Leonardo)
1x USB to arduino cable (for the Leonardo it’s USB micro)
3x Arcade buttons (I bought these)
1x solderless breadboard
3x 10k ohm resistors
3x 220 ohm resistors
Jumper wires
You can of course add more buttons, or solder everything to a breadboard to make things more permanent.
Step 2: Prototyping
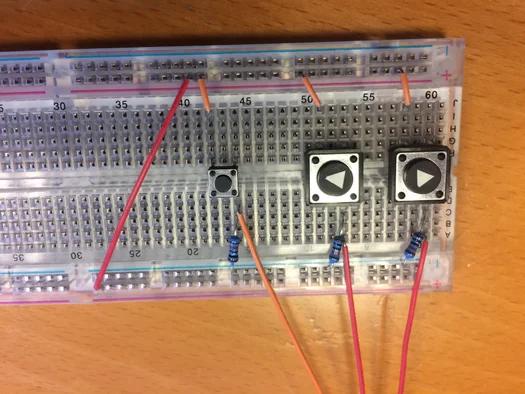
So, before I bought the arcade buttons that I wanted to use I tested this out with standard push buttons. Wire up the buttons in the standard way, I believe I used 10K ohm resistors.
The programming, thanks to the Leonardo, is pretty simple. You have to include the Keyboard library. I used the Arduino standard example “Keyboard message” as the base for my code.
Now the question is how you want your buttons to work. You basically have two choices, single buttons presses and a continuous stream of letters if pushed. It really depends on your project what you would want.
If you want a single instance of something to happen if a key is pressed, like a jump or an on/off switch then you would choose the single push method. With this method you look at the state of the button, is it up or down? Then you compare it to the previous state, was it already up or down? If the previous button state is the same as the current button state nothing happens. But if the button state changes, as in you press or release a button something happens. In my code it only types a letter when the button is pushed, not when released but you could change this.
#include "Keyboard.h"<br>
const int buttonLeft = A0;          // input pin for pushbutton
const int buttonRight = A1;
const int buttonUp = A2;
int previousButtonStateLeft = HIGH;   // for checking the state of a pushButton
int previousButtonStateRight = HIGH;
int previousButtonStateUp = HIGH;
void setup() {
  // make the pushButton pin an input:
  pinMode(buttonLeft, INPUT);
  pinMode(buttonRight, INPUT);
  pinMode(buttonUp, INPUT);
  // initialize control over the keyboard:
  Keyboard.begin();
}
void loop() {
  // read the pushbutton:
  int buttonStateLeft = digitalRead(buttonLeft);
  // if the button state has changed,
  if ((buttonStateLeft != previousButtonStateLeft)
      // and it's currently pressed:
      && (buttonStateLeft == HIGH)) {
    // type out a message
    Keyboard.print("a");
  }
  // save the current button state for comparison next time:
  previousButtonStateLeft = buttonStateLeft;
  // read the pushbutton:
  int buttonStateRight = digitalRead(buttonRight);
  // if the button state has changed,
  if ((buttonStateRight != previousButtonStateRight)
      // and it's currently pressed:
      && (buttonStateRight == HIGH)) {
    // type out a message
    Keyboard.print("w");
  }
  // save the current button state for comparison next time:
  previousButtonStateRight = buttonStateRight;
  // read the pushbutton:
  int buttonStateUp = digitalRead(buttonUp);
  // if the button state has changed,
  if ((buttonStateUp != previousButtonStateUp)
      // and it's currently pressed:
      && (buttonStateUp == HIGH)) {
    // type out a message
    Keyboard.print("d");
  }
  // save the current button state for comparison next time:
  previousButtonStateUp = buttonStateUp;
}
If you want something to continuously happen as long as the button is pushed, as you would want for a left or right movement you, just let it write a letter without checking the previous button state. Do remember to add a small delay to prevent it from going crazy and to counter any bounce your buttons may have. There are more elegant ways of solving this problem, but this is easy and quick.
#include "Keyboard.h"<br>
const int buttonLeft = A0;          // input pin for pushbutton
const int buttonRight = A1;
const int buttonUp = A2;
void setup() {
  // make the pushButton pin an input:
  pinMode(buttonLeft, INPUT);
  pinMode(buttonRight, INPUT);
  pinMode(buttonUp, INPUT);
  // initialize control over the keyboard:
  Keyboard.begin();
}
void loop() {
  // read the pushbutton:
  int buttonStateLeft = digitalRead(buttonLeft);
  if (buttonStateLeft == HIGH) //if the button is pressed
  {
    // type out a message
    Keyboard.print("a");
    delay(50); //Delay for bounce & to let you computer catch up
  }
  // read the pushbutton:
  int buttonStateRight = digitalRead(buttonRight);
  if (buttonStateRight == HIGH) //if the button is pressed
  {
    // type out a message
    Keyboard.print("w");
    delay(50); //Delay for bounce & to let you computer catch up
  }
  // read the pushbutton:
  int buttonStateUp = digitalRead(buttonUp);
  if (buttonStateUp == HIGH) //if the button is pressed
  {
    // type out a message
    Keyboard.print("d");
        delay(50); //Delay for bounce & to let you computer catch up
  }
}
You can always use a mix of both methods, depending on what best suits your needs.
Step 3: Laser Cutting the Case
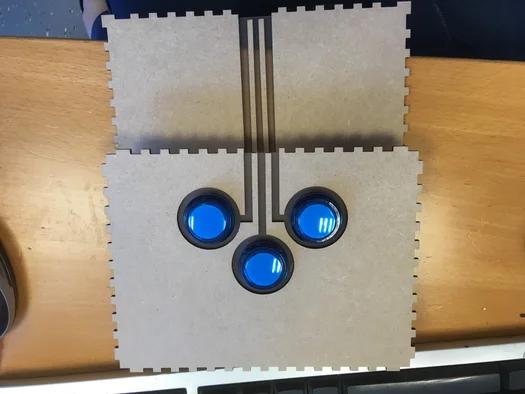
For the case I used 3 mm mdf, with a 2mm Plexiglas insert. I added the insert as I want to add some LEDs on the inside of the case at a later stage to make it nice and glowy.
I inputted my dimensions to makercase and downloaded the svg file. I opened it up in Illustrator and added the holes where I wanted them. If you don’t have Illustrator you could use Inkscape for this step.
You don’t need to use a laser cutter of course, as this is a simple box with a few holes in it. It should be easy enough to create it using more traditional power tools (or even hand tools!) I’m just very lazy and had access to a laser cutter.
Step 4: Soldering Arcade Buttons
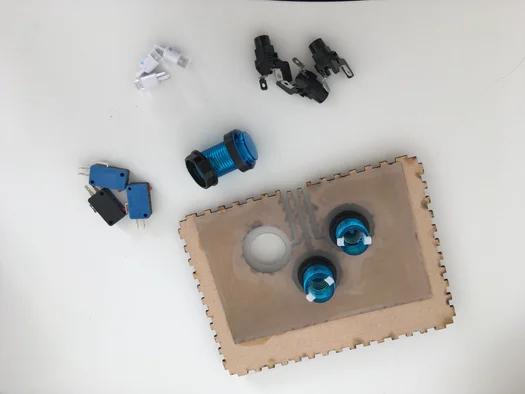
An arcade button (or mine at least) is comprised of three parts. The plastic casing, the LED holder (with LED in it) and the micro switch. The micro switch is the actual button part of the button and is what you will need to connect to your Arduino. There are three terminals (metal bits that stick out, where you’ll solder your wires) on the micro switch. The one on top (or bottom, what you want) is the ground. The other two terminals are the Normal Open (NO) and Normal Closed (NC). NO means that if the switch is pressed it makes a connection. NC means that if the button is pressed it breaks the connection. We will use the NO for this project. I labeled the ground, NO and NC on my micro switch in the pictures.
My buttons are illuminated so I soldered wires to the LED holder. Make sure to color code your wires so that you know which side is the anode and which the cathode (positive and negative sides of the LED).
I soldered header pins onto my wires, to make them easy to use with a solderless breadboard. I just soldered the wire to a header pin and put a bit of heat shrink tubing around to make them more resilient.
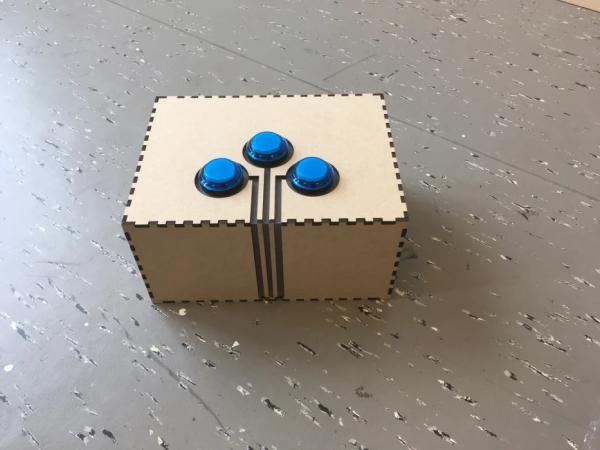
Step 5: Stack the Buttons & Connect Them to Your Board
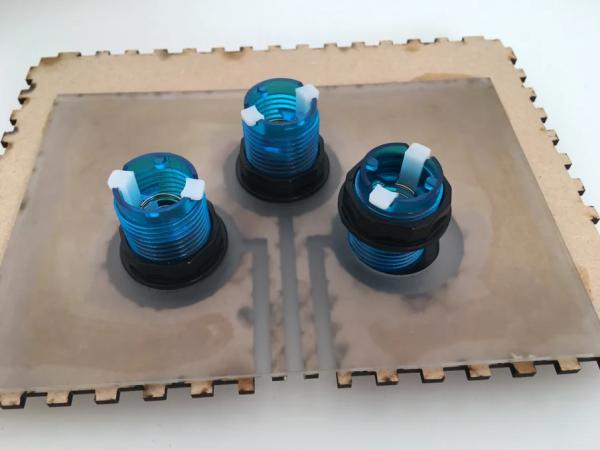
Now it’s time to stack your arcade buttons in your case. Remove the locking ring from the plastic casing and stick it through the hole in the case. Thread the locking ring on the other side to secure the button in place. Stick in the LED holder and twist it to lock it in to place. Wiggle in the micro switches (there are little nobs and holes that align with each other to hold it into place).
To connect the switches to the board remove the push buttons you may or may not have added. Connect the wire leading from the ground of the micro switch to the ground of the Arduino and the resistor (where the leg of the push button was). Connect the wire leading from the NO of the micro switch to the 5v of the Arduino.
For the LED wires connect the negative wire to the ground & the positive via a 220OHM resistor to the 5v. If you wire them up like this they will be always on. You could add them in the code and get them to switch on and off in sync with the buttons if you want.
Step 6: Coding Hell
So, now you’ve attached your fancy new buttons to you old code and suddenly it doesn’t work as it should anymore. The letters appear two or three at a time and it doesn’t work as it should with simple HTML5 games. Welcome to debounce hell.
First things first. The code we wrote during prototyping? it works fine and is simple, but it’s not elegant. If you want to add more buttons you have to copy & paste snippets of code and change all the values inside them. If you forget one of them you enter the bugfixing hell. Detect a theme here? Coding is hell, but a very fun, problem solving hell.
We want pretty, short code. So we’ll change all the individual button integers to arrays. This way, if you want to add more buttons you only have to change the button amount, the pins where they are located & their output. We also change the key inputs to ASCII because… it works better?
Now if you’re like me you’ll write a simple and easy way to use the buttons and it will not work as well as you’d like. So you create new versions (remember kids, incremental back-ups!), try different things, write constantly more complicated code that still doesn’t work well and eventually go back to the simple code you wrote hours ago AND notice a small error which instantly fixes everything.
Let me spare you that journey, here’s the working code:
Disclaimer: this text was written after hours of coding & bug fixing a very simple code. Please disregard any signs of frustration and focus on the working code posted below 😉
#include "Keyboard.h"<br>#define buttonAmount 3
int buttonPin[] = {
 A0,A1,A2 };                                  //Where are the buttons?
int asciiLetter[] = {
  97, 100, 119};                              //Letters in ASCII, here: a,d,w
int buttonState[buttonAmount];                //Is the button pushed or not?
void setup() {
for (int i = 0; i < buttonAmount; i++) {     //cycle through the array
    pinMode(buttonPin[i], INPUT);            //set all the pins to input
  }
}
void loop() {

for (int i = 0; i < buttonAmount; i++)      //cycle through the array
  {
     buttonState[i] = digitalRead(buttonPin[i]); //What are the buttons doing?
    if (buttonState[i] == HIGH){            //If the button is pressed
       Keyboard.press(asciiLetter[i]);      //send the corresponding letter
      }
      else                                  //if the button is not pressed
  {
    Keyboard.release(asciiLetter[i]);       //release the letter
    }
    }
}
Step 7: Everything Works!
Source: Plug and Play Arcade Buttons
- Why is the Arduino Leonardo chosen for this project?
The Leonardo is selected because it can act as a HID, allowing the computer to recognize the device as a keyboard or mouse without installing custom drivers. - Can I use an Arduino Uno instead of a Leonardo?
Yes, you can use an Uno if you update the firmware as described in the referenced link within the article. - How do I wire the micro switch terminals on an arcade button?
You should connect the ground terminal to the Arduino ground and the Normal Open (NO) terminal to the 5v supply. - What is the purpose of the 220 ohm resistors in this build?
The 220 ohm resistors are used to connect the positive side of the LEDs to the 5v power source to prevent them from burning out. - How does the code handle continuous key presses versus single events?
For single events, the code checks if the button state changed before triggering; for continuous actions, it simply checks if the state is HIGH while adding a delay. - What causes the issue known as debounce hell?
Debounce hell occurs when letters appear multiple times at once because the button bounces electrically, causing the computer to register one press as several. - How does the final optimized code manage multiple buttons efficiently?
The final code uses arrays for button pins and ASCII values, cycling through them in a loop to send commands based on their state. - Can the LEDs be controlled via software to turn on and off?
Yes, while the example wiring keeps them always on, the article notes you could add them in the code to switch on and off in sync with the buttons.