Summary of Play Midi Files From an SD Card Using Your Arduino UNO
This project shows how to build an Arduino-based MIDI player using a DS1307 Data Logger Shield with an SD card reader. MIDI files stored on the SD card are read by the Arduino (using SdFat and MD_MIDIFile libraries) and sent through a MIDI output circuit (with an MC74HC14 Schmitt-trigger) to a MIDI synthesizer. Instructions cover hardware, wiring, libraries, single and multiple file playback, and practical tips like FAT formatting, 8.3 filenames, SD chip select on pin 10, and using external power.
Parts used in the MIDI player:
- Arduino Uno
- DS1307 Data Logger Shield (with SD card reader)
- Printed Circuit Board Mounted MIDI Female DIN5 Jack
- MC74HC14A Hex Schmitt-Trigger Inverter
- Two 220 Ohm Resistors
- Push Button
- MIDI Cable
- SD Card (FAT16/FAT32 formatted)
Save MIDI files on an SD Card and use an SD shield connected to your Arduino to play these songs on a MIDI device.
This project demonstrates the development of a MIDI player using Arduino. The Arduino is connected to a DS1307 Data Logger Shield that has an SD Card reader. A MIDI stream is created by the Data Logger Shield utilizing a MIDI file saved on the SD card. Next, you have the option to link this MIDI flow to any MIDI synthesizer or device that can play the music.

Supplies
– DS1307 Data Logger Shield
– Printed Circuit Board (PCB) Mounted MIDI Female DIN5 Jack
– MC74HC14A Hex Schmitt-Trigger Inverter
– Two 220 Ohm Resistors
– Push Button
– MIDI Cable
Step 1: DS1307 Data Logger Shield
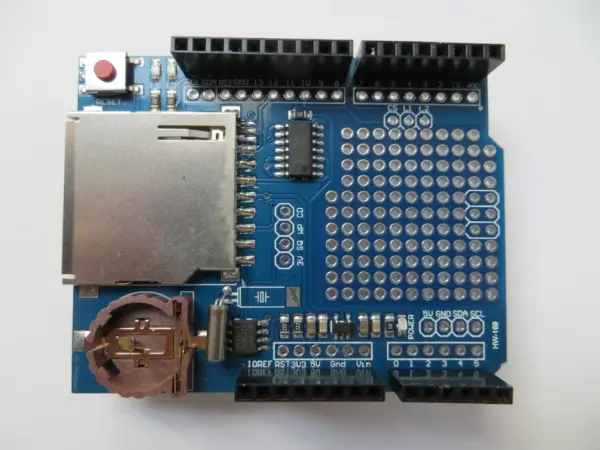
This Arduino shield can be easily found on different platforms such as Amazon, eBay, and AliExpress.
A detailed explanation of the second version of this shield is available on the Adafruit website.
Check out the overview of the Adafruit Data Logger Shield to learn more about its features and capabilities.
The shield utilized in this project is version 1 and varies from the one Adafruit specified. Nevertheless, it is crucial to mention that the code and examples supplied are all compatible with version 1.
The DS1307 functions as a clock chip that maintains accurate time. It is able to function using a battery backup, ensuring that no time is lost even if the power to nearby circuits is shut off.
In this project, the data logger shield comes with both a DS1307 and an SD card reader. The main function of this shield is to record sensor data with a precise timestamp for every reading. This data is saved on an SD card and can be accessed for examination whenever needed.
For this specific project, we are only utilizing the SD card reader and not the DS1307 capabilities (apologies for any confusion).
Here are some noteworthy features of the shield:
1. The shield includes a prototyping area, which can be handy for future expansion.
2. The Arduino headers are accessible on the shield, allowing you to connect wires by soldering them to the holes adjacent to the header.
3. The shield features two built-in LEDs with accompanying resistors, making it convenient for your circuit to connect to them via the designated wiring points.
4. Please be aware that the Chip Select (CS) for the SD card reader is linked to Arduino pin 10 for this particular shield.
5. The Arduino communicates with the SD card using the SPI interface, and the pin assignments are illustrated in the provided picture.
Before connecting the shield, it’s essential to confirm that the SD card is operational by following these steps:
1. Format an SD card on your computer, ensuring it is formatted as FAT32 (or FAT16 if you prefer older standards).
2. Copy a few files to the SD card, but be mindful that due to the reader’s limitations, file names cannot exceed 8 characters, and file extensions should have a maximum of 3 characters (keeping in mind the old MS-DOS format).
3. The Arduino IDE typically comes with the SD library preinstalled. You can check for it under File → Examples → SD. If it’s not available, you can install the library.
4. Attach the shield to your Arduino and insert the SD card. Upload the “listfiles” program and run it. If everything is functioning correctly, the serial monitor should display a list of all the files on the SD card.
Step 2: MC74HC14A Hex Schmitt-Trigger Inverter
Step 3: The Circuit
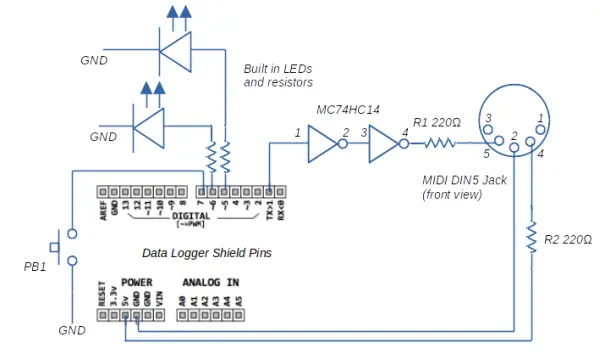
Examine the diagram of the circuit.
The diagram lacks the necessary 5V power and ground connections for the MC74HC14 chip. Establish these connections by connecting 5V to pin 14 and linking Ground to pin 7.
The shield is equipped with a pair of LEDs and their respective resistors. Connect Arduino Pin 5 to L1 and Pin 6 to L2 using the through holes on the shield in order to use these components.
The Arduino typically transmits the MIDI stream from its TX pin, which is usually connected to pin 1 on the Arduino board. The program sends MIDI commands by using the Serial.write command to pin 1, and then to the MIDI output circuit.
Step 4: Wire Up the Shield
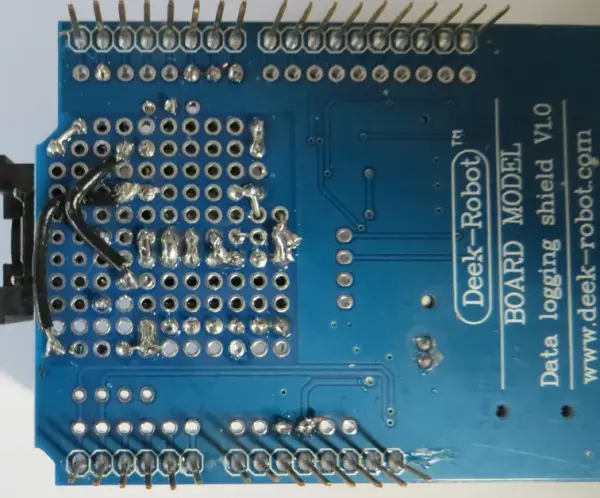
The circuit, as illustrated, is connected within the prototype section of the shield. This may demand precision, but it can be achieved. You can view images of the fully assembled shield for reference.
Alternatively, you have the option to build the circuit on a solderless breadboard. For detailed guidance on this method, you can consult an article available at www.midi.org.
Step 5: Add Libraries
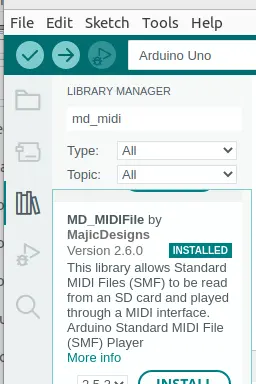
To ensure the code functions properly, it’s necessary to install the following libraries:
1. SdFat (a library for SD Card access)
2. MD_MIDIFile (a library for playing MIDI files from the SD Card)
You can easily install these libraries by navigating to Tools → Manage Libraries.
For comprehensive documentation on the MIDI library, you can refer to the following two links:
1. GitHub repository: https://github.com/MajicDesigns/MD_MIDIFile
2. Online documentation: https://majicdesigns.github.io/MD_MIDIFile/
Additionally, the GitHub repository contains various example files that provide a clear understanding of how the library operates. It also includes some sample MIDI files for reference.
Step 6: Play MIDI File
To play a MIDI file, follow these steps:
1. Load a MIDI file onto the properly formatted SD card. The file name must not exceed eight characters, followed by the “.mid” extension.
2. Open the “MinimalMidiPlayer” sketch in the Arduino IDE.
3. Inside the Arduino sketch, modify the declaration line [const char *loopfile = “LOOPDEMO.MID”] to specify the file located on the SD card.
4. Ensure that SD_SELECT is set to 10.
5. Upload the sketch to the Arduino.
6. Disconnect the Arduino from its power source.
7. Insert the SD card into the reader.
8. Connect the MIDI output jack to a synthesizer or MIDI player using a MIDI cable.
9. Power the Arduino by connecting it to an external power source. Avoid using the USB connector for power, as it may not supply enough power for both the shield and Arduino. Instead, use a power source connected to the DC in jack on the Arduino.
10. Press the button on the shield, and the song will start playing. Success!
Step 7: Play Multiple MIDI Files
To enhance the capabilities of this basic MIDI player, you can now play multiple songs from the SD Card. Follow these instructions:
1. Load several MIDI files onto the SD Card. Ensure that all files are placed in the root directory; files in subfolders won’t be playable. File names should not exceed eight characters and must be followed by the “.mid” extension.
2. Open the “MultiTrackMidiPlayer” sketch in the Arduino IDE. You can adjust the delay (located around line 82) to set the length of pauses between songs to your preference.
3. Confirm that the value of SD_SELECT is set to 10.
4. Upload the sketch to your Arduino.
5. Disconnect the Arduino from its power source.
6. Insert the SD card into the card reader.
7. Connect the MIDI output jack to a synthesizer or MIDI player using a MIDI cable.
8. Power the Arduino by connecting it to a power source. Avoid using the USB connector for power, as it may not provide sufficient power for both the shield and the Arduino. Instead, use a power source connected to the DC in jack on the Arduino.
9. Press the button on the shield, and the songs will play sequentially until all the songs have been played. Success!
Source: Play Midi Files From an SD Card Using Your Arduino UNO
- How do I prepare the SD card for the project?
Format the SD card as FAT32 (or FAT16), use 8.3 filenames (max 8 character names and 3 character extensions), and copy the MIDI files to the root directory. - Can I use the DS1307 features for this project?
No, this project only uses the SD card reader on the Data Logger Shield; the DS1307 clock is not used. - What libraries are required to play MIDI files from the SD card?
Install SdFat for SD card access and MD_MIDIFile for playing MIDI files from the SD card. - Which Arduino pin is the SD card chip select connected to on this shield?
The SD card Chip Select (CS) is connected to Arduino pin 10 on this shield. - How is the MIDI output signal generated?
The Arduino sends MIDI commands via Serial.write from the TX pin, and the signal is shaped using an MC74HC14 Schmitt-trigger inverter into the MIDI output circuit. - What power source should I use when playing MIDI files?
Use an external power source connected to the Arduino DC in jack; avoid powering only from USB as it may not supply enough power. - How do I play a single MIDI file?
Copy the MIDI file to the SD card, set loopfile in the MinimalMidiPlayer sketch to the filename, ensure SD_SELECT is 10, upload the sketch, insert the SD card, connect the MIDI cable, power the Arduino, and press the shield button. - How do I play multiple MIDI files sequentially?
Place multiple MIDI files in the SD card root, open the MultiTrackMidiPlayer sketch (adjust delay if desired), ensure SD_SELECT is 10, upload, insert SD card, connect MIDI, power the Arduino, and press the button to play songs sequentially. - Can I build the MIDI output circuit on the Data Logger Shield prototype area?
Yes, the example connects the circuit in the shield prototype area, or you can build it on a solderless breadboard as an alternative.