
Summary of PiTFT Weather Station
This article details a Raspberry Pi weather station project using an Adafruit 2.8″ Touchscreen TFT module (PiTFT) to display data from weather.com. The system utilizes the python-weather-api module for data extraction and Pretty Print for readability. Custom weather icons by MerlinTheRed are integrated, with filenames matching API codes. The setup involves configuring the Pi, installing specific Python modules, creating a directory, downloading scripts from GitHub, and running the daemon as root to visualize real-time weather conditions.
Parts used in the PiTFT Weather Station:
- Adafruit 2.8″ Touchscreen TFT module (PiTFT)
- Raspberry Pi
- python-weather-api module
- Pretty Print (pprint)
- MerlinTheRed weather icons
- Python daemon module
- GitHub repository scripts
More tinkering with the wonderful Adafruit 2.8″ Touchscreen TFT module (PiTFT) for the Raspberry Pi. This time a weather station drawing data from weather.com.
Luckily there’s a wonderful python module to extract data from three popular weather services; python-weather-api supports NOAA, Yahoo! Weather and weather.com. This makes life so much easier.
Download the module and install in the usual way; there are instructions in their wiki.
A simple way to display the raw data in a more readable form is to use Pretty Print (pprint) which is installed by default on Respbian. Just change the code in the call to weather.com in the script below to your town which can be found in the URL if you
Another thing that made this project so much simpler was access to some great weather icons on the internet. I have no artistic skill or patience for such in me. I found some great icons produced by MerlinTheRed and available on Deviant Art. These are free for non-commercial use. I’ve included the copyright notice on GitHub. The great thing about these, apart from looking good, is that the filename numbers match the icon numbers in the weather.com data! Makes scripting the right icon so simple.
Installation & setup instructions:
- Install & configure your Raspberry Pi and the PiTFT using Adafruit’s fantastic instructions.
- Download & install the python-weather-api python module.
- Download & install my python daemon module.
- Create a directory for your weather station code. I use /opt/PiTFTWeather/
- Download the script and icon images from my GitHub repository.
Start the script as root (sudo if you like):
# python PiTFTWeather.py start
Stop the script:
# python PiTFTWeather.py start
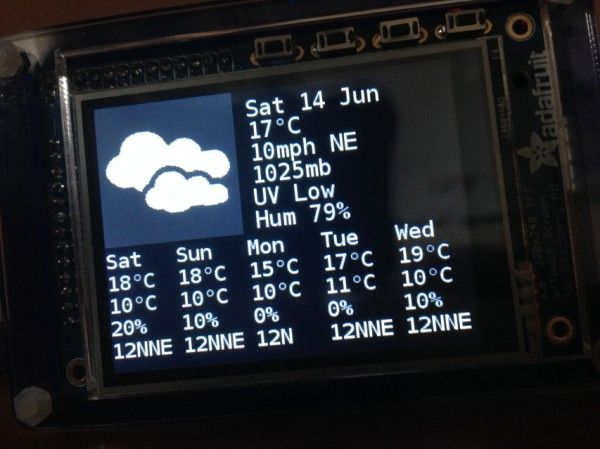
You should see a screen similar to this:
For more detail: PiTFT Weather Station
- How can I extract weather data from multiple services?
You can use the python-weather-api module which supports NOAA, Yahoo! Weather, and weather.com. - What tool is available to display raw data in a readable form?
Pretty Print (pprint) is installed by default on Raspbian and can be used to format the output. - Where can I find free weather icons for this project?
Great icons produced by MerlinTheRed are available on Deviant Art for non-commercial use. - Why are the icon filenames useful for scripting?
The filename numbers match the icon numbers found in the weather.com data, simplifying the script logic. - What is the first step in the installation process?
You must install and configure your Raspberry Pi and the PiTFT using Adafruit's instructions. - Which command starts the weather station script?
You start the script by running python PiTFTWeather.py start as root. - What is the recommended directory path for the code?
The author suggests creating a directory such as /opt/PiTFTWeather/ for the weather station code. - Can I change the location displayed on the screen?
Yes, you can change the town in the script call by finding the ID in the weather.com URL.
