Summary of Happy Birthday Song Using Arduino Uno
This beginner-friendly article guides readers on building a project to play the "Happy Birthday" song using an Arduino Uno and a buzzer. It details the necessary components, provides a clear circuit connection diagram, presents the complete Arduino code for melody generation, and includes testing instructions. The guide also promotes NextPCB as a resource for custom PCB manufacturing services.
Parts used in the Happy Birthday Song Using Arduino & Buzzer:
- Arduino Uno
- Buzzer
Hello friends welcome back to “Techno-E-solution” in todays article I’ll show “How to play Happy Birthday Song Using Arduino & Buzzer” in few steps. Most of the peoples are from technical background so I decide to wish that peoples means my besties in techy style so build this project. This is a beginners level project so let’s make it.
Follow Me On :-
| YOUTUBE | INSTAGRAM | FACEBOOK | INSTRUCTABLES | DAILYMOTION | HACKSTER |
If you like this project subscribe us on Youtube, So without wasting time Let’s get started…………..
Step 1: MATERIAL REQUIRED
To make this project we need some components (Best Buy Link Provided):-
[ Above link are affiliated if you buy from above link, We got some bonus from it. ]
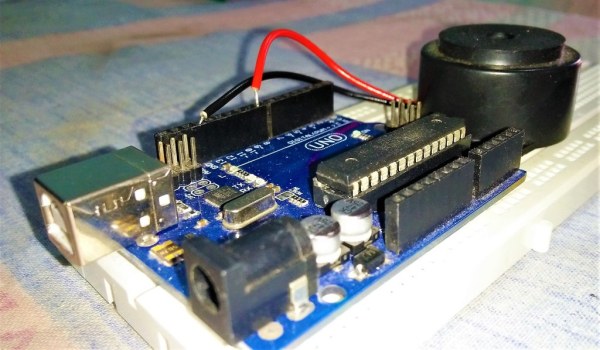
Step 2: CIRCUIT DIAGRAM

Follow the circuit diagram to make the connection.
Arduino >>> Buzzer
D8 >>> +ve
GND >>> -ve
Next PCB
NextPCB is a high-quality PCB Manufacturer. With professional PCB manufacturing capabilities, our PCB engineers with more than 10 years of experience will double-check your engineering files.
NextPCB is certified by IATF16949, ISO9001, ISO14001, UL, CQC, RoHS and REACH; more importantly, we handle the whole process including the PCB prototype, PCB manufacturing, PCB assembly, testing, and final shipment. We are capable of assembling BGA, Micro-BGA, QFN, and other leadless package parts. We also have an online parts shop, you can choose any parts you need.
If you want a Printed circuit board go through the NEXT PCB
Step 3: ARDUINO CODE
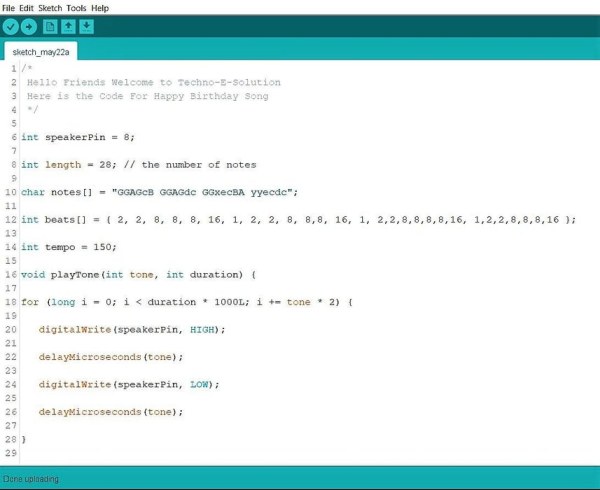
/*
 Hello Friends Welcome to Techno-E-Solution
 Here is the Code For Happy Birthday Song
 */

int speakerPin = 8;
int length = 28; // the number of notes
char notes[] = "GGAGcB GGAGdc GGxecBA yyecdc";
int beats[] = { 2, 2, 8, 8, 8, 16, 1, 2, 2, 8, 8,8, 16, 1, 2,2,8,8,8,8,16, 1,2,2,8,8,8,16 };
int tempo = 150;
void playTone(int tone, int duration) {
for (long i = 0; i < duration * 1000L; i += tone * 2) {
   digitalWrite(speakerPin, HIGH);
   delayMicroseconds(tone);
   digitalWrite(speakerPin, LOW);
   delayMicroseconds(tone);
}
}
void playNote(char note, int duration) {
char names[] = {'C', 'D', 'E', 'F', 'G', 'A', 'B',

                 'c', 'd', 'e', 'f', 'g', 'a', 'b',

                 'x', 'y' };

int tones[] = { 1915, 1700, 1519, 1432, 1275, 1136, 1014,

                 956,  834,  765,  593,  468,  346,  224,

                 655 , 715 };

int SPEE = 5;
// play the tone corresponding to the note name
for (int i = 0; i < 17; i++) {
   if (names[i] == note) {
    int newduration = duration/SPEE;
     playTone(tones[i], newduration);

   }
}
}

void setup() {
pinMode(speakerPin, OUTPUT);
}
void loop() {
for (int i = 0; i < length; i++) {
   if (notes[i] == ' ') {
     delay(beats[i] * tempo); // rest
   } else {
     playNote(notes[i], beats[i] * tempo);
   }
   // pause between notes
   delay(tempo);
}
}
Step 4: DEMO & TESTING
If you like this project subscribe us on youtube for more interesting projects :-
Step 5: NEXT PCB
NEXTPCB PCB MANUFACTURER COMPANY
NextPCB was founded in 2004 and has since established itself as a turnkey PCB manufacturing and assembly factory for prototype quantities as well as small-volume to big-volume production.
Why NEXTPCB?
NextPCB provides one-stop services for PCB with professional PCB manufacturing practices fulfilling the advanced design requirements. The company provides the speed of PCB and assembly manufacturing with efficient collaboration and quality assurance.
NextPCB provides a variety of PCBs with optimistic capabilities. Starting from the single-layer they provide PCB services up to 20 layers, with a board thickness of 0.6mm to 2.5mm with a tolerance of 10% and much more capabilities. Check out the manufacturing capabilities of NextPCB for better production of your PCB.
Source: Happy Birthday Song Using Arduino Uno
- How can I play the Happy Birthday song with an Arduino?
You can play the song by connecting a buzzer to pin D8 of the Arduino Uno and uploading the provided code that defines the notes and tempo. - What materials are required for this project?
The only components required are one Arduino Uno and one buzzer. - Which Arduino pin connects to the positive side of the buzzer?
The positive (+ve) side of the buzzer connects to digital pin D8 on the Arduino. - Where does the negative side of the buzzer connect?
The negative (-ve) side of the buzzer connects to the GND pin on the Arduino. - Can this project be considered suitable for beginners?
Yes, the article explicitly states that this is a beginners level project. - What is the purpose of the tempo variable in the code?
The tempo variable, set to 150, determines the speed at which the notes are played relative to their beat duration. - Does the code handle rests between notes?
Yes, if the note character is a space, the code executes a delay based on the beat and tempo instead of playing a tone. - Is there a video demonstration available for this project?
Yes, the article provides a YouTube link where users can view the demo and testing of the project. - What service does NextPCB offer in relation to this project?
NextPCB offers professional PCB manufacturing, assembly, and design services for those who want to create a printed circuit board for this project.