Summary of Open a box with the flick of a switch!
This guide details how to build an automatic opening box controlled by a switch. Using an Arduino, a continuous rotation servo, limit switches, and recycled materials like cardboard and coat hangers, the project creates a mechanism that opens or closes the box when activated. The process involves assembling a simple circuit, programming the Arduino to control the servo's direction based on switch inputs, and physically mounting the arm inside a box for operation.
Parts used in the Automatic Opening Box:
- A Box
- A Continuous rotation Servo
- Spare cardboard
- Two Limit switches
- A Metal Coat Hanger
- Perfboard
- Wires
- Resistors (All 10K)
- Headers
- An Arduino
- A power switch
- L brackets
- Some thread
- A Hot glue gun
- A soldering iron
- Solder
- Heavy duty wire cutters
- Pliers
Have you ever given something to someone and wished that the box you gave it in opened automatically? No? Well neither have I (well, maybe) :D. However if you have, this is the guide for you! With just a flick of a switch the box will open automatically!

Step 1: Tools & Materials
Materials:
– A Box
– A Continuos rotation Servo (Mine’s from parallax)
– Spare cardboard
– Two Limit switches (From RadioShack)
– A Metal Coat Hanger (From Laundry Places)
– Perfboard (From RadioShack)
– Wires (From RadioShack)
– Resistors (All 10K)
– Headers (From HSC Electronics)
– An Arduino (From Italy :D)
– A power switch (From an old Power Supply)
– L brackets (Cardboard works to)
– Some thread
Tools:
– A Hot glue gun
– A soldering iron
– Solder
– Heavy duty wire cutters
– Pliers
As you can tell, you can pretty much recycle everything, or find in around the house.
Step 2: The Circuit
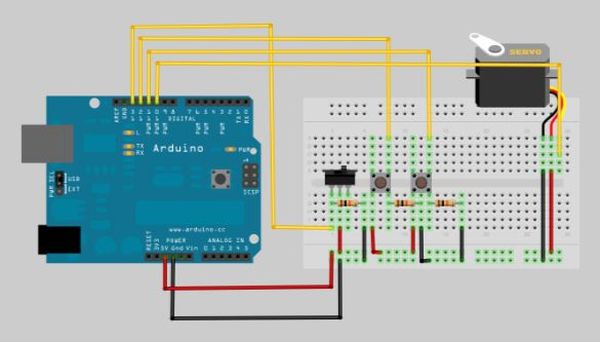
The Circuit is fairly simple. Its a 3 switches connected to 3 digital pins with 10K resistors shorting to ground. There is also a servo motor that connects to 5v, ground, and a fourth digital pin. Connect however you like, just make sure you know which digital pin goes where. I would recommend breadboarding it out first and then doing it on perfboard. Thats what I always do. Now let’s program it!
Step 3: Program It!
I like to test the code first, before putting it in the case (the box). This way, you can perfect the code and get it right, and not destroy things later. To program it, It’s like any other arduino code. Just open up the arduino project, connect your arduino, and press upload! Once you do that, your continuous rotation servo should start to spin. It will spin until it finds a button to press and then stop. When you flip the power switch to the next state, it will spin in the other direction until it finds another button to press. Believe it or not this was actually pretty hard code to write. If your just starting with arduino, you might be able to learn something from it!
Step 4: Assembly – The Arm
Great! So now we have the circuit up and running and everything working. Now lets attach the coat hanger to the servo.
Take your metal coat hanger and cut off a 5″ piece. Then, straiten out the piece with some pliers. Then measure 1″ on the coat hanger segment. Bend at that point until you get a 90 degree angle. It should look like the picture below.
By the way, the main reason for choosing hot glue is because it comes off without damaging other parts. That being said, you can attach the parts any way you like. 3D printer is preferred. Once I finish my reprap, I’ll upload the new files. In the mean time, anyone is welcome to post the in the comments!
Ok, The next step it to attach the arm to the servo. You can do this with hot glue very easily. Once you do this, your servo-arm thing is done! Next we’ll attach the servo to the box.
Step 5: Assembly – The Servo
Now we’ll glue 2″ x 1″ piece of cardboard to the side of the box. Make sure it is as secure as possible.
Once this is done, hot glue the servo to the cardboard piece. Make sure it is strait.
For more detail: Open a box with the flick of a switch!
- How does the box open automatically?
The box opens with a flick of a switch that triggers a continuous rotation servo to spin until it hits a limit switch. - What type of motor is used in this project?
A continuous rotation servo is used to drive the opening mechanism. - Can I use materials found around the house?
Yes, you can recycle items like cardboard, metal coat hangers, and old power supply switches. - Why should I test the code before putting it in the case?
Testing first allows you to perfect the code without risking damage to the components inside the box. - How do I attach the arm to the servo?
You can attach the straightened coat hanger arm to the servo using hot glue. - What is the recommended way to assemble the circuit initially?
It is recommended to breadboard the circuit first before soldering it onto perfboard. - How many digital pins are needed for the switches?
The circuit uses three switches connected to three digital pins with 10K resistors shorted to ground. - What happens when the power switch state is flipped?
The servo spins in the opposite direction until it finds another button to press.