Summary of How to turn inkjet printer to print on Coffee using Arduino
Summary: The project converts a Canon iP3600 inkjet printer into a latte/art printer by hacking its sensors and feeding signals with an Arduino Uno. The build uses a scanner as a moving carriage, custom Arduino shield to override paper-detect sensors and read motor encoder signals, and mechanical mods so the printer head prints directly onto a beverage surface without paper.
Parts used in the Latte Printer Project:
- Canon iP3600 inkjet printer
- Edible ink for Canon iP3600
- Any old scanner
- Arduino Uno R3
- Stepper Motor Driver, EasyDriver
- 2x Relay 5V coils
- Voltage regulators (9V and 5V)
- Strip board and wires
- Meccano parts or equivalent for frame and height adjustment
- Drawer slides
- Double-sided tape and miscellaneous wires
- Soldering equipment
- Oscilloscope
- Multimeter
- Hardware tools: screwdrivers, scissors, pliers, small drill
- Small wheels or toy car wheels
The aim of this project is to make latte printer, I used 1 printers and 1 scanner , it prints one line a time, all what I have done is hacking the sensors of the printer and I used Arduino Uno to send different values to printer’s micro-controller created custom shield to control stepper motor and do other taskes … ,simply I fooled the printer, make it print with no papers 🙂

Tools :
– Soldering equipment
– Oscilloscope , Multimeter
– Hardware tools : screw drivers , Scissor , pliers, small drill …
Materials :
– Canon ip3600 inkjet printer,
– Edible ink for Canon ip3600
– Any old scanner
– Arduino Uno r3
– Stepper Motor Driver , EasyDriver
– 2* Relay 5 volt coils
– Voltage regulators : 9v , 5v
– Strip board & wires
– Meccano parts or any thing to make the printer body move on wheels and ability to adjust the height from the surface , Makeblock is good option too
– Drawer slides
– Double face, tapes and wires
Step 1: Disassembling the printer
Remove all body plastic parts, but be careful it is a bit tricky you need to press some spots with a screw driver ,the parts will be removed easily without extra force , for sure you need to look for the screws first and remove them from the printer,
I did not take photos for that but this link give good tips, but you need to go further with removing parts util it becomes like the the photos above
Step 2: Adding a printer base with wheels & connect to drawer slides with scanner
– I’ve used Meccano parts and 2 small toy car’s wheels
– Connect printer base to drawer slides
– Connect drawer slides to scanner body
– Modifications needed on the beam to tie the beam to the timing built which is connected to the stepper motor
Step 3: Removing the zone beneath the print head
Using the tools cut the plastic and remove the zone beneath the print head
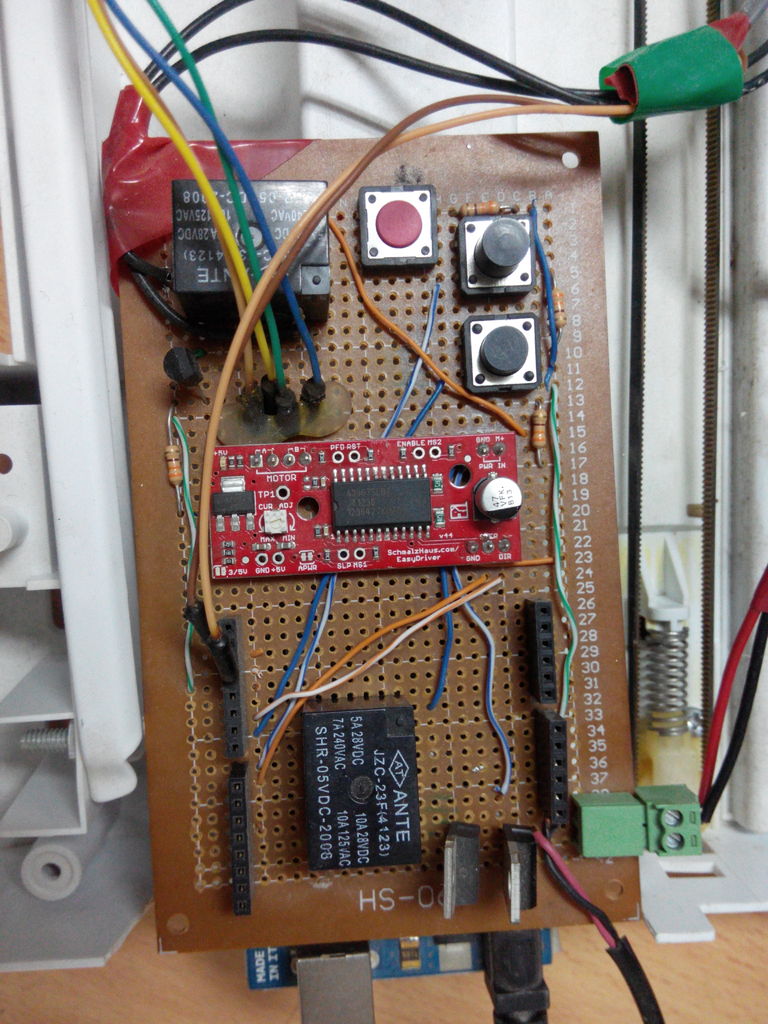
Step 4: Making the Arduino Shield
The shield board functions :
– Receiving values from printer motor encoder (direct wires to the arduino uno pins (2,3))
– Over riding IR printer sensors , the IR sensor which is responsible to detect the paper (in,out)
– Controlling the stepper motor (for multiline printing but it is not applicable, so you can ignore this part)
Step 5: Reading values from printer motor encoder
– The goal of this step is to find the motor encoder values pattern that match the paper movement,
I did a lot of experiments to find out the encoder speed values with taking into account time delays.
– Solder two long wires (50 CM min) to the motor encoder (signal pin and GND), you may need to use the oscilloscope in this step to know where is the signal pin in case you are using another printer, the two wires are liked to ardiuno pins (2,3) as before step
For more detail: How to turn inkjet printer to print on Coffee using Arduino
- What is the goal of this project?
The goal is to convert an inkjet printer to print on coffee (latte) by hacking its sensors and using an Arduino to control printing without paper. - Which printer model was used?
A Canon iP3600 inkjet printer was used. - Do I need edible ink?
Yes, edible ink for the Canon iP3600 is used in the project. - Can I use any scanner for this project?
Yes, the project uses any old scanner as part of the moving carriage and connection to drawer slides. - What microcontroller is used to send values to the printer?
An Arduino Uno R3 is used to send different values to the printer microcontroller. - What does the custom shield do?
The custom shield receives motor encoder values, overrides the printer IR paper sensors, and can control a stepper motor for multiline printing. - How are the printer paper sensors handled?
The IR paper sensors are overridden by the Arduino shield to fool the printer into printing with no paper. - How are motor encoder signals read?
Two long wires are soldered to the motor encoder signal and ground and connected to Arduino pins (2 and 3); an oscilloscope may help identify the signal pin. - Are mechanical modifications required?
Yes, body plastic parts are removed, the area beneath the print head is cut out, and a base with wheels, drawer slides, and adjustable height structure is added. - Is special equipment recommended for sensor and encoder work?
An oscilloscope and multimeter are recommended for locating signals and testing encoder patterns.