So this Lazy Old Geek (L.O.G.) hasn’t been able to do an Instructable for a few years. At 70 years old, the brain doesn’t work as well as it used to and it’s hard to focus on big projects let alone try to write about them.
(I am entering Arduino Contest.)
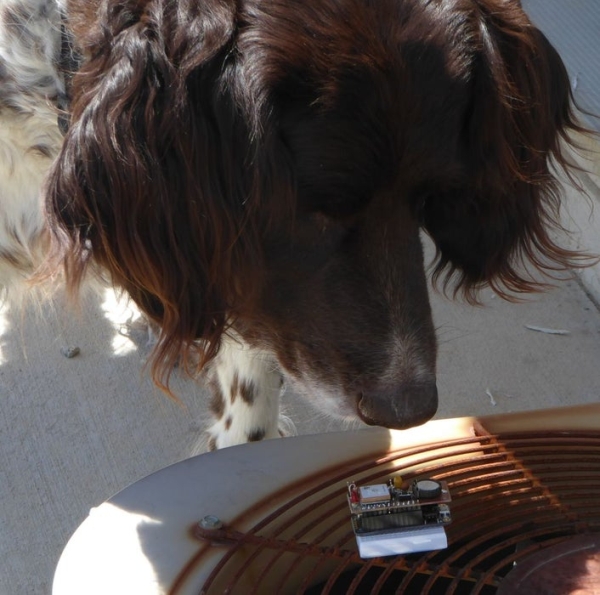
But with the help of my loving dog, Sadie and my CPAP machine, I’m going to give it a try. Sadie is my anti-depressant, keeps my spirits up and we walk every morning. My CPAP helps me sleep better and therefore, think a little better.
GPS: Well, I’ve always been interested in GPS. Most commercial GPS can only pinpoint down to 2-3 meters. My cousin, who’s a big time farmer says his equipment can do a lot better. I know one of the local farmers uses his John Deere tractors to plant crops in furrows using custom GPS.
I spend a lot of time surfing the Internet and have been reading about reasonably priced GPSs that can measure down to centimeters! Incredible. On the practical side, I don’t really need that. When I go for walks I don’t really need to know exactly where I am. Even on road trips, I use my smartphone with Android Auto to let me know where I am.
But I’m also a technogeek, so I started looking at GPSs for hobbyists. One of the most popular was Adafruit Ultimate GPS.
https://www.adafruit.com/?q=ultimate
Step 1: Adafruit Feather
Well, one of the versions of the Adafruit Ultimate GPS is the Featherwing. Now I’ve never heard of the Adafruit Feather series, so more surfing. Wow, Adafruit and Lady Ada have developed a whole bunch of microcontrollers and accessories based on a small platform called Feather. For Arduinoites, it’s similar to the basic Arduino UNO platform but smaller and more up to date. Adafruit also developed all of the software so they could be compatible with the Arduino software.
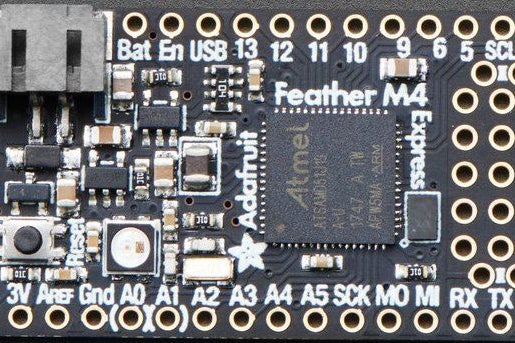
I really appreciate the work Adafruit and Lady Ada have done for DIYers and I really liked the Feather M4 Express:
https://www.adafruit.com/product/3857
Unlike the standard Arduino with 16mHz clock, it’s superfast with 120mHz clock. It’s 3.3V which is pretty much the new standard for new DIY electronics. It’s compatible with Arduino which I’m pretty familiar with plus it can also be programmed with Circuit Python (Adafruit’s custom version of Python). I am old and have a hard time learning new stuff but this would give me a chance to branch out.
So I ordered a used one on ebay and also ordered one from Mouser. Amazon, Mouser and DigiKey carry some of the Adafruit products. I would’ve liked to buy one directly from Adafruit but at the time, they didn’t have all the FeatherWings I wanted to get. In this case it’s cheaper to order a lot of stuff at one time so you don’t have to pay as much shipping costs. In my case three items cost as much to ship as one.
PROBLEM: JST2.0 battery connector on M4express. A long time ago I bought a bunch of JST2.0 power connectors like the picture. Unfortunately, the red/black is opposite what the M4express uses, and I have a lot of batteries and projects using this polarity.
Oh, well. It’s fairy easy to remove the wires from the connector and switch their positions. So I did this with several batteries and one LiPo charger. I put some red nail polish on them so hopefully won’t get them mixed up.
For the M4express, I elected to use the female headers with long pins. See picture. This allowed FeatherWings like my GPS to plug into the top. Plus the M4express can be plugged into FeatherWings like the 3.5” TFT which I bought.
For this application, the pins aren’t used so I had a small Protoboard and plugged the M4express into this so the pins aren’t exposed and can’t get bent when I carry it around.
Step 2: My GPS FeatherWing
Adafruit Ultimate GPS Featherwing
https://www.adafruit.com/product/3133
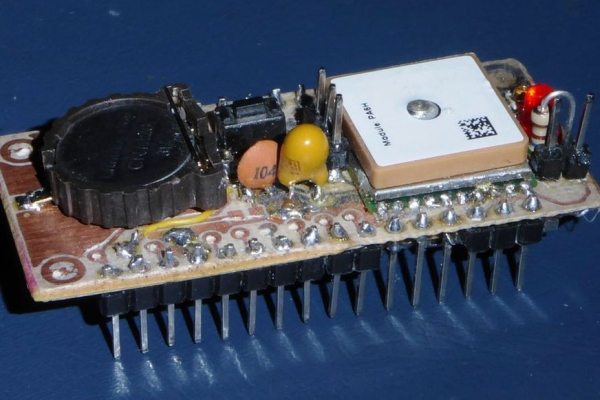
One of the great things I like about Adafruit is that they heavily document their products, I assume so hobbyists can build their own. Now the M4express has an SMD microcontroller which is too small for an Old man like me to work with so I purchased a couple instead of trying to make one. But the FeatherWing Ultimate GPS is a little better so I decided to try to make my own. So I ordered a MediaTek (GlobalTop) GPS MTK3339 module from Ebay or Aliexpress (can’t remember). Sometimes it’s called LadyBird1.
So using Eagle Cadsoft, (now, Autodesk) software I copied Adafruit’s schematic and modified it. First I can only make single sided PCBs and second I don’t have many SMD components so I simplified it.
GPS_MTK3339.zip
So I made the PCB using my toner transfer method:
https://www.instructables.com/id/Vinyl-Sticker-PCB-How-To/
PROBLEMS: As I sometimes remember, I’m Old and here’s some problems I have. Mostly I can’t see closeup that well, so I use one of these hobbyist tools and a lighted magnifying glass (see pictures) I got from Aliexpress. I use an Aoyue soldering iron so I can control temperature and choose soldering tips.
Even with all this, I had a lot of problems soldering the GPS module pins and the u.fl antenna connector. Also, I use a Dremel-clone tool to drill the holes. I’m never able to drill straight holes but fortunately was able to get everything working.
By the way, I ordered some SMD 0805 ferrite beads but never got them so waiting on some more. Meanwhile I soldered a wire across the contacts to make it work. The ferrite bead is supposed to reduce noise on the voltage pin to the GPS chip.
Step 3: MicroSD Card Reader
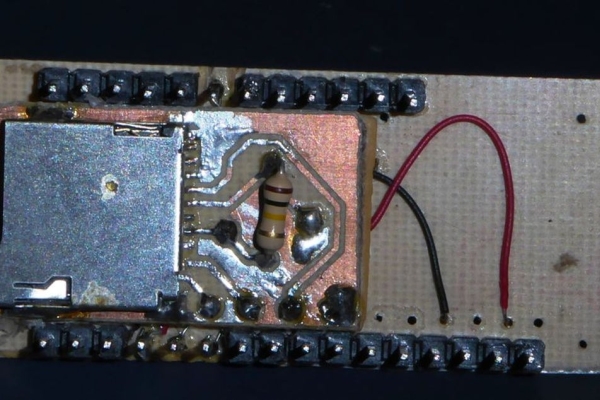
Ok, so the GPS worked pretty good but it only worked when it was tied to a computer so you can see what’s going on. To be more useful, I need something not tethered to a computer, like a display or a micro SD card. For now I wanted to store GPS information. Adafruit has some FeatherWings with microSD cards, like the 3.5” display and the RTC card. But I didn’t want to stack FeatherWings so I copied the microSD circuitry from the RTC card and made my own.
Since I didn’t want to stack another FeatherWing, I came up with a plan to attach this to my GPS PCB. Since the circuit is pretty simple, I just made it with five pads so I can attach wires to this PCB and to my GPS board.
MyDataLogger.zip
So to attach this, I placed it underneath my GPS PCB, soldered on some wire-wrap wires and connected them to my GPS PCB. For some I cut out some of the insulation on the header pins, so I could solder the wires without interfering with the PCB fitting onto the M4express. You should be able to see that in picture. Then I used some Gorilla glue to carefully glue the two cards together. Be very careful as Gorilla Glue expands.
PROBLEMS: Well, this is actually with the microSD cards. I ordered some microSD cards on ebay. I found out there is a difference between simple microSD cards and microSDHC cards. First, some of the older adapters like I have (probably) can’t read the HC versions. Second the microSDHC versions are from 4gB to 32gB. There’s another version called microSDXC with 64gB and larger sizes. Well, I received some 64gB cards but couldn’t read them with my adapters. I couldn’t figure out what was wrong. But after finding out about the differences, I thought maybe my adapters couldn’t read the HC version but further research said the HC version is maximum of 32gB and as the picture shows these are labeled microSDHC 64gB. Even tho, it says Kingston these are fakes. I contacted the seller and he promptly refunded my money. You can find a lot on the Internet about fake microSD cards.
Now even though they’re fakes, it doesn’t mean they won’t work. I am awaiting a couple of new adapters that are supposed to be able to read some HC cards, plus I ordered some different HC cards.
Read more: Old Man and the Arduino GPS