For the last month or so I’ve been working on a project involving a NeoPixel, I chose to use a NeoPixel instead of the usual RGB LED strip because I felt that the individual addressable LEDs would be easier to work and create better effects. While this is true I did not take into account the learning curb needed to start working with the NeoPixel library and I ended up spending most of my time trying to figure out how to use it.
Well after figuring out basics I thought I would make a quick tutorial to show you all how the basics of the NeoPixel work!
Step 1: What Is a NeoPixel
Before we jump into learning about the library that helps us control them lets take a second to talk about NeoPixels.
These are individually addressable LEDs all housed on a string that can be controlled from a single pin on a microcontroller. This means one pin can control all of the LEDs colors and which LEDs are on at any given time. When compared to a normal RGB LED you’ll notice that we need 3 pins to control the RedGreen and Blue value and all LEDs have to remain on or off. So as you can see using individually addressable can help create some cool effects.
Lots of companies sell strips of addressable LEDs however the most popular is the NeoPxiel by Adafruit. Adafruit produces a line of addressable LED strip and also supplies the library to control them, this is called “Adafruit NeoPixel”, there are other companies that have produced libraries to control these addressable LEDs however, in my opinion, I’ve found that Adafruits has the best support and is the easiest to get started one
If you don’t have one already you can get the NeoPixel here
Step 2: Install the Library
So we have decided we are going to use the Adafruit library to control our NeoPixel, how do we install it?
Well, first things first you need to have the Arduino IDE installed on your computer which can be downloaded from here . Once that’s all loaded up go ahead and launch the Arduino IDE and do the following:
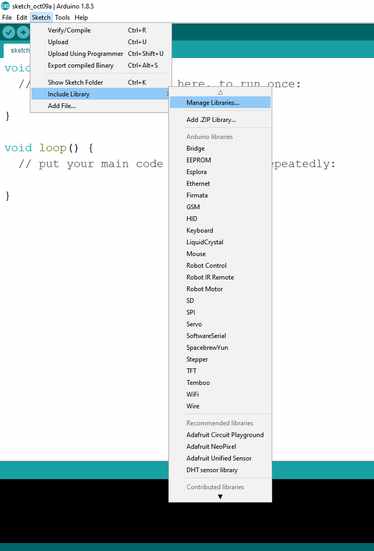
- Click on “Sketch” and then hover over “Include library”
- Click on “Manage library”
You should now see a pop-up window open, this is where we install and update new libraries.
- In the search bar, search for “Adafruit NeoPixel”
- Click on the one named “Adafruit NeoPixel”
- Click “Install”
Once that finishes loading the NeoPixel library will now be in your IDE. You can test this by checking to see if the examples loaded into your IDE:
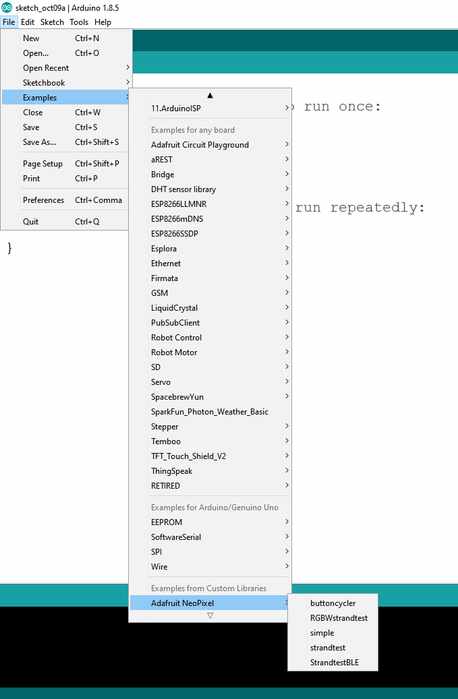
- Click on “File” and then hover over “Examples”
- Somewhere on the list, you should see “Adafruit NeoPixel”
- Click on “Adafruit NeoPixel” too see all the examples
At this point, the library is successfully loaded into our Arduino IDE and we can now move on to checking out the examples.
Step 3: Examples
Now if you clicked on any of the examples you may be a little surprised at how much code is involved in getting one of these to light up. The “Standardtest” example has 6 extra functions! Controlling one of these is definitely more challenging than just setting the Red Green or Blue pin to high like on a standard RGB strip but it’s worth figuring out as it allows you to do some really cool stuff.
“Standardtest” is actually one of the more advanced examples so lets start of by loading in a simple example and what simpler example than the “simple” example:
- Click on “File” and then hover over “Examples”
- Click on “Adafruit NeoPixel”
- Click on “Simple”
Now with the simple example open in our IDE we can get started.
Step 4: Simple Example
There’s a lot of important code happening in this example so we are going to take a look at it piece by piece.
At the very top of the example we have the following code:
#include <Adafruit_NeoPixel.h>
This tells the Arduino that we want to use the NeoPixel and all the properties it brings in this sketch, the sketch would not function without this.
Next, we see the following:
#ifdef __AVR__
#include <AVR/power.h>
#endif
This states that if we are using an AVR board such as the Trinket or Gemma to include a library that is compatible with them. This has no effect if you are using an Arduino.
Next, we see two very important lines of code:
#define PIN 6
#define NUMPIXELS 16
The first value named “PIN” is used to tell the sketch which pin we want to use on the microcontroller. If you wanted your NeoPixel to be controlled from pin 8 on your microcontroller you would need to change “6” to “8”.
The value named “NUMPIXELS” is used to tell the string how many Pixels there are on your specific string. For example, my string has 8 Pixels so I changed the value to 8. This value helps the sketch keep track of how many Pixels are on your string allowing us to create functions using this value which we will do later on.
Next, we have a line of code that references the values we defined already:
Adafruit_NeoPixel pixels = Adafruit_NeoPixel(NUMPIXELS, PIN, NEO_GRB + NEO_KHZ800);
This code doesn’t really serve a purpose for us, its there to help the microcontroller communicate with the NeoPixel. You may notice that those values we defined are here, we could remove the words “NUMPIXELS” and “PIN” and just replace them with the value if we wanted to.
Next, we have a delay value which we reference later.
int delayval = 500;
This is pretty simple its just being stated that “delayval” = 500 which is half a second
Now we see the Void Setup:
void setup() {
#if defined (__AVR_ATtiny85__)
if (F_CPU == 16000000) clock_prescale_set(clock_div_1);
#endif
pixel.begin();
}
The first couple of lines of code are again just there to make this work with the trinket and other microcontrollers of that class so we don’t really need to worry about it. “Pixel.begin” is important though, this tells the sketch to initialize the library.
Next, we see the Void Loop. This is where everything interesting happens.
for(int i=0;i<NUMPIXELS;i++){
Now, this code is quite complex and is used to create a function, we are going to come back to this in the next step.
Next, we see the code that controlls everything
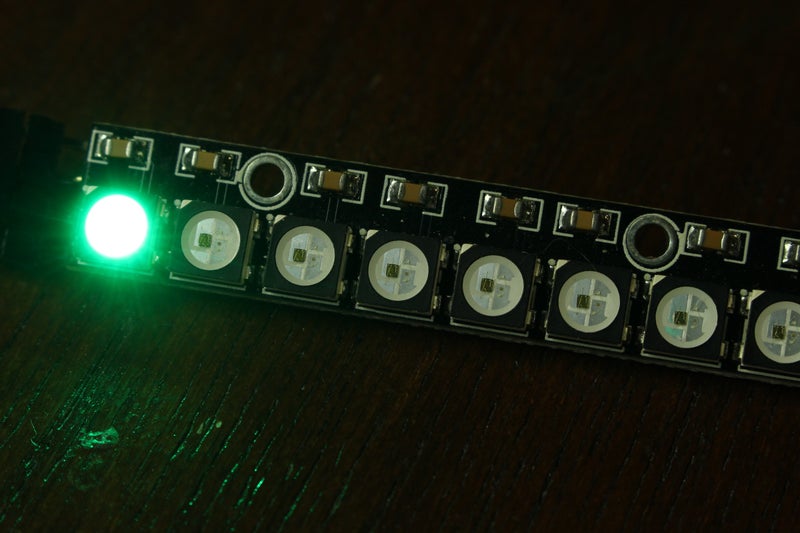
pixels.setPixelColor(i, pixels.Color(0,150,0));
The code starts out with “pixels.setPixelColor” so it seems reasonsable to belive that this code is going to allow us to change the color of the Pixel. The first value is “i” now this is the part of the code were we tell it exactly which pixel we want to be lit up, right now its set to “i” because its part of that function we spoke about earlier but if i change this value from “i” to “3” and then upload the code the third pixel on the string will light up. This is how we control indavidual pixels.
After this we see “pixels.Color(0, 150, 0)” these are the values we change to change the color, the first value is Red the second value is Green and the final value is Blue. Right now the values are set to “(0, 150, 0)” which means the the strip will be light green (0 means the color is off and 255 is the brightest the color can go). If i were to change this to “(0, 0, 255)” and upload it the strip would then become very bright blue. We can also mix colors like this “(150, 0, 150)” to make violate.
Next we have our last peice of code which is:
pixels.show();
delay(delayval);
“pixels.show” sends the current settings to the pixel, if we didnt have this it would never update the pixel and it would stay the same. The “delay” is there to stop the pixel from updating too quickly and will play a bif role in the fucntion we are going to make in the next step.
This was a very long stop but we learned the key basics of how to control the NeoPixel, in this step we learned about how to set individual LEDs on or off and how to set the colors of those individual NeoPixels.
Source: Neopixels, How Do They Work?