Summary of Musical Table using Arduino
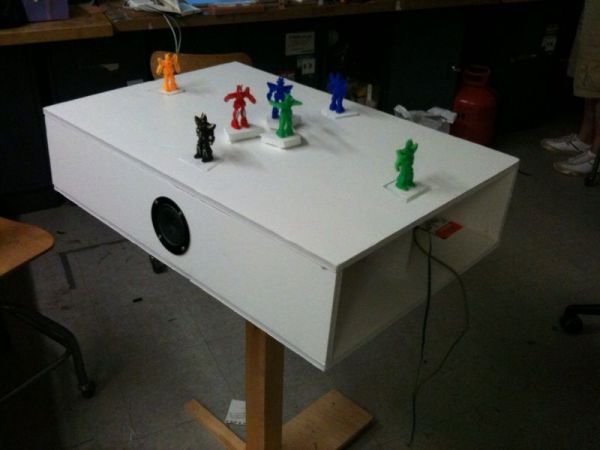
The Musical Table is an interactive toy enabling children to create music by moving figures on its surface. Utilizing two Arduino boards and seven switches, the device generates 27 distinct musical phrases across four bases. It supports simultaneous playback of two phrases, producing either melodic or chaotic sounds depending on the combination. This project fosters musical development by encouraging logical phrase sequencing while offering a fun, hands-on learning experience for kids.
Parts used in the Musical Table:
- Aluminum foil tape
- Solid hookup wire
- Ribbon wire
- 2 Arduinos
- 12 10 K resistors
- 2 speakers
- 4 sheets of foam board (20 x 30)
- 7 toy robots
- 2 8-ohms speakers
- screws/ nuts
Step 1: Product Details
Supplies
– Aluminum foil tape
– Solid hookup wire
– Ribbon wire
– 2 Arduinos
-12 10 K resistors
– 2 speakers
– 4 sheets of foam board (20 “x 30”)
– 7 toy robots (or any other your favorite toy figure)
– 2 8-ohms speakers
– screws/ nuts (to secure the table on a stand. But optional.)
Tools
– Wire stripper
– Utility knife
– Soldering iron/solder
– Solderless breadboard
– Ruler
Step 2: Wiring the Table
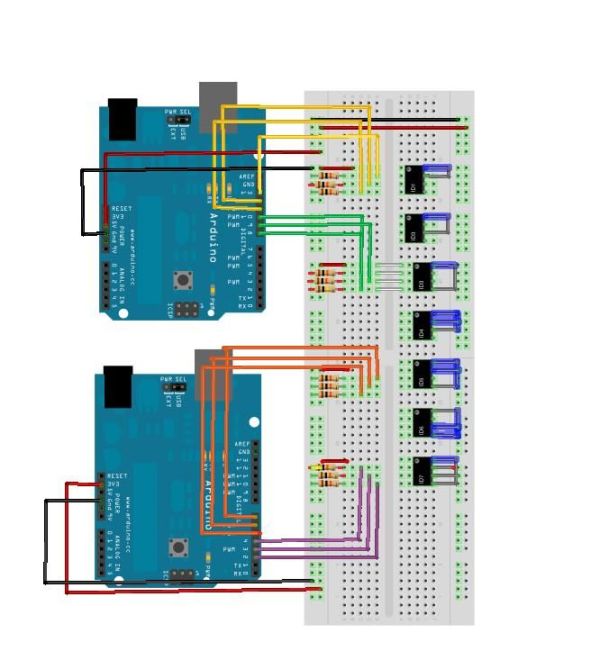
Make four sets of three 1k pull down resistors that connects Arduino pins (pin 2 – pin 13) to ground. Use different colors of wires for each set to distinguish the groups easily.
- Base1connection: Connects to digital pin 13, 12, and 11 to a breadboard. Add another wire next to pin 13 on the breadboard, and connect it to the power.
- Add pull down resistor (a resistor that connects to ground) between each pin and ground.
- Base2 connection: Leave some space on the board and connect digital pin 10, 9, and 8 to the circuit board and power in the same way as step 1 and step 2.
- Base3 connection: Take the second Arduino board and connect digital pin 7, 6, and 5 to the same breadboard.
- Add pull down resistor between pins (digital pin 7, 6, and 5) and ground.
- Add another wire next to pin 7 that connects to power.
- Base 4 connection: Leave some space below base 3 connection on the board and connect digital pin 4, 3, and 2 to the circuit board and power in the same way as step 4, 5 and 6, except this time the power is connected to a wire next to pin 4.
Step 3: Creating a melody (Arduino)
An Arduino board makes only one tone at a time (I’m sure there’s away you can get around that, leave a comment if you know how). To have more than one notes played simultaneously, I am using two Arduino boards.
Making a melody entails three variables: pitch, duration, and number of notes. The code is based on Arduino/Tutorial/Melody created by Tom Igoe. You can find the code here. A melody is called when if statement condition is met. The if statement searches for the combinations of three digital pins.
In pseudo code
If (Pin 13 == HIGH && PIN 12==LOW && Pin 11== HIGH) {playtone 3; }
In order to make 14 arrays of notes and durations, I created a class of combinations of notes and duration arrays.
– Aluminum foil tape
– Solid hookup wire
– Ribbon wire
– 2 Arduinos
-12 10 K resistors
– 2 speakers
For more detail: Musical Table using Arduino
- How many different musical phrases can the table play?
The table makes 27 different musical phrases in total. - Can you play two phrases at the same time?
Yes, the table allows you to play two phrases simultaneously. - What happens when different phrases are played together?
The sounds can be melodic or chaotic depending on which phrases are combined. - Why are two Arduino boards used in this project?
Two boards are used because one Arduino board makes only one tone at a time. - What determines the pitch, duration, and number of notes?
Making a melody entails three variables: pitch, duration, and number of notes. - How does the code identify which phrases to play?
The if statement searches for combinations of three digital pins to call a melody. - What components connect the Arduino pins to ground?
Three 1k pull down resistors connect each set of Arduino pins to ground. - Are screws required to build the table?
No, screws and nuts to secure the table on a stand are optional.