
Summary of Modifying a Robot Arm using Arduino
This article details the modification of an Edge Robotic Arm Kit to be controlled by an Arduino board instead of its original switch-based controller. The project involves replacing the internal electronics with H-bridge chips (SN754410 or L293D) to manage five DC motors, enabling bidirectional control via software. The author plans to use this setup as a foundation for future tutorials on controlling the arm using Processing and other interfaces, emphasizing that the modifications allow for greater flexibility compared to the stock system.
Parts used in the Arduino Robot Arm:
- Edge Robotic Arm Kit
- 3 H-bridge chips (specifically SN754410 recommended)
- Arduino Deumilanova w/ ATMEGA328
- Breadboard/ Prototyping board
- Jumper/ Connector wires
- Wire cutters/ strippers
Essentially another tutorial involving controlling DC motors. In this post I’m going to first alter a robot arm I had built previously from a beginners kit so that it can be controlled from Arduino. Then I’m going to write a series of posts on different ways to control the robot arm using Processing and other things. You should be able to use all of what I write for work with other toys and motors.
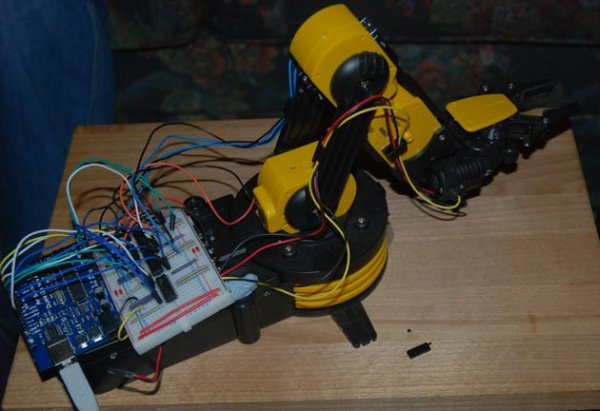
To start with have a look at the robot arm, it’s an ‘Edge Robotic Arm Kit‘:
The kit is a basic construction one and costs about £30 which you can find in most gadget shops and web stores. You assemble a gear box for each motor/ joint in the arm, doesn’t take long to build (about an hour) and is controlled by a set of switches on a control box. The only thing to note here is we’re dealing with motors, not servos or stepper motors just bog standard DC motors. This means calculating positions isn’t going to be straightforward later on. The kit has 5 motors and 4 ‘D’ series batteries to power them and can lift about 100 grammes.
So this version has a controller attached that lets you move each motor by pressing a switch, the electrics are pretty basic and don’t allow much control or further input. I have seen other versions that allow you to plug it in to a computer via USB but you pretty much have the same controls.
In order for us to build our own controls/ interfaces and software we need to modify the arm to allow us to interface our microcontroller – in this case an Arduino board. The best way I think do this, since we want to control a motor going backwards and forward, is to use H-bridge chips – the L293D and SN754410 and wire each motor into a chip and then alter the power circuit to run these chips. Arduino can then digitally control the H-bridge chip to turn the motor on/off and change its direction.
You can see some other work I’ve done with motor DC motor control and I’ll be covering the same info throughout these posts.
Arduino Robot Arm Parts
3 H-bridge chips – I heavily recommend using the sn754410 chip but you can probably get away with the L293 series. Each chip can control 2 motors – 5 motors = 3 chips.
Arduino Deumilanova w/ ATMEGA328
Breadboard/ Prototyping board
Jumper/ Connector wires
Wire cutters/ strippers
Hacking the Robot Arm
I hope you’re not too precious about wanting to use the control unit again, thats the first thing to go! I did look at working with this but it doesn’t give the level of control that I want. Also I’ll be cutting and stripping the wires and removing the control circuit from the arm. The only permanent damage is done to the wires – basically cutting the plugs off of the wires, so you could always get new plugs if you wanted to revert it, although once I’ve shown you what can be done I don’t think you’ll mind.
Step 1
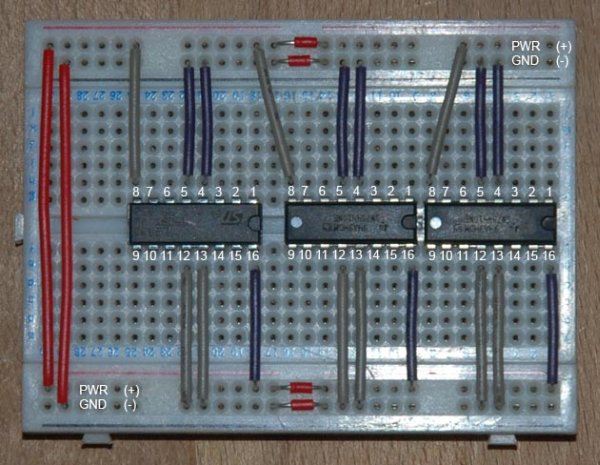
First we need to create our breadboard layout so we can plug in all the wires, we’re going to be using alot of pins on the Arduino, in fact I think I use pretty much all of them. You could reduce this using shift registers but for now its not an issue, although please follow the wiring diagrams as this layout gives the least hassle. Some pins e.g. digital pin 13 will make the motors move when the board is powering up so we want to avoid this.
First of all we need to put our H-Bridge chips on the breadboard. Make sure to put them in the center like illustrated. This means the 2 sides of the chip are isolated – it will not work otherwise!
For more detail: Modifying a Robot Arm using Arduino
-
What type of motors does the Edge Robotic Arm Kit use?
The kit uses standard DC motors rather than servos or stepper motors. -
How many motors are included in the robot arm kit?
The kit has 5 motors. -
Which H-bridge chips are recommended for this project?
The article heavily recommends using the SN754410 chip, though the L293 series can also work. -
Why is the original control unit removed from the robot arm?
The original unit is removed because it does not provide the level of control required for custom interfaces and software. -
How many H-bridge chips are needed to control the 5 motors?
Three chips are needed because each chip can control two motors. -
Which digital pin should be avoided when wiring the Arduino?
Digital pin 13 should be avoided because it may cause motors to move when the board powers up. -
What is the lifting capacity of the robot arm kit?
The arm can lift about 100 grammes. -
Can the robot arm be reverted to its original state after modification?
Yes, you could get new plugs if you wanted to revert it since only the wire plugs are permanently cut off.
