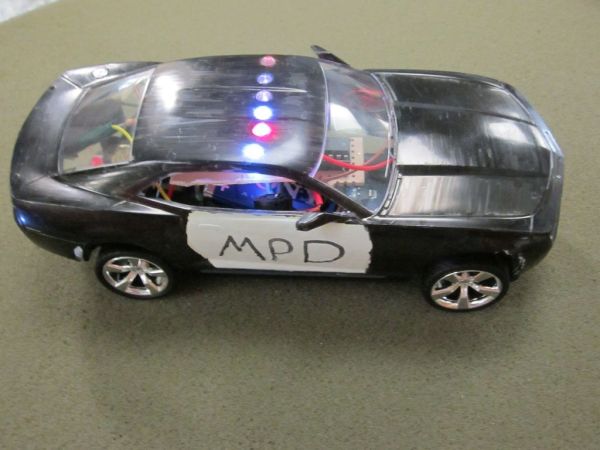
We wanted to build a model police car with working lights and sirens. Then we decided to add a motor and instead of using a switch to turn everything and off we used a photodiode. For our car the photodiode signal is a simple on off switch. If you want a more complicated device that will respond differently to different signals (only do lights, or do lights and drive but no sirens) then you will need a significantly more complicated setup and code.
Step 1: Gathering the Necessities
Materials, (suggested sources):
-Plastic Model Car, preferably snap together. We used a 1:25 scale and that seemed to be a little on the small side (http://www.amazon.com/gp/product/B000JSNYU6/ref=oh_o00_s00_i00_details)
-3 Superbright red LEDs (http://www.sparkfun.com/products/528)
-3 Superbright blue LEDs (http://www.sparkfun.com/products/529)
-A small buzzer or speaker (http://www.sparkfun.com/products/7950 or http://www.sparkfun.com/products/9151)
-A small motor (http://www.sparkfun.com/products/10171)
-A Darlington transistor (http://www.sparkfun.com/products/312)
-A photodiode (http://uk.rs-online.com/web/p/photodiode/6655331/)
-A flashlight, preferably quite bright. Or possibly a laser pointer, experiment!
-Wire
-2 9V Batteries
-1/4 Watt Resistors: 6 330 ohm resistors for the LEDs, a 100 ohm resistor for the buzzer, a 10,000 ohm resistor for the photo diode.
-Perforated PVC sheet or printed circuit board: You can design and print your own circuit boards if you have the resources. It will make for a tidier interior of the car and an easier soldering process. You can also wire and solder to a perforated sheet of PVC.
-Solder and Soldering Iron
-Breadboard for testing setups
-An Arduino Uno
-The Arduino program
-Gears for your motor and axle?
-Multimeter for testing
-Paint and decorations for your car
If you can get a good gear ratio for your motor the the car will actually be able to drive. We found that the car was too heavy to drive at our current gear ratio, but ran out of time to change it. You may also need to consider getting your car lifted after all the circuitry is inside it. You could also use a larger model and a more powerful motor. Or really just a more powerful motor.
Step 2: Prepare the Car
With the snap together model cars it is relatively easy to remove all the interior parts and only assemble the base, the wheels and axles and the outside shell. Make sure the wheels and axles are working well and turn freely. Experiment with assembling the car using the minimum number of interior parts, you will need that space to work with.
For the lights on top of the car, take the outer shell of the car and drill 6 holes in the roof in a line. Use a drill press and a drill bit with a guage slightly less than than the size of the LEDs. Make sure to use mineral oil or another lubricant while drilling because the soft plastic heats up and starts to melt very fast. Clean the drill holes of excess plastic and then widen the holes a tiny bit by hand using the drill bit. Make sure the LEDs fit in tightly.
Take the base of the car and make sure your Arduino can fit comforably. At this point you will need to consider the location for your motor and how you will connect the axle to the motor. Our very kind machinist designed a pulley system for our axle and motor. We cut a section out of the base to allow room for the pulley around the axle and set the motor behind the Arduino between the back wheels. Make sure to leave room for a couple batteries because your ardunio and all the other components need a power source. You may have to lift the body a bit.
Step 3: Wiring the Lights
The lights need to be wired in parallel to shine brightly, but also to have resistors so as not to blow them out. The resistance will vary based on the type of LED you chose and the power source. We used 5mm superbright LEDs with 330 ohm resistors and a 9V battery as a power supply.
Put a resistor in series with each LED, then wire the three red LEDs in parallel with each other and the three blue LEDs in parallel with each other. Wire all the LEDs to a common ground, such as the ground of the battery. Make sure to wire the Arduino’s ground to that ground as well.
This is the circuit diagram for our lights, Red Input and Blue Input imply a connection to one of the Arduino’s digital ports. There will be a full circuit diagram for how to wire everything to the Arduino later on.
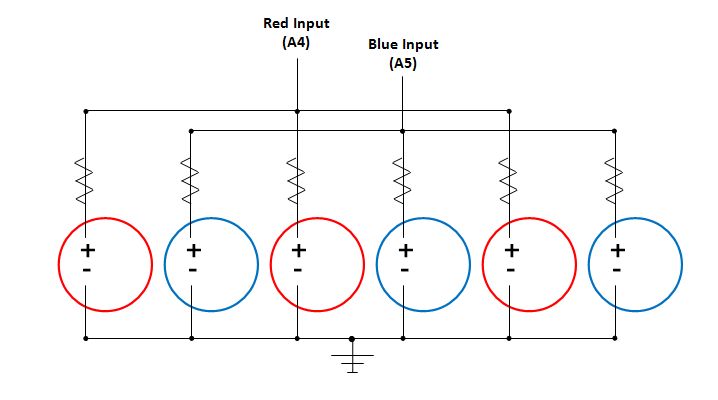
You could also opt to use 6 RGB LEDs and those can be very bright, so it may be a good option if you have them available. Wire them in the same manner as you would the single color LEDs, using only the pin of the color you want to light up. Or wire separately to both the red and blue pins and play with code for more complicated light sequences.
[box color=”#985D00″ bg=”#FFF8CB” font=”verdana” fontsize=”14 ” radius=”20 ” border=”#985D12″ float=”right” head=”Major Components in Project” headbg=”#FFEB70″ headcolor=”#985D00″]-Plastic Model Car, preferably snap together. We used a 1:25 scale and that seemed to be a little on the small side (http://www.amazon.com/gp/product/B000JSNYU6/ref=oh_o00_s00_i00_details)
-3 Superbright red LEDs (http://www.sparkfun.com/products/528)
-3 Superbright blue LEDs (http://www.sparkfun.com/products/529)
-A small buzzer or speaker (http://www.sparkfun.com/products/7950 or http://www.sparkfun.com/products/9151)
-A small motor (http://www.sparkfun.com/products/10171)
-A Darlington transistor (http://www.sparkfun.com/products/312)
-A photodiode (http://uk.rs-online.com/web/p/photodiode/6655331/)
-A flashlight, preferably quite bright. Or possibly a laser pointer, experiment!
-Wire
-2 9V Batteries
-1/4 Watt Resistors: 6 330 ohm resistors for the LEDs, a 100 ohm resistor for the buzzer, a 10,000 ohm resistor for the photo diode.
-Perforated PVC sheet or printed circuit board: You can design and print your own circuit boards if you have the resources. It will make for a tidier interior of the car and an easier soldering process. You can also wire and solder to a perforated sheet of PVC.
-Solder and Soldering Iron
-Breadboard for testing setups
-An Arduino Uno
-The Arduino program
-Gears for your motor and axle?
-Multimeter for testing
-Paint and decorations for your care[/box]
For more detail: Model Police Car using an Arduino