Summary of Mini BillBoard
Designing a Mini BillBoard using LED Lights, Arduino and Bread Board — Summary: A mini billboard spells the name Josh using different colored LEDs on breadboards controlled by an Arduino Uno. LEDs are wired with 220Ω resistors and jumper wires to Arduino pins and ground; the board blinks the letters to mimic a billboard. Power is supplied from a laptop or 5V adapter and code uploaded to Arduino controls the blinking sequence.
Parts used in the Mini BillBoard:
- Two breadboards
- LED lights (different colors)
- 220Ω resistors
- Jumper wires
- Cardboard box (optional)
- Arduino Uno
- Power source (laptop or 5V adapter)
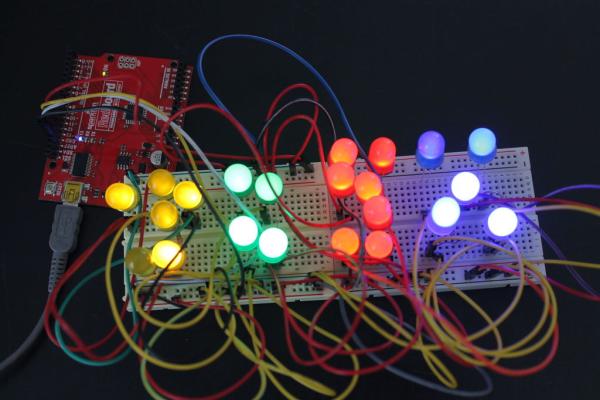
Designing a Mini BillBoard using LED Lights(different colors) , Arduino and Bread Board. Thought of creating a mini billboard, that could display my name (“Josh”) . This is for one of the build nights (required us to use LED lights). This billboard would blink in out josh several times just like any big billboard. Here is a link to the video of the project Mini BillBoard . Follow me on twitter @SJTGs
Step 1: Tools Needed for This Project
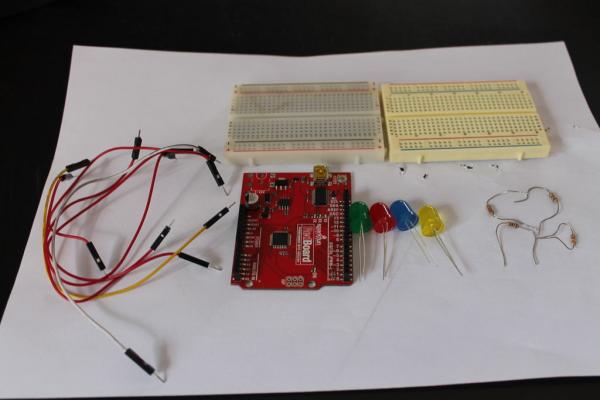
Tools needed for this project :
- Two Bread Boards
- LED lights with different Colors
- 220Ω Resistors
- Jumper Wires
- Card Box optional
- Arduino uno
- Power source (Laptop or 5v adapter)
All the mentioned tools are basic need for the project to work.
Step 2: Connecting the Dots
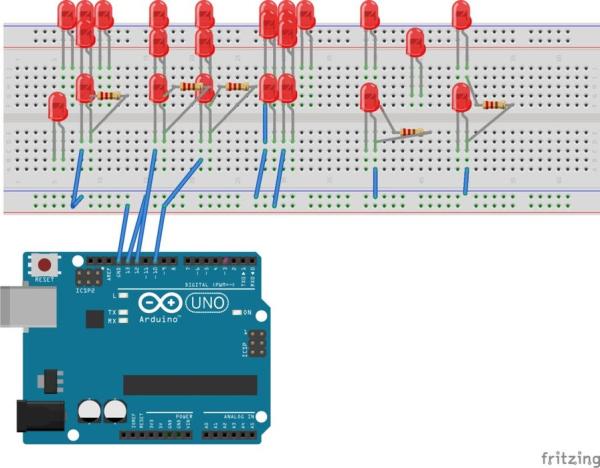
- This step will require you to connect the LED lights to the board. I connect mine in form of letters.
- Next connect the 220Ω Resistors as shown in the above image.
- Connecting the jumper wires to the board. This will provide connection between the Arduino to the bread board.
- Connect one of the jumper wires to the GND (negative) and the one of the positive like that in the diagram
The above diagram shows how the cables and tools need to be connected. If you are unclear ask!!!!!!!
Step 3: the Source Code
This part of the step will require the user to input in the source code to make the the mini billboard work. I have include the source needed for this project. This code is self explanatory.
Read more: Mini BillBoard
- What is the purpose of the resistors?
220Ω resistors are used to limit current to the LEDs as shown in the wiring step. - How are the LEDs connected to the Arduino?
LEDs are placed on the breadboards, connected via jumper wires to Arduino pins and to GND, with resistors in series as shown in the diagram. - Can I use different colored LEDs?
Yes, the project uses LED lights with different colors to form the letters. - What powers the Arduino and LEDs?
The power source can be a laptop USB or a 5V adapter as listed in the tools. - Do I need two breadboards?
The project lists two breadboards as needed for arranging the LEDs and wiring. - Is a cardboard box required?
Cardboard box is optional for mounting or housing the billboard. - Where does one wire the ground connection?
One jumper wire should connect the breadboard ground rail to the Arduino GND as described. - How do I make the billboard blink?
The provided Arduino source code controls the blinking sequence when uploaded to the Arduino.