Summary of How to Make a Programmable Guitar Pedal With Arduino!
This article introduces pedalSHIELD UNO, an open-source DIY guitar pedal project enabling users to create custom effects like distortion and fuzz using Arduino UNO. It requires no deep expertise in DSP or electronics, allowing programming in C/C++ or selection of pre-made effects from the ElectroSmash forum. The system processes audio through input amplification, Arduino-based digital signal processing, and PWM output stages.
Parts used in the pedalSHIELD UNO Guitar Pedal:
- Ceramic capacitors (6.8n, 100n, 270p)
- Electrolytic capacitors (4.7u)
- Resistors (4.7K, 100K, 1M, 1M2)
- 500K resistor trimmer
- 3mm blue LED
- TL972 rail-to-rail op-amp
- DIP 8 socket
- 3PDT footswitch
- SPDT toggle switch
- Pushbutton switches
- 40-pin header
- Stereo 6.35mm audio jacks
This DIY Guitar Pedal project is for guitarists, hackers, and programmers that want to learn about digital signal processing, effects, synthesizers, and experiment without deep knowledge of DSP, electronics, or hardcore programming. pedalSHIELD UNO is a lo-fi, programmable guitar pedal that works with the Arduino UNO/Genuino UNO boards and is Open Source & Open Hardware. Learn to create your own programmable DIY Guitar Pedal and add effects such as distortion, fuzz, and more to your music. You can program your own effects in C/C++ or even use the ready-to-play effects from the ElectroSmash forum we have set up to support this project.
You can either get the PCB for this project on the ElectroSmash store or you can make your own on a breadboard by following the schematics in this tutorial. Check out this demo video of the Arduino DIY Guitar Pedal:
Required Materials
| Reference | Qty | Value | Description | Part Reference | ||||
| Capacitors | ||||||||
| C5,C2, C7, C8, C9 | 5 | 6.8n | ceramic cap | SR211C682MARTR1 | ||||
| C3, C6, C10 | 3 | 4.7u | electrolytic cap | ECE-A1EKA4R7 | ||||
| C1, C11 | 2 | 100n | ceramic cap | K104K10X7RF5UH5 | ||||
| C4 | 1 | 270p | ceramic cap | D271K20Y5PH63L6R | ||||
| Resistors | ||||||||
| R12,R13, R10, R9, R6, R4, R3 | 7 | 4.7K | Resistor, 1%,1/4W | MFR-25FRF52-4K7 | ||||
| R5, R7, R8, | 3 | 100K | Resistor, 1%,1/4W | MFR-25FRF52-100K | ||||
| R1, R2 | 2 | 1M | Resistor, 1%,1/4W | MFR-25FRF52-1M | ||||
| R11 | 1 | 1M2 | Resistor, 1%,1/4W | MFR-25FRF52-1M2 | ||||
| Others | ||||||||
| RV1 | 1 | 500K | resistor trimmer | 3319W-1-504 | ||||
| D1 | 1 | Led 3mm blue | blue led 3mm | SSL-LX3044USBC | ||||
| U1 | 1 | TL972 pdip-8 | op-amp rail-to-rail | TL972 | ||||
| IC Socket | 1 | dip 8 socket | socket dor dip8 | 1-2199298-2 | ||||
| SW1 | 1 | 3DPT footswitch | 3PDT footsitch | 107-SF17020F-32-21RL | ||||
| SW2 | 1 | Toggle switch | SPDT toogle switch | 612-100-A1111 | ||||
| SW3, SW4 | 2 | Pushbutton | off-on pushbutton | 103-1013-EVX | ||||
| Conn1,2,3,4 | 1 | 40 pin header | 2.54 pitch pin header | |||||
| J1, J2 | 2 | 1/4 Jack audio | stereo 6.35mm jack | NMJ6HCD2 | ||||
How Does it Work?
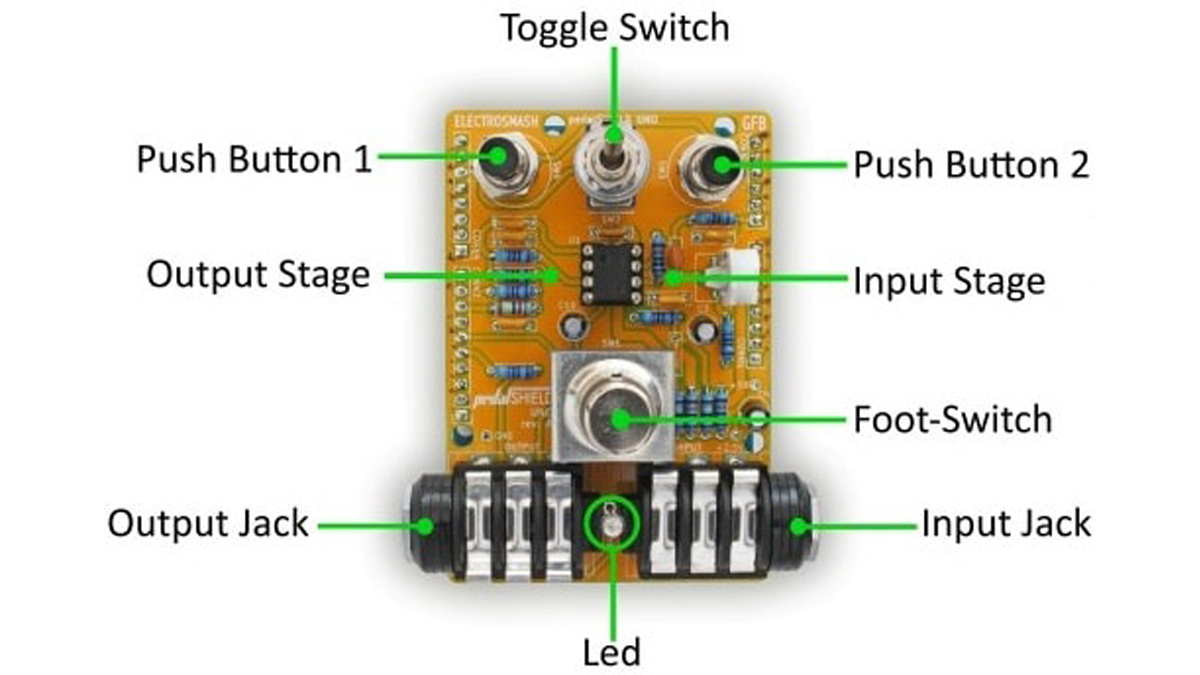
The system consists of three stages:
- The Input Stage: Amplifies and filters the guitar signal making it ready for the Arduino Uno ADC (Analog do Digital Converter).
- Arduino Board: Takes the digitalized waveform from the ADC and does all the Digital Signal Processing (DSP) creating effects (distortion, fuzz, volume, metronome…).
- The Output Stage: Once the new waveform is created, the signal is taken from the Arduino digital outputs (two PWMs combined) and prepared to be sent to the next pedal or the guitar amp.
Read More: How to Make a Programmable Guitar Pedal With Arduino!
- Who is this DIY guitar pedal project intended for?
Guitarists, hackers, and programmers who want to learn about digital signal processing without deep knowledge of DSP, electronics, or hardcore programming. - Can I program my own effects for this pedal?
Yes, you can program your own effects in C/C++ or use ready-to-play effects from the ElectroSmash forum. - What board does this project work with?
The pedalSHIELD UNO works with Arduino UNO/Genuino UNO boards. - How do I obtain the PCB for this project?
You can get the PCB from the ElectroSmash store or make your own on a breadboard using the provided schematics. - What are the three main stages of the system?
The system consists of an Input Stage, an Arduino Board stage, and an Output Stage. - How is the audio signal processed by the Arduino?
The Arduino takes the digitalized waveform from the ADC to perform Digital Signal Processing to create effects like distortion, fuzz, and volume. - How is the final signal sent to the amp?
The signal is taken from two combined Arduino PWM outputs and prepared to be sent to the next pedal or guitar amp. - Is this project open source?
Yes, the pedalSHIELD UNO is Open Source and Open Hardware.