Summary of Make a Mini LED Siren powered by Arduino
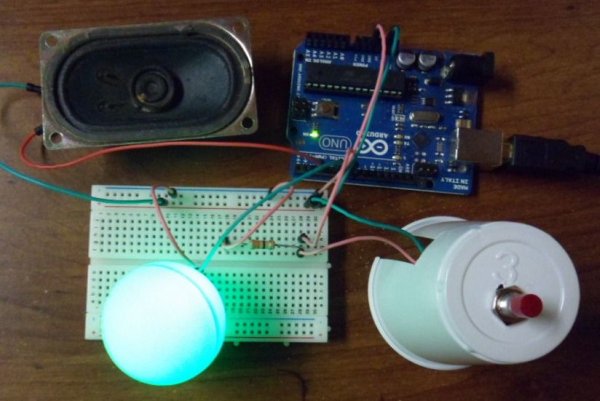
This Arduino project creates a mini siren featuring a fading and blinking LED alongside an audible alarm. The build involves soldering components to a breadboard, housing the electronics inside a modified ping pong ball, and programming the Arduino Uno to control the light and sound effects. It serves as an introductory exercise for beginners learning basic LED and speaker integration with microcontrollers.
Parts used in the Mini LED Siren:
- Arduino Uno
- USB cable for the Arduino
- Solderless breadboard
- Breadboard jumper wires
- LED (Any color)
- Small resistor(s)
- Small speaker
- Ping pong ball
- Soldering iron
- Electrical solder
- Pliers
This is one of the first projects I have made with Arduino. It’s a little siren with a LED that fades and blinks on and off. It demonstrates basic use of LEDs and speakers. Also check out this article: 8-Pin Programming Shield
Constructive criticism is appreciated!
Let’s get started!
Step 3: Drill a hole in the table tennis ball
Step 4: Wiring it up
Get power to the breadboard:
Run a jumper wire from the Arduino GND pin to a breadboard “-” row.
Run a jumper wire from the Arduino 3.3v pin to a breadboard “+” row.
Wire the button:
Run one of the buttons wires to anywhere on the breadboard’s “+” row.
Run the other wire to an empty column on the breadboard.
Run a resistor from the button wire column to an empty column.
Run a wire from the resistor column to Arduino pin 7.
Wire the LED:
Stick the LED on to the breadboard. Slide each pin into a different column.
Run a wire from the positive LED column to Arduino pin 5.
Run a wire from the negative LED column to breadboard “-” row.
Materials & Tools
Fist off, gather your materials and tools. I am assuming that you known the basics of Arduino and how to solder.
Materials:
–Arduino Uno
–USB cable for the Arduino (sometimes called a printer cable)
–solderless breadboard
–breadboard jumper wires
–LED (Any color)
-A small resistor or two.
–small speaker (I found one for $2 at a thrift store)
–Ping pong ball
Tools:
–soldering iron
–electrical solder
–pliers
- What is the main purpose of this Arduino project?
The project demonstrates the basic use of LEDs and speakers by creating a mini siren that fades and blinks. - How do you power the breadboard in this setup?
You run a jumper wire from the Arduino GND pin to the negative row and another from the 3.3v pin to the positive row. - Which Arduino pin connects to the button?
A wire runs from the resistor column connected to the button to Arduino pin 7. - How is the LED connected to the Arduino?
The positive LED pin connects to Arduino pin 5, while the negative pin connects to the breadboard's negative row. - What tool is required to modify the ping pong ball?
A Dremel tool is used to drill a hole large enough for the LED bulb to fit inside the bottom of the ball. - Can I use any color LED for this project?
Yes, the article states you can use an LED of any color. - Where did the author find the small speaker?
The author found a small speaker for $2 at a thrift store. - What skills are assumed before starting this project?
The article assumes the reader knows the basics of Arduino and how to solder.