A simple project to display cool 8bit art and animation on your backpack! This is a quick and easy project you could finish off in minutes and show off to your friends. What it does is, when you move your backpack, a dot matrix display turns on and shows any character you have programmed in it. In this case its a fun pixelated character.

Required Materials
1. MAX7219 Dot Matrix Display Module
2. Arduino <Any version>
3. 9v Battery & Connector / Any other portable power source.
4. ADXL335 Accelerometer Module
5. Jumper wires
How Does it Work?
The objective of the project is to light up a character on a dot matrix display. The display should light up when you move the bag. There are two parts to this project.
Part 1: The Wake Part
This part uses the accelerometer to sense when the bag moves. The accelerometer sends this data to the Arduino via the ‘Analog In’ pins.
Part2: The Display Part
The display shown on the LED matrix is driven by the MAX7219 IC. It talks to the Arduino using the SPI protocol. But we don’t need to know much about this because there’s a library “ledcontrol” that does the job for us.
Wiring Up the Dot Matrix Display, Arduino, and Accelerometer

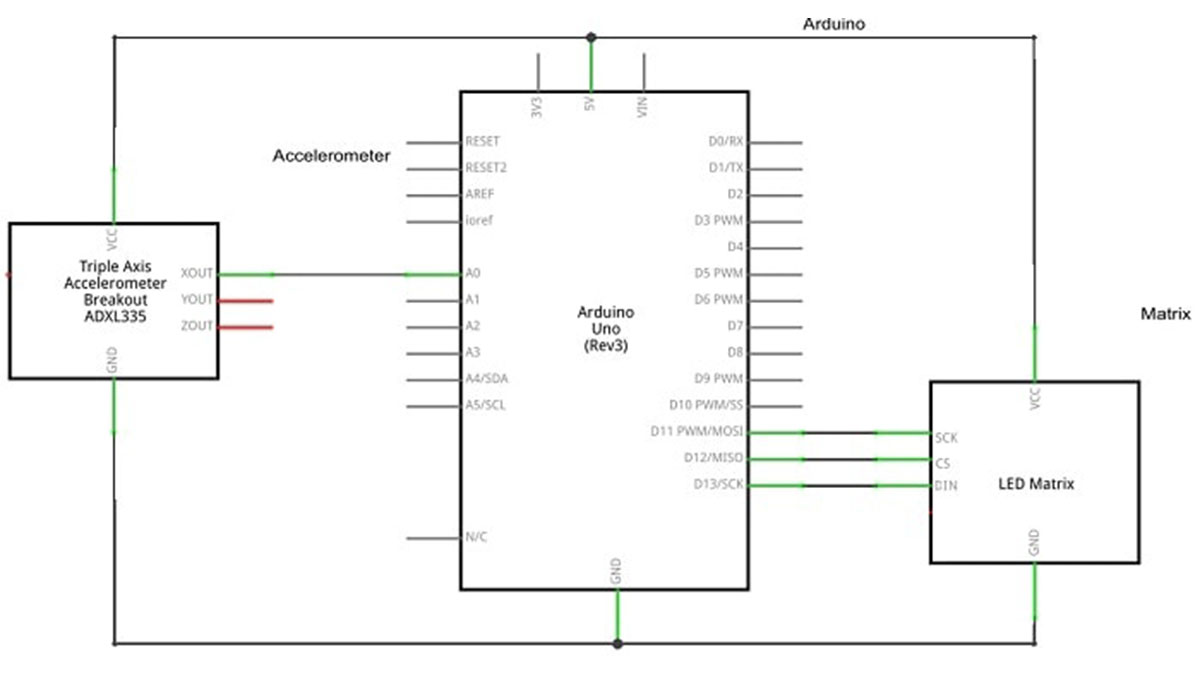
The circuit is as straight forward as it gets. The accelerometer returns analog values for acceleration in each axis. But here we only need the values for one axis. So connect either the X,Y or Z axis output from the accelerometer to any of the analog input pins (I have used A0 in the code provided). Power up the accelerometer. Be careful at this point because some modules use 3.3V and some use 5V. Give power accordingly or else you might end up with a burnt module. Connect its ground (GND) to the ground on the Arduino.
The dot matrix display has 3 input pins DIN (Data in), CS (Chip Select) and CLK (Clock). These are SPI (Serial Peripheral Interface) pins. Like I said before, the library does the job for us 🙂 They are all digital, connect them to any of the GPIO pins. I connected DIN to pin 13, CS to pin 12, CLK to pin 11 in the code provided.
The dot matrix display takes in power via the 5V pins from the Arduino. Connect ground (GND) to the ground on the Arduino. And that’s all there is with the circuit.
The Code
We should include the LedControl.h library to our code. This is what makes talking to the LED dot matrix display extremely easy.
As this is not an included library in the Arduino IDE, we should manually add it. If you don’t know how to, follow this guide to importing libraries on Arduino.
The code:
#include "LedControl.h"
LedControl lc=LedControl(13,11,12,1);
int a[5],k=0,rno=0;
unsigned long delayTime=200;
byte invader1a[] =
{
   B00011000,  			// First frame of invader #1
   B00111100,
   B01111110,
   B11011011,
   B11111111,
   B00100100,
   B01011010,
   B10100101
};

byte invader1b[] =
{
  B00011000, 			// Second frame of invader #1
  B00111100,
  B01111110,
  B11011011,
  B11111111,
  B00100100,
  B01011010,
  B01000010
};

byte invader2a[] =
{
  B00100100, 			// First frame of invader #2
  B00100100,
  B01111110,
  B11011011,
  B11111111,
  B11111111,
  B10100101,
  B00100100
};

byte invader2b[] =
{
  B00100100,		 	// Second frame of invader #2
  B10100101,
  B11111111,
  B11011011,
  B11111111,
  B01111110,
  B00100100,
  B01000010
};

void lister(){			//  Makes a stack of the analog input from A0
  for (k=0;k<4;k++){
    a[k]=a[k+1];
   }
  a[4]=analogRead(A0)/75;
  Serial.print("Input = ");
  Serial.println(a[4]);
 delay(100);
 }

int check(){			// Checks all the values in the stack and returns 1 if any value is different
  int flag=0;
  for(k=0;k<4;k++){
    if(a[k]!=a[k+1]){
      flag=1;
      break;
    }

  }
  return(flag);
}

void sinvader1a()		// Draws frame one from invader #1
{
  for (int i = 0; i < 8; i++)
  {
    lc.setColumn(0,i,invader1a[i]);
  }
}

void sinvader1b()		// Draws frame two from invader #1
{
  for (int i = 0; i < 8; i++)
  {
    lc.setColumn(0,i,invader1b[i]);
  }
}

void sinvader2a()		// Draws frame one from invader #2
{
  for (int i = 0; i < 8; i++)
  {
    lc.setColumn(0,i,invader2a[i]);
  }
}

void sinvader2b()		// Draws frame two from invader #2
{
  for (int i = 0; i < 8; i++)
  {
    lc.setColumn(0,i,invader2b[i]);
  }
}

void setup(){
  lc.setIntensity(0,5); 	 // Set intensity level
  lc.clearDisplay(0); 		 // Clear Display
}

void disp(long sel){ 		// Displays invader depending on the arguments recived
  if(sel==1){
    sinvader1a();
    delay(delayTime);
    sinvader1b();
    delay(delayTime);
    }
    if(sel==2){
    sinvader2a();
    delay(delayTime);
    sinvader2b();
    delay(delayTime);
    }
  }

void loop(){

  int inc=-1,test;
  lister();
  test=check();
  Serial.print("Test = ");
  Serial.println(test);
  if (test==1){
    lc.shutdown(0,false);	//Truns on the display
    disp(rno);
    }
   else{

    if(rno==0||rno==1)
     inc=-inc;

     rno=rno+inc;
     lc.shutdown(0,true);	// Turns off the display
    }
}
Here are some of the basic functions in the header:
Read More: How to Make a 8bit Dot Matrix Display Using Arduino
