I have one M5Paper which is equipped an ePaper touch screen 540 x 960 pixels, temperature and humidity sensor, real-time clock, microSD, 03 x HY2.0-4P ports. It can connect to WIFI, bluetooth, or implement other protocols like: I2C, UART, DAC/ADC via extension ports and a magnetic attachment system….
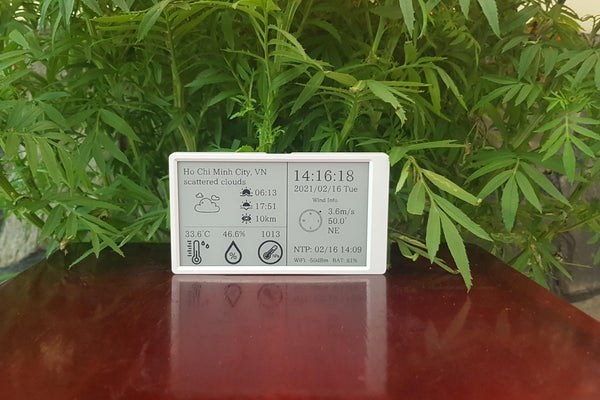
Today, I’d like to share my home weather station by using this M5Paper.
Let’s getting started.
Step 1: Things We Need
Hardwares:
- 1pcs x M5Stack® M5Paper ESP32 Development Kit 960X540 4.7 Inch eInk Display 235 PPI IoT Terminal E-Book Industrial Control Panel
- 1pcs x USB-C programming cable.
Softwares:
- Visual Studio Code.
- PlatformIO IDE for VSCode (Extension).
- LCD Image Converter: It can transform your bitmaps and fonts to “C” source format.
Step 2: About M5Paper
M5Paper features:
- ESP32-D0WDQ6-V3 @ 240 MHz dual core, 600 DMIPS, 520 KB SRAM.
- Screen: ePaper / eInk multipoint touchscreen, 4.7 “, 540 x 960 pixels @ 235ppi, 180 degree viewing angle.
- Connectivity: Wi-Fi with 3D antenna, dual mode Bluetooth.
- Memory and storage: 16 MB flash memory, PSRAM 8MB, Micro SD card reader up to 16GB.
- Built-in RTC BM8563.
- Built-in temperature and humidity SHT30.
- Built-in Magnet.
- Internal 1150mAh LiPo battery.
- Expansion connectors x3 HY2.0-4P.
It can be used for the following applications: IoT Terminal, E-Book, Industrial Control Panel, Smart Home Panel….
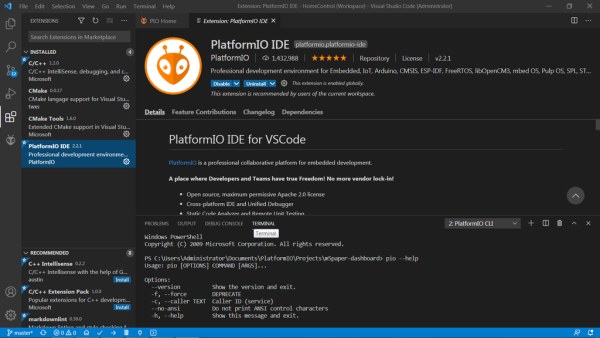
Step 3: Installing VSCode and PlatformIO IDE Extension
M5Paper can be programmed by classic Arduino IDE, MicroPython or UIFlow (M5Stack’s graphical IDE) and so on….Previously I had tested some M5Paper sample codes by Arduino IDE from internet, it caused errors and I couldn’t return to original factory test. Then I found that M5Paper original factory test program is developed by VSCode + PlatformIO IDE extension therefore I took my times to install & learn. This is a tool I’ve never used previous time, but after I studied some basic knowledge, it really seem like to be a good platform.
To install VSCode and PIO for M5Paper, I followed below steps:
- Firstly, I downloaded Visual Studio Code from https://code.visualstudio.com base on my computer operating system Windows 7(/ macOS/ Linux)… and installed it to computer.
- Secondly, I opened VSCode, go to Extensions Tab ‣ Type PlatformIO IDE at “Search Extensions in Marketplace” ‣ Click “Install“. There are many extensions here, we can install more depending on our needs.
Thirdly, I entered to PIO Home ‣ Click Libraries tab ‣ Search and install “M5Stack by Zibin” and “M5EPD by m5stack“
Step 4: Overview Weather Station Idea
To do this weather station, I was inspired by estshorter with his M5Paper dashboard project at:
https://github.com/estshorter/m5paper-dashboard
Since the M5Paper is new product and it doesn’t have many resources to refer to, so for me this is a good starting point, both in terms of M5Paper and PlatformIO.
The time & weather information are described in the below picture.
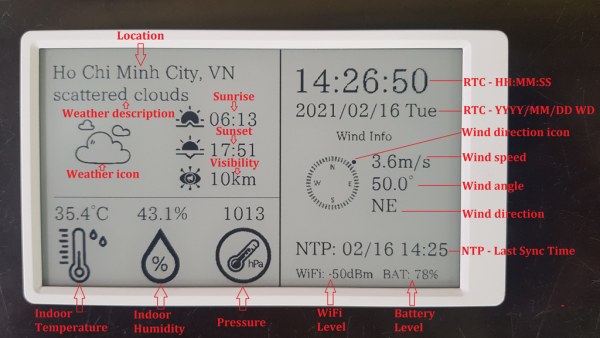
- The indoor temperature and humidity are read from a built-in SHT30 sensor.
- Time information is read from a RTC built-in sensor BM8563 and it can be synchronized with NTP Time Server.
- The other weather information like: pressure, wind, sunrise & sunset time, visibility, weather icon & description…are read from openweathermap.org
Step 5: Programming
The code is available at my GitHub. Thank to estshorter for his good reference source related to M5Paper.
https://github.com/tuenhidiy/m5paper-weatherstatio…
Notes:
– Change your Wi-Fi parameters in “src/WiFiInfo.h”.
– Weather, sunrise & sunset, temmperature, humidity, visibility, pressure, wind … icons are converted to “C” codes and located at:
- “scr/WeatherIcons.c”
- “scr/THPIcons.c”
- “scr/WindIcons.c”
Step 6: Libraries
1. LovyanGFX library:
This is a graphics library that compatibles with M5Paper, display driver: IT8951.
https://github.com/lovyan03/LovyanGFX
2. M5EDP library version 0.1.1
This is an official library for M5Paper from M5Stack.
https://github.com/m5stack/M5EPD
3. ArduinoJson version 5.13.4
This library is used to make the HTTP query and read the response from OpenWeatherMap.
https://github.com/bblanchon/ArduinoJson/releases
We can learn how to generate a JSON document on Arduino follwing this tutorial:
https://arduinojson.org/v5/doc/serialization/
We can see all libraries in file “platformio.ini”
lib_deps =
	https://github.com/lovyan03/LovyanGFX
	m5stack/M5EPD@^0.1.1
	bblanchon/[email protected]
Step 7: Icons Collection
1. Weather icons set by Dooder
https://www.iconfinder.com/iconsets/weather-413
Take note that we should rename the weather icons same like on OpenWeatherMap, detail information at:
https://openweathermap.org/weather-conditions
The “Weather icons set by Dooder” on top link has been named according to their names on OpenWeatherMap.
Because OpenWeatherMap clearly identifies icons between day and night, so that their names have the suffix “D” or “N“.
2. Temperature, humidity, pressure, sunrise, sunset and visibility icons:
These icons are easy to find on the internet in black and white format. We can choose the icons that we like, download, and resize them to fit with our dashboard.
3. Wind icons
These wind icons are hard to find on the internet in black and white format. The icon set below I found at the Home Assistant Community forum and made a little tweaking by adding a black dot indicating the wind direction because M5STACK only shows grayscale images so the red color of indicating point won’t be visible.
There are totally 16 wind directions as declared in “WindIcons.c”:
#define TXT_N       	"N"
#define TXT_NNE     	"NNE"
#define TXT_NE      	"NE"
#define TXT_ENE     	"ENE"
#define TXT_E       	"E"
#define TXT_ESE     	"ESE"
#define TXT_SE      	"SE"
#define TXT_SSE     	"SSE"
#define TXT_S       	"S"
#define TXT_SSW     	"SSW"
#define TXT_SW      	"SW"
#define TXT_WSW     	"WSW"
#define TXT_W       	"W"
#define TXT_WNW     	"WNW"
#define TXT_NW      	"NW"
#define TXT_NNW     	"NNW"
Source: M5Paper Weather Station