
Summary of Lightweight GSM Mobile With Arduino UNO and Nextion Display
This article details a lightweight GSM mobile project by Avishek Hardin, utilizing an Arduino UNO, SIM900A module, and Nextion touch display. The device supports making/receiving calls, sending/receiving SMS, and deleting messages. It features a user-friendly interface designed via Nextion Editor, communicating with the microcontroller over UART to optimize MCU memory usage.
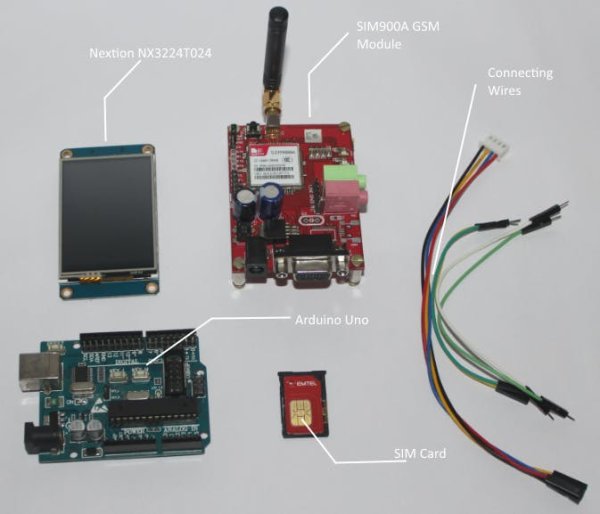
Parts used in the Lightweight GSM Mobile:
- Arduino Uno
- SIM900A GSM module
- Nextion TFT Intelligent LCD Touch display
- SIM card
- Connecting wires
- External mic & speaker
- Stylus
Avishek Hardin at Arduino Project Hub designed a lightweight mobile using a GSM module, an Arduino UNO, and a Nextion touch screen display. The lightweight mobile has the following features:
- Make calls
- Receive calls
- Send SMS
- Receive SMS
- Delete SMS
In this project, he uses a GSM SIM900A module to establish the cellular communication. The GSM SIM900A is an all-in-one cellular module that lets you add voice, SMS, and data to embedded projects. It works on frequencies 900/1800MHz and uses the RS232 standard to communicate with MCUs. Baud rate of this module is adjustable from 9600 to 115200 through specific AT Commands.
This GSM mobile features a Nextion touch display to take input from the user and visualize the GUI. Its easy-to-use configuration software (Nextion Editor) allows you to design your own interfaces using GUI commands. All GUI data is stored in Nextion display instead of the master MCU. Thus, lots of program space in MCUs can be saved efficiently and it makes the development procedure effortless. The Nextion displays communicate with microcontrollers over UART which is supported by a wide range of MCUs.
Required Parts
- Arduino Uno.
- SIM900A GSM module.
- Nextion TFT Intelligent LCD Touch display.
- SIM card.
- Connecting wires.
- External mic & speaker.
- Stylus.
Required Tools
- Nextion Editor.
- Paint.net.
- Arduino IDE.
Connection
Connect the Nextion display and the GSM module with your Arduino using following instructions:
- Nextion +5V to Arduino VDD_5v.
- Nextion RX to Arduino pin 11
- Nextion Tx to Arduino pin 10
- Nextion GND to Arduino GND_0v.
- GSM Rx to Arduino pin 1
- GSM TX to Arduino pin 0
- GSM GND to Arduino GND_0v.
- What are the main features of this lightweight mobile?
The device can make calls, receive calls, send SMS, receive SMS, and delete SMS. - How does the GSM SIM900A module communicate with the microcontroller?
It uses the RS232 standard to communicate with MCUs over frequencies 900/1800MHz. - Can the baud rate of the GSM module be adjusted?
Yes, the baud rate is adjustable from 9600 to 115200 through specific AT Commands. - Where is all GUI data stored in this project?
All GUI data is stored in the Nextion display instead of the master MCU to save program space. - How do the Nextion displays communicate with microcontrollers?
They communicate with microcontrollers over UART which is supported by a wide range of MCUs. - Which software is required to design the interface for the Nextion display?
The easy-to-use configuration software called Nextion Editor is used to design interfaces. - Which pins on the Arduino connect to the GSM module?
GSM Rx connects to Arduino pin 1, GSM TX connects to Arduino pin 0, and GSM GND connects to Arduino GND_0v. - What tools are needed to complete this project?
The required tools are Nextion Editor, Paint.net, and Arduino IDE.
