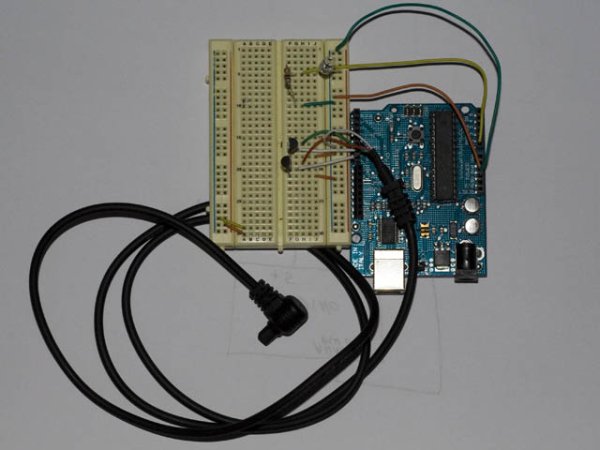
I knew there were devices that could trigger a camera to fire during a lightning strike, but their circuits were more complicated than I wanted to make. I’m a software guy not a hardware guy so I decided to use an Arduino and that allowed me to write a little code that made the circuit much simpler.
Before I got started I looked at this wikipedia article about lightning so that I could verify this project would work. It has a lot of interesting information about lightning, but the most useful piece of data in the wikipedia article is the time lapse shot of a lightning strike. From the time lapse photo I was able to determine the duration of a lightning strike is about 100 ms. Then from this page I found my Canon 30d camera has a shutter lag of 65 ms. I know from a past project that if I use a reverse biased photo transistor to detect light it has a response time under 1 ms. The last piece of delay is the software running on the Arduino board and since it’s running at 16 MHz I am sure I can run a tight loop that takes under 1 ms. Adding up all the delays, I get 67 ms which is still much less than the 100 ms duration of a lightning strike so I was pretty confident this would work before I started work on the prototype.
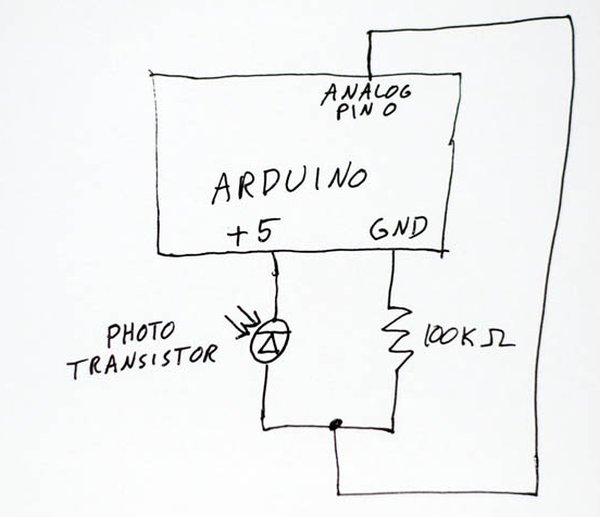
The circuit I used to detect the light from the lightning was a very simple circuit that looked like the above circuit diagram. I used a cheap infrared photo transistor because that’s what Radio Shack had. I noticed that the sun, my house lights, and lightning all pump out plenty of infrared light for this circuit to detect. If this circuit is not sensitive enough try changing the value of the resistor. Larger resistance values should help sensitivity when there is only a little infrared light and smaller resistance values should help sensitivity when there is a lot of infrared light.
I also needed a circuit to trigger the camera. I already have written a short tutorial about how to do that here.
The last thing I needed to do was write some software. At first I thought I’d just have a threshold value that triggered the camera. That would work, but I’d need to calibrate the threshold value to different values depending on the environment. Instead I have the software look for a rapid change in the amount of infrared light detected. This works great because lightning causes a very rapid change.
Here is the code.
// Maurice Ribble
// 6-1-2008
// http://www.glacialwanderer.com/hobbyrobotics

// This code uses my camera trigger and lightning detector.
// It waits for a sudden change in the light intensity
// and then triggers the camera.

#define SHUTTER_PIN 7
#define LIGHTNING_TRIGGER_ANALOG_PIN 0
#define TRIGGER_THRESHHOLD 5

int lightningVal;

void setup()
{
  pinMode(SHUTTER_PIN, OUTPUT);
  digitalWrite(SHUTTER_PIN, LOW);
  Serial.begin(9600); // open serial

  lightningVal = analogRead(LIGHTNING_TRIGGER_ANALOG_PIN);
}

void loop()
{
  int cmd;
  int newLightningVal = analogRead(LIGHTNING_TRIGGER_ANALOG_PIN);
  Serial.println(lightningVal, DEC);

  if (abs(newLightningVal - lightningVal) > TRIGGER_THRESHHOLD)
  {
    digitalWrite(SHUTTER_PIN, HIGH);
    delay(1000); // May want to adjust this depending on shot type
    digitalWrite(SHUTTER_PIN, LOW);
    Serial.println("Shutter triggered");
  }

  lightningVal = newLightningVal;
}
Here are a few example pictures from Adam Bell. He used this blog to make a lightning shutter trigger. Traditionally lightning is captured at night. This lightning shutter trigger could do that (while you sleep), but where this device creates new opportunities is photographing lightning during the day. Peoples’ reflexes just are fast enough to get pictures like these. Thanks for the examples Adam!
For more detail: Lightning Shutter Trigger for a Camera using Arduino


