This a Knight Rider Style LED Chaser Done with a Arduino Duemilanove with an ATmega328 chip.
Step 1:
Things you’l need:
6 LEDs (any color)
1 Breadboard
1 100 Ohm Resistor
12 Breadboard Jumpers
1 Arduino Duemilanove “or” Decimila
1 USB cable with A-type connector on one end, and B-type on the other. (See photos)
Arduino IDE software (www.arduino.cc)
1 PC or Laptop with Windows 98′ or better

Step 2:
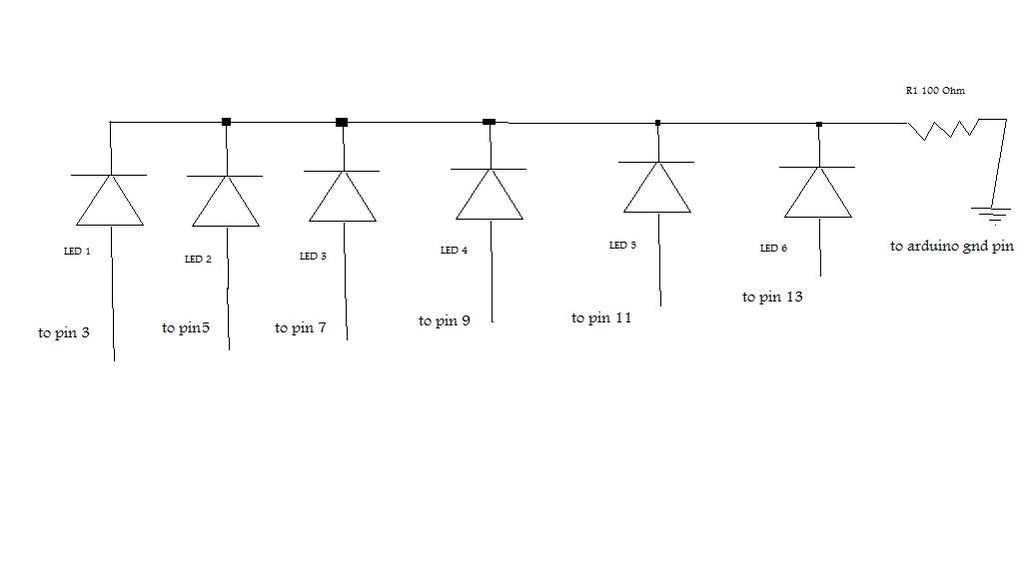
Follow the schematics for wiring the LED array using your breadboard and jumpers. Don’t forget to include the 100 Ohm current limiting resistor, or you’ll be replacing your LEDs. the schematic Above indicates which pins to connect to which LED on the arduino. most arduinos have pin numbers printed right next to the headers on the curcuit board.
Step 3:
Next you’ll need to install the programmig software for the arduino onto your computer. the programming IDE can be downloded for free from: www.arduino.cc download and install the IDE, and sync up your arduino using the USB cable in your materials list. most arduinos come with one, but if yours did not, they can be purchased very cheaply on ebay, or at your local walmart. After the software is in your computer, make sure it is installed correctly, by checking the device manager. for Vista click start, then right click on computer, then manage. the menu on the leftside of your window will have a listing that reads “device manager” click that, and look at your “USB ROOT HUB” if it is installed correctly the you should see the words “USB COMPOSITE DEVICE” somewhere in that list this it is the arduino. close that out. and run the arduino IDE program, in the top tool bar, click tools and go to “Boards” it will list all the arduino boards iin existence, for this project you will need to click on the one called “Duemilanove328” then click tools again, this time go to “serial ports” and click on COM1.In the main field of the IDE editor. Copy and paste the code below.
#define LED1 3
#define LED2 5
#define LED3 7
#define LED4 9
#define LED5 11
#define LED6 13
void setup()
{
{
pinMode(LED1, OUTPUT);
pinMode(LED2, OUTPUT);
pinMode(LED3, OUTPUT);
pinMode(LED4, OUTPUT);
pinMode(LED5, OUTPUT);
pinMode(LED6, OUTPUT);
}
}
void loop()
{
1 Breadboard
1 100 Ohm Resistor
12 Breadboard Jumpers
1 Arduino Duemilanove “or” Decimila
For more detail: Knight Rider Rides Again using an Arduino