Summary of Kaleiduino: A Battery Powered Arduino LED Kaleidoscope
This Instructable details the construction of a DIY Arduino-controlled LED Kaleidoscope, replacing traditional loose objects with programmable LEDs for dynamic patterns. The project utilizes a square mirror arrangement and multiplexing to control nine LEDs with six Arduino pins. Powered by a battery, it features a custom PCB matrix, transistors for column control, and structural support from ice cream sticks and mountboard, offering an interactive and customizable electronic toy.
Parts used in the DIY Arduino controlled LED Kaleidoscope:
- Arduino board (Mega2560 recommended)
- LEDs (any color or 4-pin RGB)
- General purpose PCB
- BC547 transistors (3 units)
- Jumper wires
- PCB Strip Socket Connector (optional)
- Mirrors (4 units, approx. 17 x 3 cm)
- Mountboard or cardboard
- Cyanoacrylate glue
- Ice cream sticks
- Battery
- USB Cable for programming
- Current limiting resistors (270 ohms)
Hello everyone, and welcome to my Instructable! This instructable will show you how I made the first ever DIY Arduino controlled “LED Kaleidoscope”!
What is an LED kaleidoscope? Well, our traditional kaleidoscopes used 3 mirrors joined as a triangle with stuff like sequins and stolen cake decorations at one end, to create an awesome pattern when seen from the other end. My kaleidoscope uses 4 mirrors – forming a square. But wait, no cake decorations here- that’s what the LEDs are for! They blink and fade and flash about to make a pattern at least 20x cooler than the old fashioned k’ scopes.

Step 1: Background…
The definition of a kaleidoscope from wikipedia…:
“A kaleidoscope is a cylinder with mirrors containing loose, colored objects such as beads or pebbles and bits of glass. As the viewer looks into one end, light entering the other creates a colorful pattern, due to the reflection off of the mirrors.”
Kaleidoscopes are awesome toys, and are always fun to make and play with. But admit it, you’ll get bored with it pretty fast. Thats where my idea comes in – why not make a kaleidoscope with LEDs? With so many electronic toys available these days, why is the kaleidoscope lagging behind?
With LEDs you have unlimited possibilities – make customisable patterns, adding interactivity, changing patterns according to readings from sensors and so on…… This isn’t just fun to play, it’s fun to make and customize it too!
My kaleidoscopes square because making a compatible LED matrix board is simpler and more practical.
Step 2: Materials…
This isn’t expensive at all, and materials are easily available.
- An Arduino board ( Mega2560 is the best)..http://www.radioshack.com/product/index.jsp?productId=12272877
- LEDs, any colour. For example, this one…
- General purpose PCB. http://www.radioshack.com/product/index.jsp?productId=12516741
- BC547 transistor- 3 of them.
- Jumper Wire. Here’s a pack of hundred
- PCB Strip Socket Connector (optional)
- 4 mirrors of dimensions approximately 17 x 3 cm
- Mountboard or cardboard
- Cyanoacrylate glue
- Lots of ice cream sticks
- Battery http://www.radioshack.com/product/index.jsp?productId=4356385
- USB Cable for programming
Tools required:
- Soldering Iron and associated tools and materials Here’s a cheap but good one..
- Decent computer.
- Box cutter.
- At least 2 hands.
- Other tools may be required depending on how you plan to make it.
Step 3: How it works…………..
Controlling LEDs.
There are 9 LEDs, that are controlled with an Arduino using a technique called multiplexing. This article will make you understand the theory of multiplexing LEDs well. Ignore the circuit part though, it is quite different from this one.
Due to this, I only need 6 pins of the Arduino to control 9 LEDs. These LEDs are soldered on a PCB mounted at the back of the kaleidoscope.
How Kaleidoscope Works.
Mirrors, when put together, form multiple reflections of the same object. This makes the LED pattern awesome and cool. I didn’t make a triangular kaleidoscope because making a suitable LED matrix for it is tricky and impractical. Hence the odd (but super cool) square.
I’ve controlled the LEDs with simple Arduino code (I’m a bit of a newbie), which you can hack.
Ice cream sticks are just there to make the kaleidoscope firmer and better looking.
And this thing is powered by a battery. Just so you know.
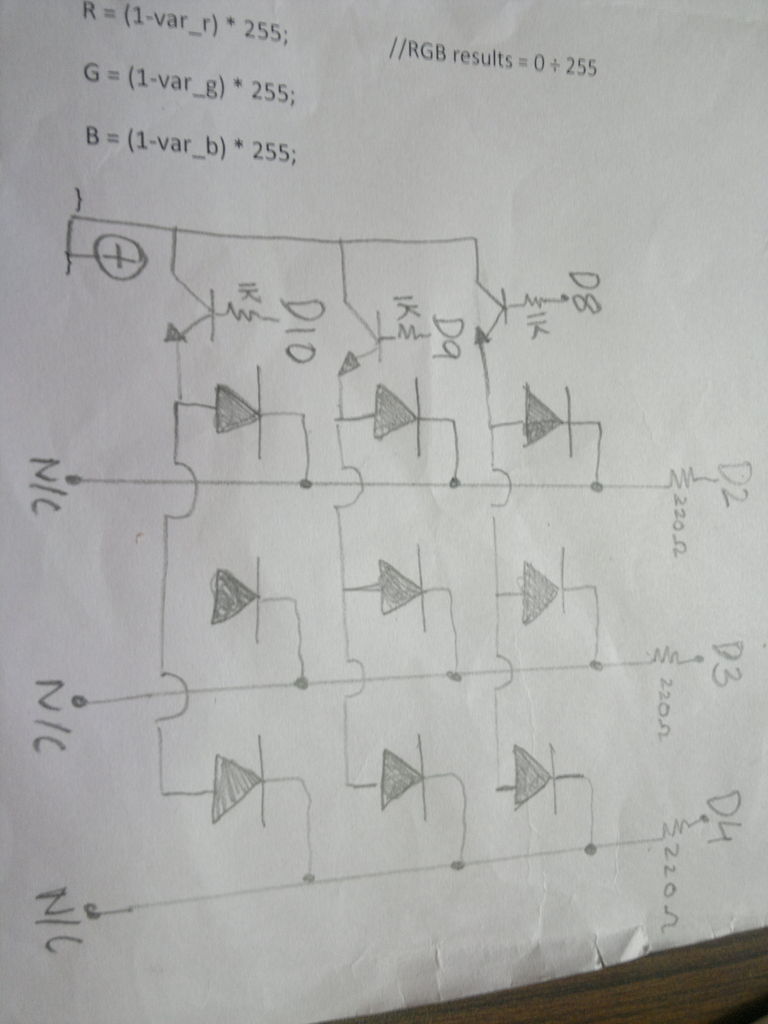
Step 4: Making The LED Matrix..
LED matrix is simple to make. The ‘Matrix’ here has nothing to do with Neo, Agents and Zion. Its just that the LEDs are connected in such a way that we can multiplex them. See the last diagram for the matrix’s circuit. It’s just like any other matrix. Columns are controlled by arduino via transistors. I used current limiting resistors of 270 ohms.
Soldering requires some experience. Making columns of solder isn’t easy. You’ll need lots of wires too.
I made the matrix board on such a way that I can use 4 pinned RGB LEDs too. However using this board for single LEDs is fine. You may make the board for either only the single LEDs (diagram 1), or the one compatible with both single and RGB LEDs (diagram 2 – the one I have done).
I didn’t solder LEDs and transistors directly, but used the socket. It a good idea- you can modify or troubleshoot later easily. After soldering the sockets, put the LEDs. Remember to cut off a bit of the LED’s lead so that it isn’t too long. Add the transistors too.
Be sure to test LEDs to make sure connection are good.
For more detail: Kaleiduino: A Battery Powered Arduino LED Kaleidoscope
- How many mirrors are used in this LED kaleidoscope?
The project uses 4 mirrors arranged to form a square. - Why is a square shape chosen instead of a triangular one?
A square shape was chosen because making a compatible LED matrix board is simpler and more practical than for a triangle. - How many pins on the Arduino are needed to control the LEDs?
Only 6 pins of the Arduino are required to control 9 LEDs using multiplexing. - What type of transistors are used in the circuit?
The project uses 3 BC547 transistors to control the columns of the LED matrix. - What is the value of the current limiting resistors used?
Current limiting resistors of 270 ohms were used in the circuit. - Can this matrix board be used with RGB LEDs?
Yes, the matrix board can be made to be compatible with both single LEDs and 4-pin RGB LEDs. - How is the device powered?
The kaleidoscope is powered by a battery. - What material is used to make the kaleidoscope firmer and better looking?
Ice cream sticks are used to make the structure firmer and improve its appearance.