Summary of Interface Arduino to MySQL using Python
Summary: This tutorial explains how to send sensor data from an Arduino over serial to a Python script and store it in a MySQL database. It covers installing pySerial and MySQLdb, sample Arduino code using a DHT sensor to print humidity and temperature to Serial, and notes that Python will read serial data and insert it into a preconfigured MySQL table.
Parts used in the Interface Arduino to MySQL project:
- Arduino (any compatible board)
- DHT temperature/humidity sensor (example: DHT22)
- USB cable for Arduino serial connection
- Computer with Python installed
- pySerial Python library
- MySQL server (database)
- MySQLdb Python library (MySQL-python)
- Development tools for building Python extensions (Xcode or GCC on macOS/Linux)
Here’s a brief tutorial that should get you up and running interfacing your Adruino with a MySQL database. For the sake of this tutorial, I am assuming you know how to set up and use MySQL. This tutorial does not require much Python experience, but you will be required to install two Python libraries for this project.
Glad we’re on the same page, let’s get to it!
Step 1: Downloading and Installing the Python Libraries
First I’ll point you in the right direction for installing the required Python libraries. First you’ll need to install the pySerial library. Simply put, the pySerial library allows your Python script to talk with the serial port in which the Arduino is connected. I.e. you can kind of think of it as a stream connecting the Arduino code to the Python code (insert other silly analogies here).
1. You can download the pySerial library here:
https://pypi.python.org/pypi/pyserial
2. For mac or linux users, download the file and extract it. Open terminal and cd into the extracted folder and run the following command:
python setup.py install
This will install the pySerial package. (screen shot below)
Next, we will install the library to allow Python to talk with MySQL called MySQLdb.
I just want to note, this step can be very annoying, but very rewarding once completed. I have included a guide for you to follow, but I recommend you have MySQL, python, and XCode(or the latest GCC) installed before you try and install MySQLdb.
1. download the library from source forge:
http://sourceforge.net/projects/mysql-python/?source=dlp
2. If you’re lucky enough, you should just be able to download it, extract it, open Terminal, cd into the folder and run python setup.py install, just as you did before. If this works, you’re awesome and you should awesome, but if not, this guide should help. Note, I had to do step 6 before step 3.
Step 2: Fewf, now let’s set up our Arduino!
All right. Now that we’ve gotten all of the annoying steps out of the way, let’s get to the fun parts!
For the sake of getting you up and running, I’ll keep this short and concise.
1. Let’s get our Arduino sending some output.
What we’re going to do is essentially send data from our Arduino for our Python code to process, so let’s first get our Arduino to send some data.
I have a temperature/humidity sensor lying around, so I’m going to take the readings from this and send them to my Python code.
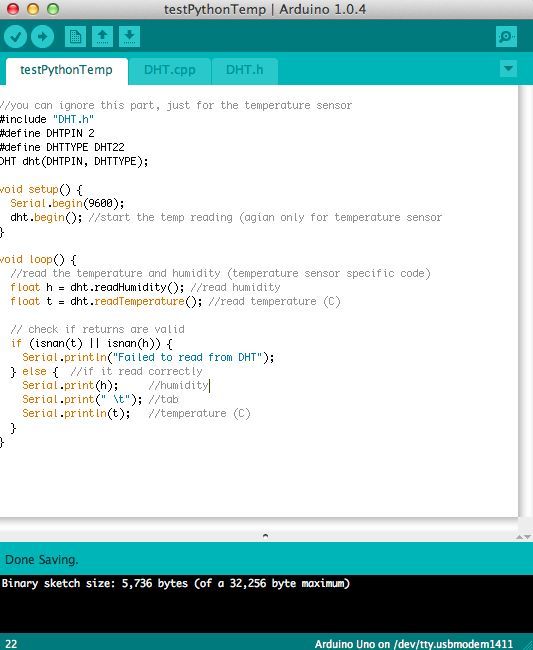
Here’s the sample code:
//you can ignore this part, just for the temperature sensor
#include “DHT.h”
#define DHTPIN 2
#define DHTTYPE DHT22
DHT dht(DHTPIN, DHTTYPE);
void setup() {
Serial.begin(9600);
dht.begin(); //start the temp reading (agian only for temperature sensor
}
void loop() {
//read the temperature and humidity (temperature sensor specific code)
float h = dht.readHumidity(); //read humidity
float t = dht.readTemperature(); //read temperature (C)
// check if returns are valid
if (isnan(t) || isnan(h)) {
Serial.println(“Failed to read from DHT”);
} else { //if it read correctly
Serial.print(h); //humidity
Serial.print(” \t”); //tab
Serial.println(t); //temperature (C)
}
}
It should be pretty straight forward. Again, I’m using a temperature/humidity sensor to get some data to send to the Python, but this could obviously be substituted with anything other data; it’s just used as an example!
Note: the Serial.print lines are the data that is being sent to the serial port that the Python code will be grabbing and doing all the wonderful things with it.
Step 3: Let’s go ahead and set up our MySQL
Now that we have the code running on our Arduino, we need some Python code to talk to it, but first we need a MySQL database and table to store this data.
For more detail: Interface Arduino to MySQL using Python
- How do I install the library to communicate with the Arduino serial port?
Install the pySerial library (download from pypi.python.org/pypi/pyserial) and run python setup.py install from the extracted folder. - How do I install the library to let Python talk to MySQL?
Download MySQLdb (MySQL-python) from SourceForge and run python setup.py install; you may need MySQL, Python, and Xcode or GCC installed first. - What Arduino code is used to send sensor data over serial?
Sample code uses the DHT library to read humidity and temperature and prints values with Serial.print and Serial.println at 9600 baud. - Can I use a different sensor than the DHT in this tutorial?
Yes, the DHT is an example; any sensor that outputs data to Serial can be substituted. - What does the Python script receive from the Arduino?
The Python script reads the serial output lines printed by the Arduino, such as humidity and temperature values separated by a tab. - Do I need prior Python experience to follow this tutorial?
No, the tutorial does not require much Python experience but does require installing two Python libraries. - What prerequisites are recommended before installing MySQLdb on macOS?
Have MySQL, Python, and Xcode (or the latest GCC) installed before attempting to install MySQLdb. - What baud rate does the Arduino use in the example?
The Arduino example uses Serial.begin(9600) so the baud rate is 9600.