
This is an instructable for the Interactive LED Lab Coats, showcased at Autodesk University.
Check out the videos below! The first is a demo of the colors actuated by the buttons. The second is a demo of the breathalyzer! (this will be explained later)
Tools
- Sewing machine
- Soldering iron
- Wire cutters & strippers
- Hobby knife
- Hot glue gun
- Computer
Materials
- Two lab coats
- Arduino (Uno or later)
- LED Spool(s) (5 meter, 300 LED count, 50/50 size LEDs, epoxy-coated) – 2 spools for a child’s coat, 3 for an adult.
- 24 gauge 4-wire strips (Intercom wire works well.)
- Protoboards (Or a ProtoShield for the Arduino will work even better. We cut our own protoboard to size and tucked it behind, because we wanted to keep the arduino visible. But a real protoshield would be more stable.)
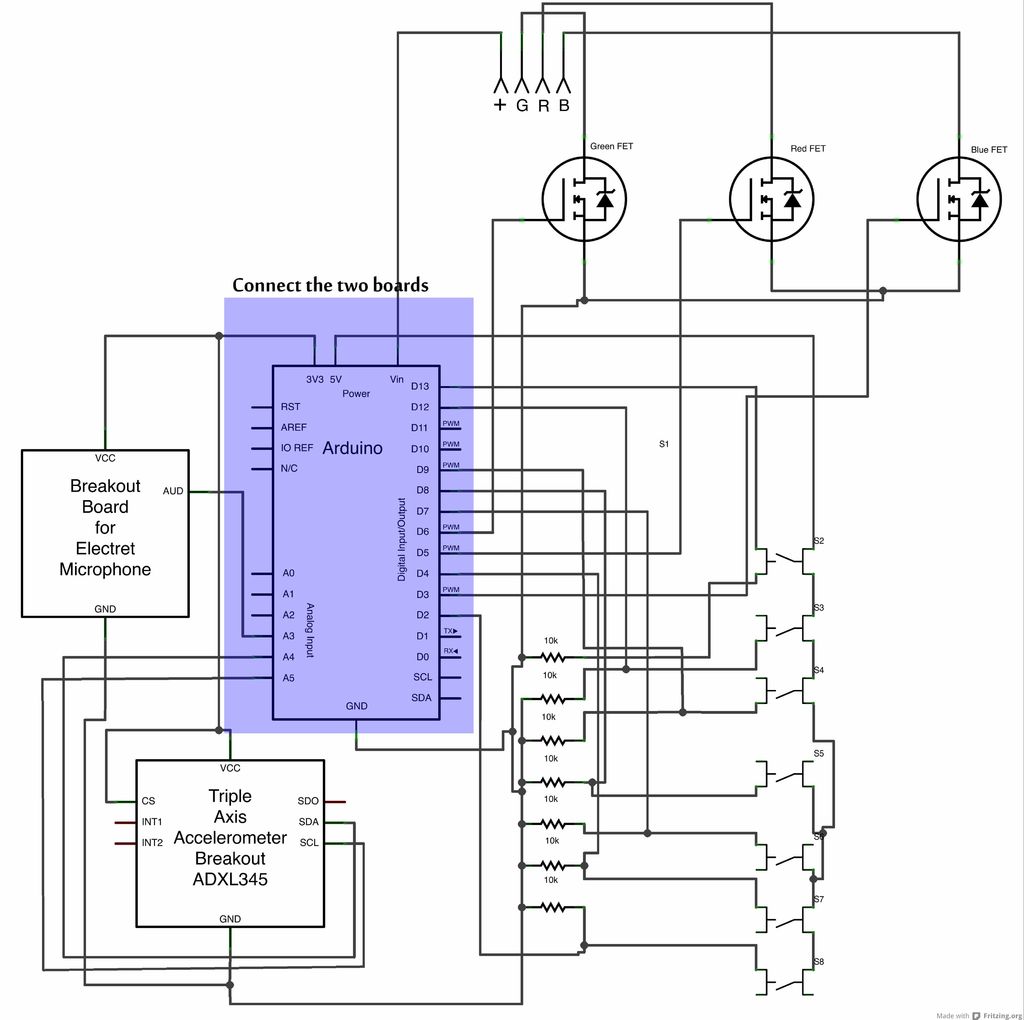
- Sensors, to taste. Our code and wiring diagrams include a microphone, so your coat can light up in response to noise, and an accelerometer so your coat can light up as you move.
- 12 volt rechargeable battery packs. For a few hours of use, 2 or 3 packs for a child sized coat, 3 or 4 for an adult coat (this is to make sure there is enough amperage, each battery is limited to 2A max)
- Push-buttons
- Hot glue
- Solder
- Masking tape
- A white zipper (long enough to run the length of your coat)
- Velcro
This instructable assumes a middling knowledge of a few different fields. If you can use a sewing machine, follow a circuit diagram, and load a program onto an Arduino, you can do it on your own. If not, it’s all stuff you can learn with the help of the right friend. Some of the steps are time consuming, but all the skills you need can be learned quickly.
Step 1: Plot the Light Strips
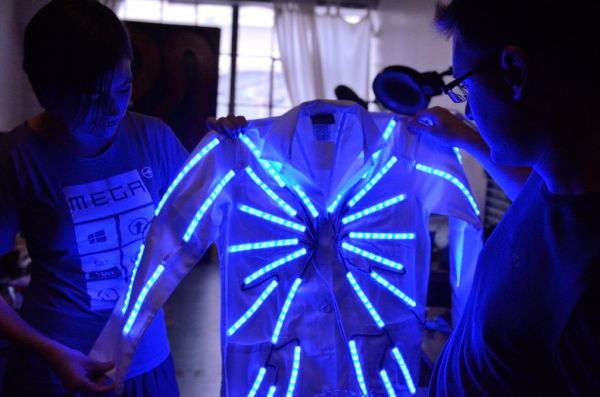
The coat, in summary, is one lab coat holding the lights in place while a second coat over it diffuses the light. At its heart, an Arduino takes in information from sensors and converts it to patterns of flashing colors. Easy enough, right? But before we can launch in, we need to answer a question of taste, first: What light-up pattern do you want?
We decided an a starburst pattern for Carl and Schuyler’s coats. It’s a dramatic look, and it makes the lights come together at one point, shortening the total amount of wire the coat has to carry. There’s more than one right answer, though…
Once you’ve chosen your light pattern, take one of your two lab coats to lay out the pattern on. This will be the “undercoat” that holds the lights in place. Mark everywhere you want to put a light strip with masking tape. Note that your LED strips can only be cut at certain places (without breaking the circuit).
Step 2: Cut the Light Strips
Now, cut strips from your LED spool equal in length to each of the tape strips marking your undercoat. A sturdy pair of scissors will make short work of this. The cuts need to be on the lines between the contract points. Your strip may have contact points every inch, every two or three inches. Cut there, nowhere else.
After you’ve cut the LED strips, you need to cut the protective epoxy off the ends of the strips to expose the contact points you’ll be soldering the wires down to.
Note: You might be tempted to skip this step by just buying the LED strips that have no epoxy coating. They’re a little cheaper, and a little brighter, too. However, the epoxy is important for a couple reasons: First, it gives you a hint of weatherproofing. More importantly, it keeps the strips from getting any really hard kinks or bends as you move around in the coat. A hard kink in the LED strip repeated over and over will cause a stress break in the wires hidden within. That makes the strips go dark, usually one color at a time. (Ugly!) The epoxy prevents tight kinks in the wires, and the stress breaks they create.
Your LED strip has a tape-like adhesive on the back. (Typically.) Peel off the paper covering it to expose the sticky tape, and press the strip into place. This holds the strip on well enough to try on the coat and make sure the strips are sitting right. Yet it’s weak enough you can peel the strips back off and move them if you need to.
The LED strips have a +12 volt side, printed by the cut edge. You wiring job will be much easier later if these are all stuck down with the +12 volt side pointing towards where you’re going to power them from. For our starburst design, they all pointed to the center of the chest, where the power wires ran from.
- Sewing machine
- Soldering iron
- Wire cutters & strippers
- Hobby knife
- Hot glue gun
- Computer
Materials
- Two lab coats
- Arduino (Uno or later)
- LED Spool(s) (5 meter, 300 LED count, 50/50 size LEDs, epoxy-coated) – 2 spools for a child’s coat, 3 for an adult.
- 24 gauge 4-wire strips (Intercom wire works well.)
- Protoboards (Or a ProtoShield for the Arduino will work even better. We cut our own protoboard to size and tucked it behind, because we wanted to keep the arduino visible. But a real protoshield would be more stable.)
- Sensors, to taste. Our code and wiring diagrams include a microphone, so your coat can light up in response to noise, and an accelerometer so your coat can light up as you move.
- 12 volt rechargeable battery packs. For a few hours of use, 2 or 3 packs for a child sized coat, 3 or 4 for an adult coat (this is to make sure there is enough amperage, each battery is limited to 2A max)
- Push-buttons
- Hot glue
- Solder
- Masking tape
- A white zipper (long enough to run the length of your coat)
- Velcro
For more detail: Interactive LED Lab Coat using Arduino