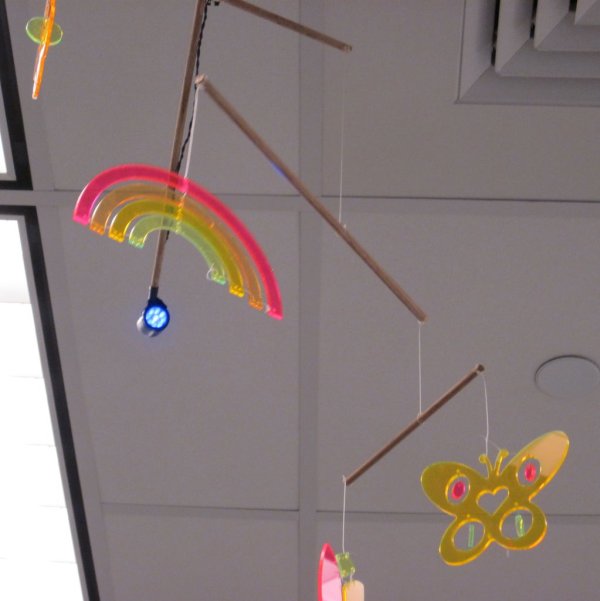
What can you make with fluorescent acrylic as the inspiration? We chose to make a glow-in-the-dark baby mobile, with an accompanying toy. This project was completed as a part of the Computing and Craft class at Olin College of Engineering.
Materials:
– Craft Materials:
– Fluorescent acrylic (1 square foot of each of the following colors: pink, orange, yellow, green*)
– Wooden dowels (8 feet of each of 1/4″ and 3/8″ diameter and 4 feet of 1/2″ diameter)
– Fishing line (approximately 5 yards)
– Light-colored thread (approximately 5 yards)
– Hot glue gun (1) and hot glue sticks (1-2)
– Stuffed toy (1) (one which had circuitry in it and therefore has easy access to the insides is convenient)
– Electronics
– Arduino UNOs (2)
– LEDs** (3)
– FTDI Breakout board (1)***
– USB cables, A to B plugs (2)
– XBee radios (2)
– XBee breakout boards with headers (2) ****
– Mini Servo motors (2)
– A-B USB cable (1)
– 1-axis accelerometer (1)
– Three-terminal switches (3)
– Push buttons (2)
– Flex sensors (2)
– Resistors (2x10k and 4×2.2k)
– Blacklight flashlights with screw-off heads (2)
– Solid-core wire (a lot*****)
– Electrical tape (approximately 1 yard)
– Soldering iron (1) and solder (approximately 1 yard)
– Battery packs and batteries (we used one of three AAAs, one of three AAs, and two of two AAs, but some of this is flexible)
* We used 12″ x 24″ sheets from inventables.com. Depending on the sizes and shapes of your parts, you might be able to use 12″x8″ sheets, which are the next-smallest size. Also, the blue fluorescent acrylic from Inventables doesn’t fluoresce (as of March, 2012).
** We used lilypad LEDs because we had them in a color we liked (orange-yellow). We don’t recommend using lilypad LEDs instead of regular ones, though.
*** One of these will make your life much easier if your XBee radios aren’t already configured to talk to each other. Don’t assume they will. http://www.sparkfun.com/products/718
**** XBee radios have non-standard pin spacing, so you will want a workaround. Reference http://www.ecrater.com/p/10690385/xbee-breakout-board-kit-10-pack. Alternatively reference digikey.com
***** We used about a dozen wires of approximately 4 yards in length to suspend switches from the ceiling for easier access. Securing the blacklights and the servos to the dowels also required a few yards of wire. Other than that, most of the wiring could be done with a yard or two of wire.
Step 1: Design Parts
The acrylic for this project is cut using a laser cutter. We designed our parts in Solidworks, but feel free to use whatever CAD software you prefer. All of our parts were between 3 and 6 inches on a side, with most of them being approximately 4″ square. For the theme our our baby mobile, we designed two flowers, two butterflies, and one rainbow.
The sides of the acrylic fluoresce more than the faces do. To show this off (and to mix up the colors) we cut holes and inset parts for all of the acrylic shapes. To facilitate mixing and matching of these inset parts, we cut one of each of the flowers and the butterflies out of each color of acrylic. We also cut the corresponding arc of the rainbow out of each color of acrylic (with pink being the largest and green being the smallest). This gave us 20 parts, enough for two mobiles with 10 parts each. We also cut small (1/16″) holes where we wanted to attach the parts to each other to facilitate the assembly process later.
Assemble the parts onto cutsheets (according to the format for the laser cutter you use), putting the parts as close together as you can given the tolerance of your laser cutter. Be aware that parts placed too close to the edge of the sheet may get cut off. Then cut the parts (or get someone to cut them for you).
The images for this step show the Solidworks parts for all the components we designed.
Step 2: Assemble Parts
Decide what color combinations you like best and lay out how you would like to assemble your parts. We found that the orange and yellow acrylics looked similar, so we preferred to accent the pink and green with the orange and yellow, and vice versa. We initially intended to use only fishing line to secure parts to each other but found that thread was easier to work with and allowed spinning parts more movement. However, for parts requiring structure, fishing line worked very well to hold subparts in a particular configuration. For our mobile, we used thread to hold together the two butterflies and the flowers. We used fishing line to hold together the tulips and the rainbows. as these looked significantly better with more structure.
All subparts were secured to each other using square knots through corresponding holes. (See step 1 again and look at the alignment of the holes in the parts, if you’re interested.) The spacing was intended to match that in the parts, though of course getting this exact in practice was difficult.
For more detail: Interactive Child’s Mobile using Arduino