Summary of Indoor/outdoor wireless thermometer using Arduino
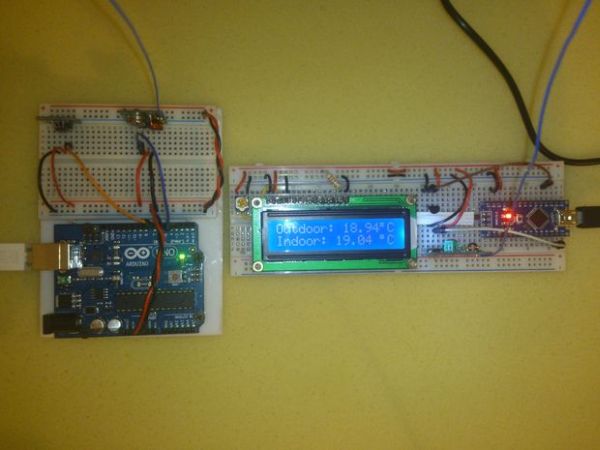
This article describes a wireless thermometer project using two Arduino boards to measure indoor and outdoor temperatures. The system comprises a transmitter with a digital sensor sending data via RF to a receiver, which displays the reading on an LCD alongside an analog sensor input.
Parts used in the Wireless Thermometer:
- Two arduinos any version
- DS18B20 digital temperature sensor
- LM35 analog temperature sebsor
- LCD 16x2
- RF 433MHz or 315 MHz module
I would like to introduce you to one of my interesting projects. It is a wireless thermometer that measures the indoor and outdoor temperature. The device consists of two parts. One is a transmitter that contains one digital temperature sensor and a transmitter module. A second receiver consisting of an LCD screen, the analog sensor and receiving module.
Step 1: Parts
You need:
1. Two arduinos any version
2. DS18B20 digital temperature sensor
3. LM35 analog temperature sebsor
4. LCD 16×2
5: RF 433MHz or 315 MHz module
Step 2: Transmitter
Transmitter is very simple. Connect the wires as shown in pictures.
Here is transmitter code:
#include <VirtualWire.h>
#include <OneWire.h>
#include <DallasTemperature.h>
#define ONE_WIRE_BUS 7
OneWire oneWire(ONE_WIRE_BUS);
DallasTemperature sensors(&oneWire);
char msg[6];
void setup() {
sensors.begin();
vw_setup(2000);
vw_set_tx_pin(3);
}
void loop() {
sensors.requestTemperatures();
float temperature = sensors.getTempCByIndex(0);
dtostrf(temperature, 6, 2, msg);
vw_send((uint8_t *)msg, strlen(msg));
vw_wait_tx();
delay(200);
For more detail: Indoor/outdoor wireless thermometer using Arduino
- What components are required for the transmitter?
The transmitter consists of one digital temperature sensor and a transmitter module connected to an Arduino. - How does the receiver display temperature data?
The receiver uses an LCD screen to show the temperature received from the transmitter. - Can I use different versions of Arduino for this project?
Yes, you need two arduinos of any version. - What type of modules are used for wireless communication?
An RF 433MHz or 315 MHz module is used for transmitting data between parts. - Which digital sensor is used in the transmitter?
The DS18B20 digital temperature sensor is used in the transmitter section. - Is there an analog sensor included in the setup?
Yes, the receiver includes an LM35 analog temperature sebsor. - What library is included to handle the digital sensor?
The code includes the OneWire.h and DallasTemperature.h libraries. - At what rate is the transmission speed set?
The setup function initializes the transmission speed using vw_setup(2000).