Summary of Ikea Kids Kitchen Lights Mod
This article details a DIY project modifying an IKEA Duktig Kids Kitchen for a child's birthday. The creator added two interactive features: an oven with color-changing, adjustable lights and a microwave with a spinning LED timer. Inspired by existing hacks, the maker utilized spare electronics from a previous wedding light project to create a unique play experience that delighted their daughter.
Parts used in the Modified IKEA Duktig Kids Kitchen:
- 2x D1 Mini ESP8266 Arduino boards
- 3x 16 LED Neopixel Rings
- 4x Arcade Buttons
- 2x Rotary encoder modules
- 1x 7-Segment display module
- Large Amp 5V power supply (minimum 3 or 4 A)
- Perf board pieces
- Screw terminals
- DC Jack to screw terminal adaptors
- Ikea Dukstig Kitchen
- Cable trunking
For my daughters second birthday, we decided to get her a kitchen set. But I really wanted to make what we got her special and after being inspired by what some awesome makers had done with the Ikea Duktig Kitchen, we decided to get one and to make some modifications to it to make in unique.
The two new features we added to the kitchen are
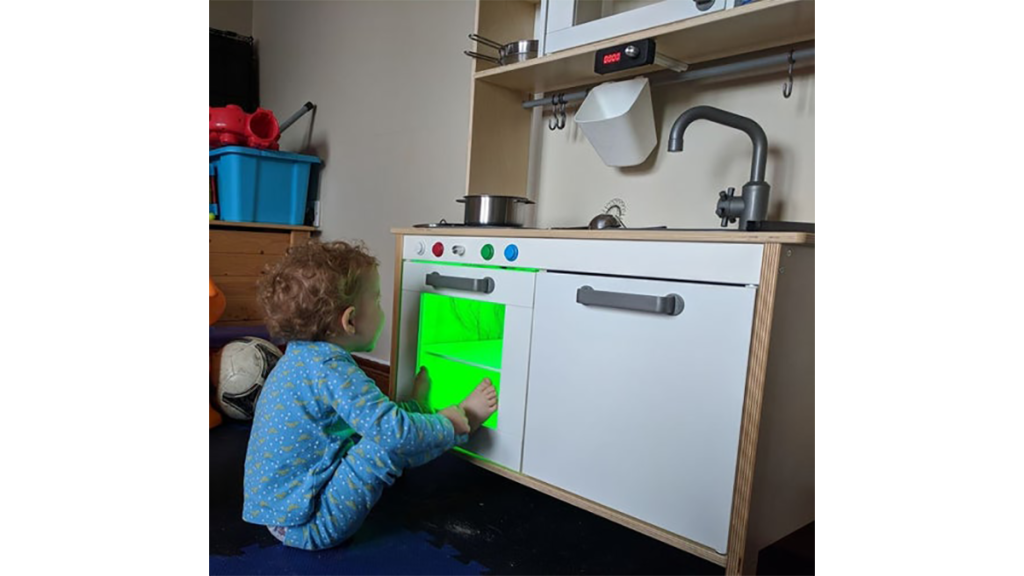
Oven Mod:
Adding lights to the oven section that could be set to different colours and that the brightness could be adjusted. This is obviously is not a realistic representation of how an oven works, but our daughter was just starting to learn her colours and we thought that she would really enjoy swapping between the different colours. (sorry about my dog wanting to be famous)
Microwave Mod:
Adding lights and a timer to the microwave section. I went for a little bit more realism here, even trying to simulate the item in the microwave spinning by rotating the lit LED around the neopixel ring. This was bit too advanced for her at the time but now that she is a few months older she does really like this too!
Seeing my Daughter play with this for the first time is probably my proudest moment as a maker. A lot of the times the things I make might be kind of interesting or cool, but seeing the glow on my Daugther’s face the first time she was playing with it is honestly one of the highlights of my Dad career so far (some of it was from the Oven lights, but there was serious joy too!)
Step 1: The Remix
I seen a couple mods for the Ikea Duktig Kitchen last year that I thought were amazing so I wanted to see if I could combine some of the best of both and make a few changes based on what I parts I had available and my based on my limited woodworking skills!
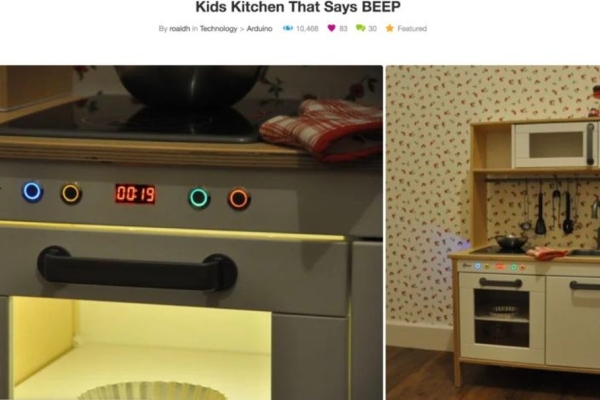
The first is the Kids Kitchen that says BEEP by RoaldH. This is a mod that adds lights and buttons to the oven section of the Kitchen.
The second is the IKEA Hack: Microwave for the Duktig Kids Kitchen by Myles Eftos. This mod adds a rotary encoder, a 7 segment and lights to the microwave section of the kitchen.
Lastly, I had a lot of spare Neopixel rings and ESP8266 boards left over from my WiFi Wedding Lights project so I wanted to try use as much as I could from that project so it would no longer just be sitting in a box on a shelf! I also think its kind of nice that something from our wedding is now being used by daughter to play with!
Step 2: Things You’ll Need
I used the following parts in this project
Components:
- 2no. D1 Mini ESP8266 Arduino boards* – I used these as I had some spare after the Wifi Wedding Lights project. You could replace this with any Arduino board though
- 3no. 16 LED Neopixel Ring* – Again these were spare from the Wedding lights project, but the rings ended up working out quite well, especially for the mircrowave.
- 4no. Arcade Buttons
- 2no. Rotary encoder modules*
- 1no. 7-Segment display module
- Large Amp 5V power supply* – You need minimum 3 or 4 A amps, but could get away with less if you limit the max brightness of the the Neopixels.
- Some perf board* – I used two pieces
- Screw terminals*
- DC Jack to screw terminal adaptors (Male and Female)*
Parts From Ikea:
- Ikea Dukstig Kitchen – I had mine assembled before stating these mods.
- Cable trunking – This is a nice cheap way of tidying up the cable.
Tools:
- Cordless Drill
- Selection of standard wood drill bits
- 25mm Hole Saw bit
- Some screws
- Some clips to tidy up cables
- 3d Printer (or access to one)
Step 3: The Code
There are two sketches used in this project, one for the Oven mod and one for the Microwave mod.
The code is pretty simple, and as mentioned earlier, should run on any arduino if you change the pin numbers to match.
If you are using the ESP8266 boards like I did, you will first need to setup your Arduino IDE for programming these boards, check out the video above for steps on how to do this.
Once you are setup, download the the two sketches from github and upload them to the two separate boards
Step 4: The Oven Mod – Drilling the Holes
First thing that we need to do is drill the holes above the oven to house the buttons and the rotary encoder. I did these steps while the kitchen was fully assembled, I just needed to remove the plastic stove top. You may need to remove the door in later steps, but that’s easily done.
I put some masking tape on the area where the buttons were being places so I could mark out where the holes were and to help protect the finish of the wood when drilling.
I marked out the holes as shown below. The marking for the centre, the rotary encoder, is 16cm from the left. The inner buttons are marked 5cm from the centre and the outer buttons are marked 6cm from the inner buttons.
I drilled a guide hole on the markings for the buttons using a 4mm drill bit. I then used a 25mm hole saw to drill the holes out large enough so that buttons could fit in them.
Now comes for the scariest part of the whole build for me, the hole for the rotary encoder. The shaft of my rotary encoder was far to short to be able to just drill a single hole through the wood and get the nut on the shaft. I drilled a hole for the shaft using a 8mm drill bit (I think, please check the size before doing it!). Then from the inside of the oven I used a flat drill bit to drill out a hollow so that the rotary encoder fits inside this to make the depth of the hole the shaft needs to pass through shorter. Be very careful at this part! Take it slow and keep checking if its deep enough for the encoder to go through and grip the nut.
Now would be a good time to test the fit of the button and the Rotary encoder. I was really happy with how they came out!
Source: Ikea Kids Kitchen Lights Mod
- What modifications were added to the kitchen?
An oven mod with color-changing adjustable lights and a microwave mod with a spinning LED timer. - Can I use any Arduino board instead of the D1 Mini?
Yes, you can replace the ESP8266 boards with any Arduino board if you adjust the pin numbers. - How did the creator source the electronic components?
The parts were spare items left over from a WiFi Wedding Lights project. - What is the minimum amperage required for the power supply?
You need a minimum of 3 or 4 amps, though less may work if brightness is limited. - How were the holes for the buttons marked out?
The rotary encoder center was marked 16cm from the left, inner buttons 5cm from the center, and outer buttons 6cm from the inner buttons. - What tool was used to drill the large holes for the buttons?
A 25mm hole saw bit was used after drilling initial guide holes with a 4mm drill bit. - How was the depth issue for the rotary encoder shaft solved?
A flat drill bit was used from inside the oven to create a hollow, shortening the depth the shaft needed to pass through. - Where can I find the code sketches for this project?
The sketches are available on GitHub and there is a YouTube video demonstrating the setup.