Summary of How to Use the Adafruit Flora Board – Arduino Tutorial
This tutorial guides users on programming the Adafruit Flora wearable board using Codebender. It covers the board's features, including its Atmega32u4 microcontroller, flexible power options, and sewable design. The guide demonstrates connecting NeoPixel v2 RGB LEDs via conductive thread or cables, configuring data pins, and uploading a custom sketch to control the LED strand.
Parts used in the Adafruit Flora Board Project:
- Adafruit Flora board
- NeoPixels v2 (RGB LEDs)
- Conductive thread
- Alligator clips
- Cables
- External battery pack (3.5V to 9V DC)
- Computer with USB connection
In this tutorial you will learn how to use the Adafruit Flora board and how you can easily program it with Codebender!
FLORA is Adafruit’s fully-featured wearable electronics platform. It’s a round, sewable, Arduino-compatible microcontroller designed to empower amazing wearables projects. The FLORA family also has the best stainless steel threads, sensors, GPS modules and chainable LED NeoPixels, all are wearable!
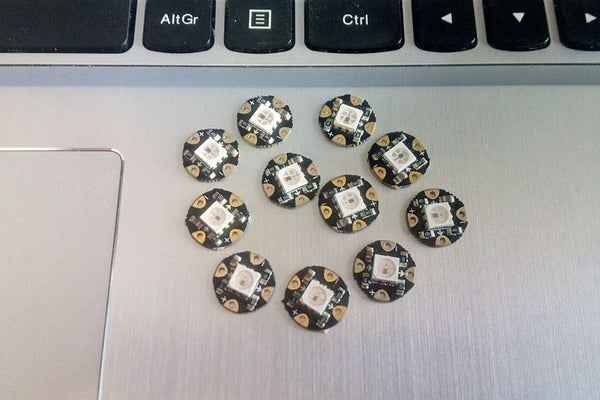
In this tutorial we will use the RGB leds NeoPixels v2!
Step 1: About Flora
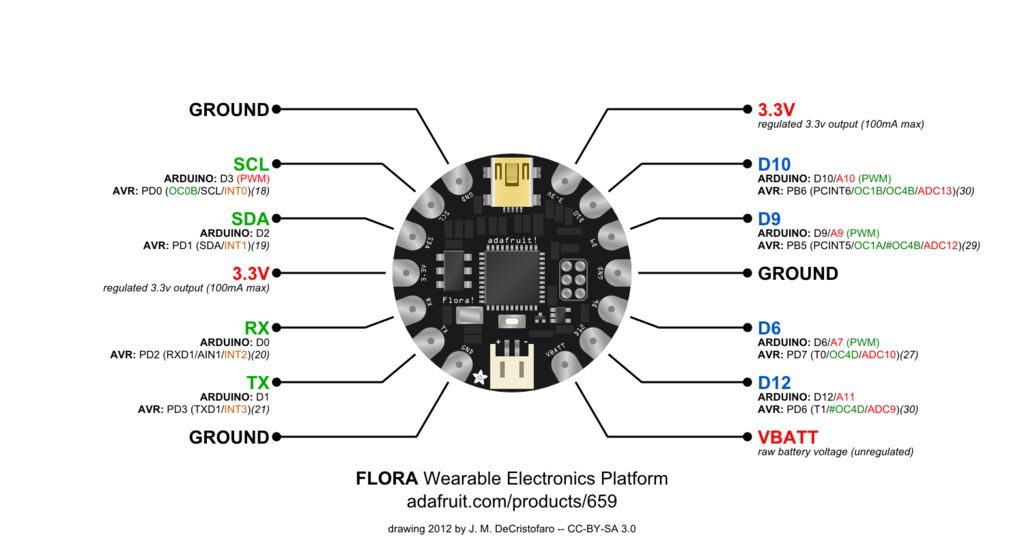
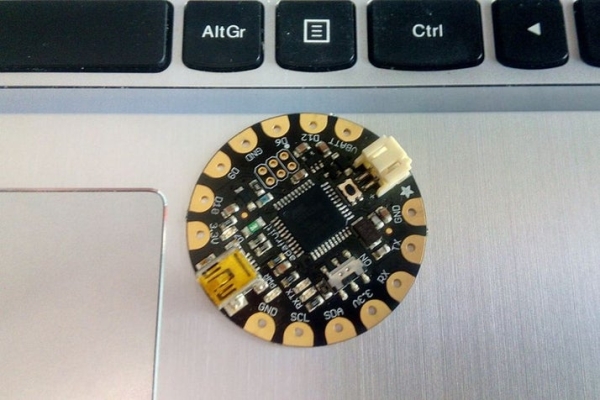
Flora wearable board uses the Atmega32u4 micro controller, has built in mini-usb port (new Flora v2 has micro-usb) and a reset button to reboot the system. The power supply is deigned to be flexible and easy to use. There is an onboard battery connector with protection diode for use with external battery packs from 3.5v to 9v DC in (It can run on 3V but 3.5V-5V or higher is ideal). Also, the FLORA has an onboard 3.3v 250mA regulator with a protection diode and USB fuse so that the microcontroller voltage is consistent and can power common 3.3v modules and sensors.
The FLORA power system is specifically designed to allow easy control and power of a large quantity of addressable NeoPixels. Flora can easily drive 50 pixels directly from the onboard power supply, or up to 500 with the pixels externally powered by a separate 5V supply!
FLORA is fabric friendly– all the components on board are flush to the PCB and won’t snag delicate garments (it does not use FTDI headers).
The FLORA has 4 indicator LEDs: power good, digital signal LED for bootloader feedback, data rx/tx.
Also onboard is an ICSP connector for easy reprograming for advanced users. Flora v2 even has an RGB NeoPixel for even more colorful lighting.
There are 14 sewing tap pads for attachment and electrical connections. Data buses are interleaved with power and ground pads for easy module and sensor attachments without worrying about overlapping traces which are not possible with conductive thread.
You can find more info here, and some useful videos here
Step 2: First Time of Using It?
If this is the first time you are using the Codebender or the Flora board with your computer, click here and follow the guide to install the browser plugin and the Arduino drivers.
You should see the green power LED lit and the red bootloading LED pulse indicating that the Flora is ready to start bootloading. If you’ve programmed the Flora since getting it, you can always get it back to the bootloader state by pressing the small onboard reset button.
Step 3: Program It With Codebender!
Now we can write our first program for Trinket board!
We will use the Codebender to program the board but if you still want to use the Arduino IDE you have to install Adafruit boards on it first. Just follow the instructions on this link.
To build the circuit, you can use alligator clips, cables or conductive thread! I prefer to use conductive thread and build my first wearable project!
Tip:
If you don’t know how to use conductive thread, read this very helpful guide on Afadruit site.
Connecting one NeoPixel v2:
Connect “+” pin to Flora pin 3.3V, “-” pin to Flora GND and “->” to Flora D12.
Now connect more NeoPixels v2!
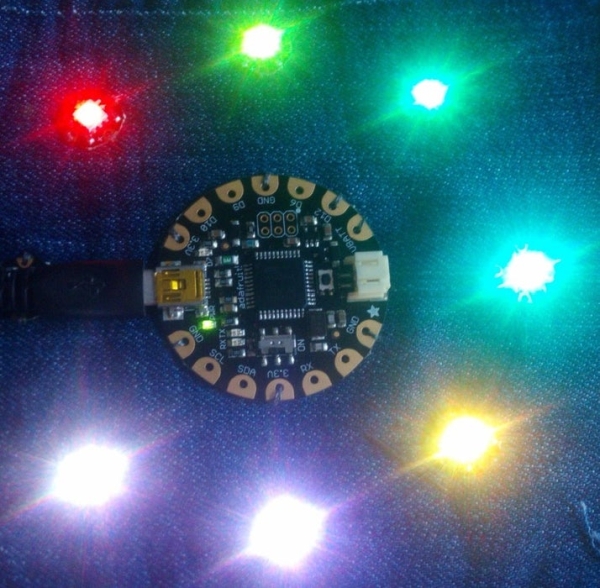
Each new NeoPixel led must have connection with the previous one, “+” and “-” pins, signal pin “->” will follow the previous “->” NeoPixel pin. (see above image). You can use as many as you want. I used 8 of them.
Make it alive!
Now connect the Flora board with your computer, select “Adafruit Flora” from boards and your connection port. Now click the “Run on Arduino” button. That’s it, you’ve programmed your Flora board with this sketch!
(Sketch is the same as Adafruit NeoPixels strandtest example. We just change PIN to 12.)
You can keep playing with that by clicking the “Edit” button and start making your own modifications to the code.
Step 4: Well Done!
You have successfully completed one more “How to” tutorial and you learned how to use the Adafruit Flora board and NeoPixel RGB LEDs with Codebender.
I hope you liked this, let me know in the comments.
There will be more of them, so make sure to click Follow button!
Source: How to Use the Adafruit Flora Board – Arduino Tutorial
- How do I connect the first NeoPixel v2?
Connect the + pin to Flora pin 3.3V, the - pin to Flora GND, and the signal pin > to Flora D12. - Can the Flora board drive multiple NeoPixels?
Yes, it can easily drive 50 pixels directly from the onboard power supply or up to 500 if externally powered by a separate 5V supply. - What is the best way to build a wearable circuit for this project?
The author prefers using conductive thread to build the first wearable project. - Does the Flora board support external batteries?
Yes, it has an onboard battery connector for external battery packs ranging from 3.5V to 9V DC. - How do I reset the Flora board to the bootloader state?
You can press the small onboard reset button to reboot the system and return it to the bootloader state. - What microcontroller does the Flora wearable board use?
The board uses the Atmega32u4 microcontroller. - Can I use the Arduino IDE instead of Codebender?
Yes, but you must install Adafruit boards on the Arduino IDE first by following specific instructions. - Why is the Flora board considered fabric friendly?
All components are flush to the PCB and it does not use FTDI headers, preventing snags on delicate garments.