
Summary of How to make a multi-layered acrylic and LED sculpture with variable lighting levels using Arduino
This article details the creation of a multi-layered acrylic art sculpture shaped like the letter 'n' for the Lapland Landscape exhibition. The project features five laser-cut acrylic layers with 300 yellow LEDs, controlled by an Arduino to fade lights between the letter's outline and its exterior using three knobs. Instructions cover gathering electronic and structural parts, preparing vector artwork in Adobe Illustrator for laser cutting, and assembling the components into a wall-mounted display.
Parts used in the n Artwork:
- 150 x LED's - Yellow
- 150 x carbon film resistors - 0.5W 68ohm 5%
- 6 x transistors
- 3 x 22k pots
- 3 x knobs
- 1 x arduino decimila
- 4 x stripboard
- pin strip
- 5 x 3mm acrylic sheet 610mm x 610mm
- small white cable ties
- 4 x 400mm M10 stud
- 38 x M10 nuts
- 4 x M10 dome nuts
- 1 x regulated power supplies 4.5volts 1400ma
- 1 x regulated power supplies 7.5 volts
- solder
- super glue
- araldite
Here you can find out how to make you very own n as made for the exhibition www.laplandscape.co.uk curated by art/design group Lapland.
More images can be seen at flickr
This exhibition runs from Wednesday 26 November – Friday 12 December 2008 inclusive, and had a private view on Tuesday 25 November. Each participant has been asked to make a letter each of the ‘laplandscape’ portion of the web address. On the website each letter will link to related web contributions from each participant. This instructable is our web exhibit for this exhibition.
This n is an art work and experimental and these instructions should be treated as such!
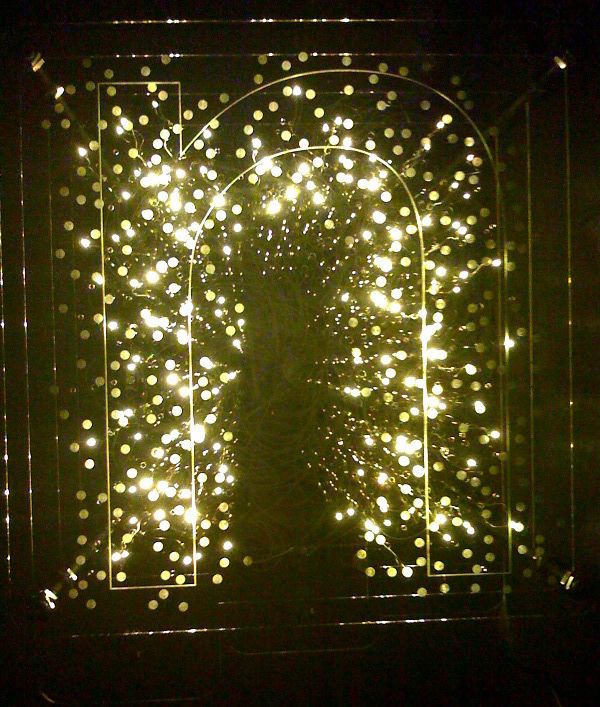
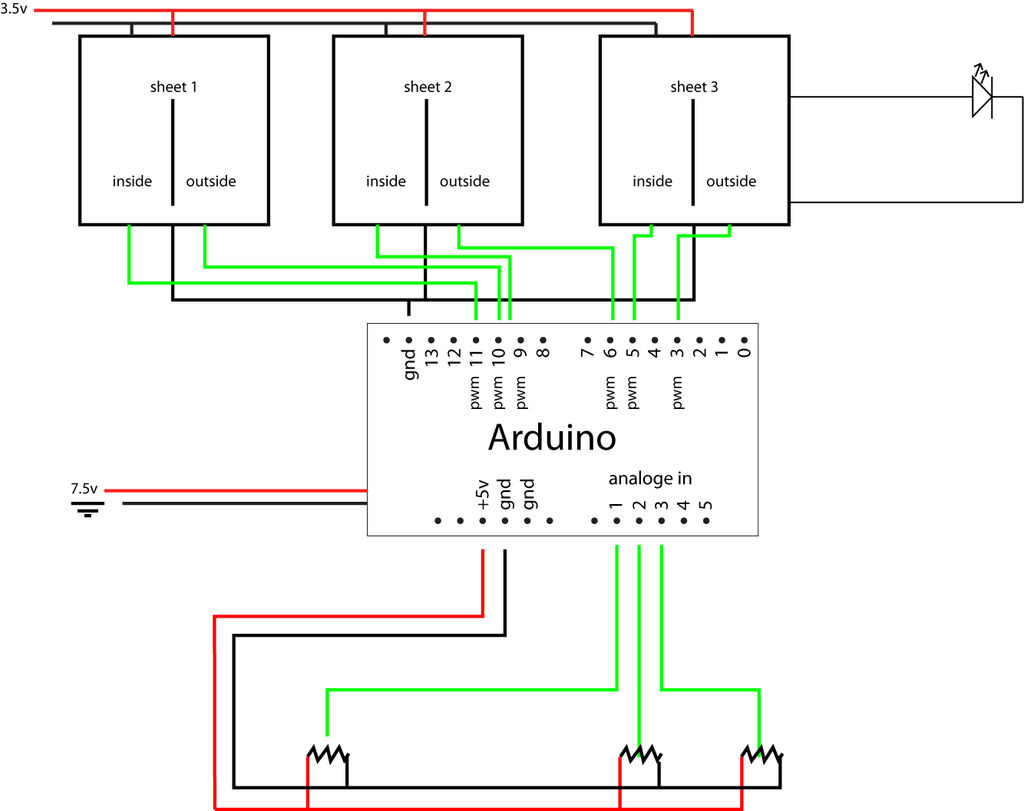
The n takes the form of 5 layers of laser cut acrylic, 3 of which have LEDs in them. The front panel has the outline of a letter n etched in it. 3 knobs control the LEDs and fade them between the ones inside and outside the outline of the n being on, on each layer.
There are no doubt simpler ways if wiring up the LEDs to do the same thing but, as all the exposed components etc are a big part of the aesthetic, we decided to do it this way.
Enjoy!
Step 1: Gathering parts
Electronics
150 x LED’s – Yellow
150 x carbon film resistors – 0.5W 68ohm 5%
6 x transistors
3 x 22k pots
3 x knobs
1 x arduino decimila
4 x stripboard
pin strip
Stuff
5 x 3mm acrylic sheet 610mm x 610mm
small white cable ties
4 x 400mm M10 stud
38 x M10 nuts
4 x M10 dome nuts
Power
1 x regulated power supplies 4.5volts 1400ma
1 x regulated power supplies 7.5 volts
Consumables
solder
super glue
araldite
Step 2: Gathering tools
tools
soldering iron
damp sponge
solder sucker
snips
screwdriver
tape measure or ruler
strip breaker
work surface
‘steady eddie’
multi-meter
hacksaw
spanner
cable stripper (though I prefer just to use the snips)
Step 3: Preparing artwork
In order to laser cut the acrylic sheets first you need to prepare the vector files. To do this we used Adobe Illustrator CS3, though any vector based software would suffice.
Files for each layer will be added below shortly, but the instructions explain how we made the files so that you could create your own.
The pdf file has the 5 layers saved and named as below
Front
Sheet 1
Sheet 2
Sheet 3
Back
Sizing
The first step is to measure the components that will be used, to make sure we create shapes the correct size. To do this we used a set of digital callipers.
Our 3mm LEDs were 2.9mm dia. The pots were 7mm. Holes to enable LEDs and attached wires to be pushed through easily from one layer to the next needed to be 5mm. Holes to take stud 10mm. And screw fixing “key hole” 15mm were at biggest and 6mm at smallest
Layout
Make sure you save your file at regular intervals. We called our source file source layers.
Next layout the basic shape in Illustrator. We are using a 400mm x 400mm square with rounded corners, radius 18mm. Centered within that is a lowers case n; font myriad overall height 337mm. This should be converted to outlines in the file. We specified a line thickness of 1mm and no fill. We then expanded the stroke to make it a solid object.
The 4 x 10mm dia. circles should be placed with the centre 20mm from top and side edge closest, so that they sit squarely in each corner.
This layer is named sheet front, and then duplicated and the new layer is named sheet 1.
Next work on sheet 1, but have sheet front visible but locked.
Save the file regularly.
Delete the outline of the n on sheet 1. Then place 50 x 2.9mm dia. circles within the outline of the letter ,and 50 x 2.9mm dia. circles outside the letter. Distribute them fairly evenly across the layer, but concentrate the ones outside the letter near the perimeter of the letter.
Duplicate sheet 1 and name the new layer sheet 2′. Hide and lock sheet 1. ‘
sheet 2 will be the next layer back in the sculpture. The circles on sheet 2 should be resized to be 5mm dia. These will be used to thread the wires through to the LEDs on sheet 1.
Place another 50 x 2.9mm holes within the letter and 50 x 2.9mm outside the letter on sheet 2. Distribute them evenly across the layer similar to before. Make sure that the new holes are not overlapping, or too close to, the previous ones.
This layer should then be duplicated and the new layer named sheet 3. Hide and lock sheet 2. The 2.9mm circles on sheet 3 should be resized to be 5mm dia. Then place another 50 x 2.9mm holes within the letter and 50 x 2.9mm outside the letter on sheet 3. Again make sure the distribution is fairly even and no holes overlap with previous ones.
Duplicate sheet 3 and call the new layer sheet back. Hide and lock sheet 3.
Delete all the holes except the 10mm ones in the corners on sheet back.
You now have the basic layout that will allow you to place a maximum of 300 LEDs over the 3 layers.
Details
We then added some further details. We selected all the holes on sheet 3 and copied them and pasted them onto sheet front. We then replaced each one with a little concentric circle pattern to act as diffusers in front of each LED. We expanded these in the same way as the n to create thick lines. On sheet 1, sheet 2, and sheet 3 we added a tab to each at the bottom for the pot and knob. We added a circle for the hole for the pot and a rectangle for the locating pin.
On sheet back we added keyholes to allow us to attach it to the wall with screws.
Saving
To save these drawings as separate files we saved the source file as sheet front.ai,sheet 1.ai, sheet 2.ai, sheet 3.ai and sheet back.ai using the ‘save as’ command.
These files were then opened and the other layers in the file deleted so that the file sheet 1.ai only has the layer sheet 1 in it and the file sheet back.ai only has the layer sheet back etc.
 sheets for n.pdf(1191×1417) 376 KB
 back.eps(1136×1136) 313 KBsheet 1.eps(1334×1136) 339 KBsheet 2.eps(1334×1136) 366 KBsheet 3.eps(1334×1136) 393 KB
150 x carbon film resistors – 0.5W 68ohm 5%
6 x transistors
3 x 22k pots
3 x knobs
1 x arduino decimila
4 x stripboard
pin strip
- What is the main purpose of this project?
The project is an art work and experimental piece made for the Lapland Landscape exhibition where each participant makes a letter. - How many layers does the n sculpture have?
The n takes the form of 5 layers of laser cut acrylic. - Can I use software other than Adobe Illustrator CS3 to prepare the files?
Yes, any vector based software would suffice to prepare the artwork for laser cutting. - What is the function of the 3 knobs on the sculpture?
3 knobs control the LEDs and fade them between the ones inside and outside the outline of the n being on. - How are the wires threaded between the layers?
Holes sized 5mm dia are used to thread the wires through from one layer to the next. - What font and size were used for the letter n?
A lowers case n using the font myriad with an overall height of 337mm was centered within a 400mm square. - How do you attach the back of the sculpture to the wall?
Keyholes were added to the back layer to allow it to be attached to the wall with screws. - What is the total number of LEDs used in the project?
The layout allows for a maximum of 300 LEDs over the 3 layers containing the lights. - Why did the creators choose this specific wiring method?
They decided to do it this way because all the exposed components are a big part of the aesthetic.
