
Summary of HOW TO CREATE A MECHANICAL SHUTTER RELEASE FOR YOUR DIGITAL POINT & SHOOT CAMERA
Most cameras offer wireless control, but the Ricoh GRII owner Steloherd made a mechanical shutter-release bracket that fits the hot shoe and lets a traditional cable press the shutter for tactile feedback and immediacy. It was created because the USB remote was inflexible and smartphones were not used. The bracket comprises three main parts joined by one screw, and similar solutions sometimes use servos or actuators and Arduinos for cameras lacking remote options.
Parts used in the Mechanical Shutter Release for Ricoh GRII:
- Hot shoe foot
- Mounting arm for release cable
- Protective lever that the cable pushes down
- Single screw to hold components together
- Mechanical shutter release cable (screws into top)
Most cameras these days offer some kind of built-in WiFI or Bluetooth control that allows you to fire your camera from an app on your smartphone. But not all of them do. The Ricoh GRII is one of those cameras that actually does offer some remote control via an app or USB remote, but sometimes you still want that tactile feel of pushing a shutter button, and the immediate response it gives.
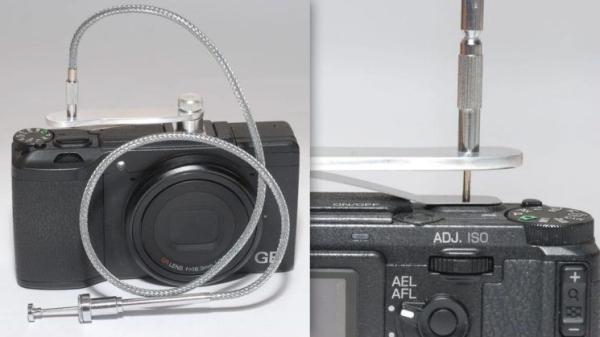
One GRII owner, Steloherd, has created his own method of firing the camera’s shutter via a traditional mechanical shutter release cable. It attaches via the camera’s hot shoe, and then the cable just screws into the top to push down the regular shutter button.
Steloherd says he made the mechanical cable release bracket because he wasn’t very comfortable with the Ricoh CA-3 remote shutter release, which connects through the GRII’s USB port. He says the cable isn’t very flexible and little movements of the cable can shift the camera when he sets it down on a flat surface without a tripod. He also does not use smartphones.
The lever is made from three main parts. There’s the foot which slides into the camera’s hot shoe, an arm to mount the release cable, and a lever which the cable pushes down to fire the shutter (although he says it’s not essential, it’s merely to protect it from scratches). These three components are held together by a single screw going into the hot shoe mount.
It’s a neat idea, and I’ve seen a few others do similar over the years to add an external shutter release to cameras. Typically, though, it’s to add an external shutter release ones that don’t have a USB or smartphone option, often to be able to shoot timelapse. In those cases, instead of the mechanical shutter release cable, a servo motor or linear actuator and an Arduino was used to push down a lever onto the camera’s shutter button.
Source: HOW TO CREATE A MECHANICAL SHUTTER RELEASE FOR YOUR DIGITAL POINT & SHOOT CAMERA
- Why did Steloherd create a mechanical shutter release for the Ricoh GRII?
Because the Ricoh CA-3 USB remote was not flexible, could shift the camera when set on a flat surface, and he did not use smartphones. - How does the mechanical shutter release attach to the camera?
It slides into the camera’s hot shoe foot and is held together with a single screw into the hot shoe mount. - What are the main components of the lever assembly?
There is a hot shoe foot, an arm to mount the release cable, and a lever that the cable pushes down, all held by one screw. - Does the mechanical release use the camera’s USB port?
No, it uses a traditional mechanical shutter release cable that screws into the top and a bracket that mounts in the hot shoe. - Is the protective lever essential?
No, Steloherd says the lever is not essential and mainly protects the shutter button from scratches. - Can similar solutions be made for cameras without USB or smartphone options?
Yes, similar external shutter releases have been created, often using a servo motor or linear actuator and an Arduino to push a lever onto the shutter button. - What problem does the mechanical cable release solve compared to the CA-3 remote?
It avoids the inflexibility of the CA-3 cable which can move the camera when placed on a flat surface and provides tactile shutter-button feedback.
