Summary of How to Control a Nixie Tube With an Arduino
This article guides users on integrating vintage Nixie tubes with modern Arduino microcontrollers. It covers historical context, safety warnings regarding high voltage, and a step-by-step process to test the tube, wire the SN74141 driver IC, upload code, and troubleshoot common issues like dim digits or wiring errors.
Parts used in the Nixie Tube Project:
- 12vdc Power Supply
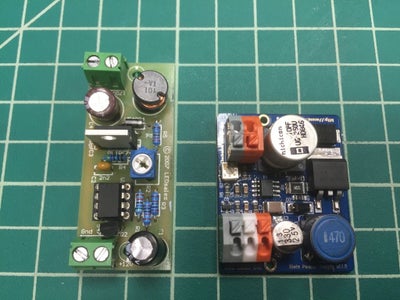
- 12vdc to 180vdc converter (kit or pre-assembled)
- Arduino or other microcontroller
- Nixie Tube (IN-12B or IN-14)
- SN74141 IC chip
- Multimeter
- 12k resistor
- Potentiometer
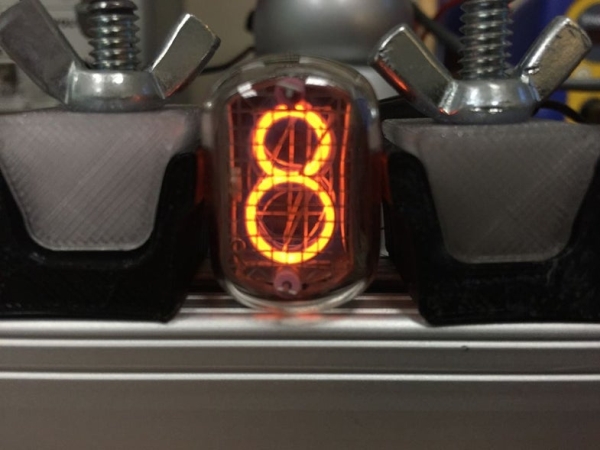
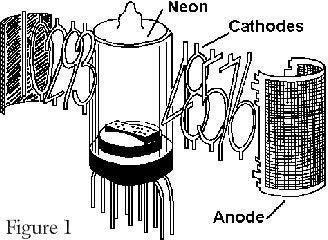
A Nixie Tube is a Neon gas-filled tube, that has a wiremesh anode with various cathodes shaped like numbers or symbols. Back in the 1950s they were used in computers, calculators, and laboratory equipment. Nixie tubes were replaced by LEDs and VFDs(vacuum fluorescent displays)in the 1970s. They were too costly to to mass produce so they were no longer used in most new products. Spice up your next project by adding a few nixie tubes.
Disclaimer: This instructable involves using a high voltage power supply. Please take extreme caution if you plan on using Nixie tubes in your projects.
Step 1: Things You’ll Need
1. 12vdc Power Supply
2. 12vdc to 180vdc converter. I have tried two that work for me. This one is a kit that you have to solder yourself. This one comes pre assembled.
3. Arduino or other microcontroller.
4. Nixie Tube. I have IN-12B and IN-14 Nixie tubes. Search on ebay for NOS(new old stock) Nixie Tubes.
5. SN74141 IC chip
6. Multimeter.
Step 2: Test Your Nixie Tube
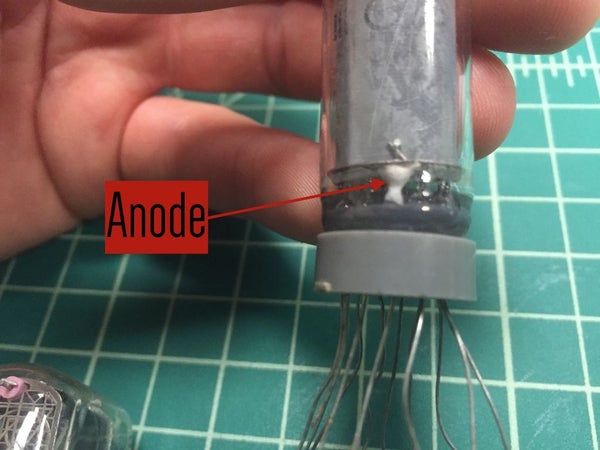
Before connecting your nixie tube to your Arduino, you should test that each digit is functioning properly. Use a multimeter to adjust the DC-DC step up converter to the proper voltage. My nixie tubes need around 180vdc. Connect 180vdc+ to the anode of your nixie tube with a 12k resistor. It doesn’t have to be exact and it will depend on the Nixie tube you are using. I like to use a potentiometer so I can adjust the brightness of the tubes. It is best to check the datasheet of your specific nixie tube to determine which pin is the anode but I have found that the pin with a white protective coating is always the anode. Now connect each of the remaining pins to ground to ensure the digits are fully functional. Don’t worry about touching two cathodes at once. All that will happen is two digits will light up.
Step 3: Connect Your Nixie Tube
Once your nixie tube has been tested, connect digital pin 11 to pin 4(D), digital pin 10 to pin 7(C), digital pin 9 to pin 6(B), and digital pin 8 to pin 3(A) on the SN74141 IC chip. Connect 5v from the Arduino to pin 5 of the chip and ground from the arduino to pin 12 of the chip. Connect the cathodes of your Nixie tube to the corresponding pins on the SN74141 and connect the the anode of the Nixie tube to 180vdc+. The IC chip takes a binary input on D, C, B, A and outputs the corresponding digit of the nixie tube. Low, Low, Low, Low for 0. Low, Low, Low, High for 1 and so on. If you want to drive two Nixies independently, it will take up 8 Arduino digital pins or you could use a shift register(see figure 4) to only use 3 pins with two nixie tubes. For more information on using a shift register with a nixie tube, visit this instructable. If you use an Arduino Mega, then you probably will not need to use a shift register. You can power the Arduino from the 12v end of the converter or you can use a separate power supply if you want to, but it is not necessary.
Step 4: Upload Your Demo Code
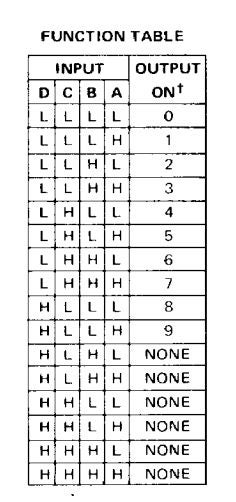
Upload the attached code to your Arduino. The code cycles through each digit of the nixie tube. Use this as a template for your next project. If you want to make your own code, use the function table as well as the attached datasheet for the IC chip.
Step 5: Moment of Truth
Plug in your 12vdc power supply and watch as the Nixie tube cycles through the numbers. If you have problems with only some of the digits lighting, it could be a few things. You may have a bad digital pin on your Arduino or microcontroller, you may have a bad IC chip, or you may have wired your circuit incorrectly. Leave a comment below saying what you’d like to do with Nixie Tubes.
Read more: How to Control a Nixie Tube With an Arduino
- How do I determine the anode pin on my Nixie tube?
The pin with a white protective coating is always the anode. - What voltage should I set for the DC-DC converter?
You should adjust the converter to around 180vdc, though this depends on your specific tube. - Can I connect two cathodes at once during testing?
Yes, connecting two cathodes will simply cause two digits to light up simultaneously. - Which Arduino pins connect to the SN74141 IC?
Digital pins 11, 10, 9, and 8 connect to pins D, C, B, and A respectively. - How can I drive two Nixie tubes using fewer than eight digital pins?
You can use a shift register to control two tubes using only three pins. - Does the Arduino need a separate power supply from the converter?
No, you can power the Arduino from the 12v end of the converter if you wish. - What does the binary input Low, Low, Low, High produce on the tube?
This input sequence produces the digit 1. - What should I check if only some digits light up?
Check for a bad digital pin, a faulty IC chip, or incorrect circuit wiring.