Summary of Home automation system using Arduino and SIM900 GSM module
This article details a low-cost, open-source GSM home automation project designed for controlling lighting and heating. The author built a custom Arduino clone to reduce costs, aiming for a total price under $100. The system uses a SIM900 shield for remote control via text messages, allowing hobbyists to replicate the device easily. Key components include sensors for temperature monitoring and relays for appliance switching, all mounted on a wooden board using standard electronics parts.
Parts used in GSM Home Automation System:
- Arduino clone
- SIM900 GSM SHIELD
- Relay module
- 2x16 LCD Display
- DS18B20 temperature sensor
- Push button
- Dupont wires
- LED module
- Nuts and bolts
- Wooden chopping board or similar wooden board
- ATmega328P-PU
- 16MHz Quartz
- Ceramic capacitors (22pF, 100uF, 10uF, 47uF)
- Resistors (10k, 1k)
- 1N4007 diode
- 5mm LEDs
- 7805 voltage regulator
- Barrel power connector
- Male and female pin headers
Hi there! As I’ve almost finished my studies at Faculty of Engineering, I had to make a graduation project and my thought was to make a jaw-dropping thing (I know that’s hilarious 😀 ) to show everybody that I’m a good prototype maker and I can turn ideas into real and useful things.
I know GSM controlled home automation systems are widely used and can be found easily on internet, but as we all know, the prices are very prohibitive for general consumers. This is why I’ve tried to build some sort of device based on open-source knowledge that can be replicate by all the hobbyists, even if they are amateurs or professionals.
So I begun to think what kind of basic home appliances could be remote controlled via GSM network and nothing else? We all know, that you can control lights, heating, multimedia system and so on, but I’ve tried to make my project closer for my basic needs: lighting and heating (optional – garage doors, but it’s not my case because I live on a 3rd floor apartment).
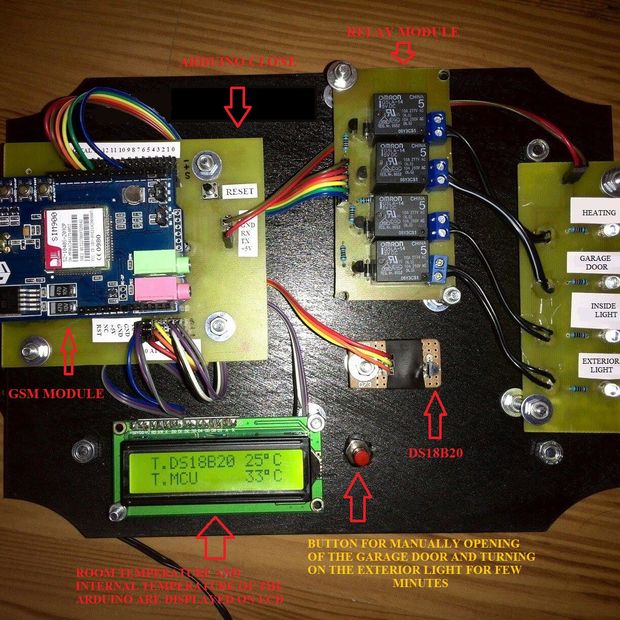
I mention that the finished prototype, seen in the photo, can be used safely (with a bit of tweaks, of course) on any kind of building with or without garage (the garage door relay can be repurposed for any other activity)
For this project I’ve used:
1. An Arduino clone
2. SIM900 GSM SHIELD
3. Relay module
4. 2×16 LCD Display
5. DS18B20 temperature sensor
6. Push button
7. Some Dupont wires
8. A led module (this is optional, if you have a chinese relay module with built in LEDs)
9. Some nuts and bolts to mount everything in place
10. A wooden chopping board or other kind of wooden board for propper display of the components
The costs?… The gsm shield was about 40$ from eBay, LCD…2$, DS18B20…1.5$, Dupont wires another 2 bucks, push button…few cents, the relay module 2-3$ to make and the Arduino clone was less than 10bucks to make…
Conclusion: you can build your own basic GSM home automation with less than 100$!
If you like this instructable please feel free to vote it on each contest it is subscribed! Thanks! 🙂
Step 1: Making the Arduino clone
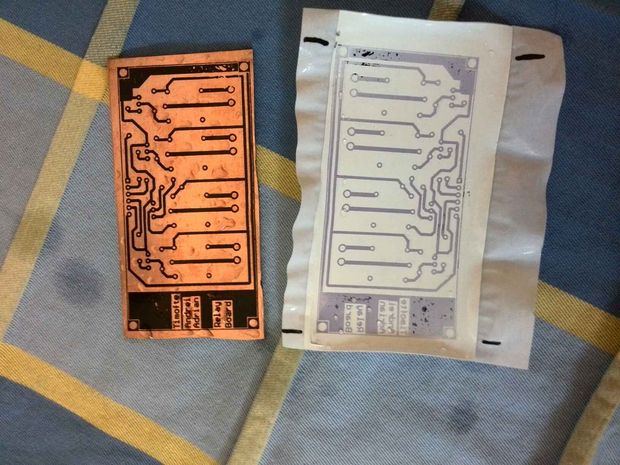
The method used to make the PCB is just p’n’p using Oracal 641 paper, an 8 years old HP LaserJet 1018 printer, a clothes iron, ferric chloride etchant, some kind of dissolvent to clean out the toner traces after etching process and obviously a copper-covered board ready to be turned into a PCB.
After etching and cleaning the finished PCB, I’ve drilled all the holes for components and connectors, I’ve soldered them all, I’ve checked for short circuits and the result can be seen on the last photo.
The BOM is:
– ATmega328P-PU
– 16MHz Quarz
– 2 x 22pF caps
– 3 x 100uF caps
– 1 x 10uF cap
– 1 x 47uF cap
– 2 x 10k resistors
– 1 x 1k resistor
– 1 x 1N4007 diode
– 2 x 5mm LEDs
– 1 x 7805
– 1 x barrel power connector
– 1 x push button
– some male and female pin headers
Because I don’t think that the etching and soldering processes are important, I’ve only made few pictures of the critical parts of the building.
 schematics.rar93 KB
- How can I build a GSM home automation system for less than 100$?
You can build one by using an Arduino clone, a SIM900 GSM shield, a relay module, an LCD display, and other low-cost components totaling under 100 dollars. - What basic home appliances can be controlled remotely via this GSM network?
The project focuses on controlling lighting and heating, though the relay can be repurposed for other devices like garage doors. - Can this prototype be used in buildings without a garage?
Yes, the finished prototype can be used safely on any kind of building with or without a garage as the relay can be repurposed. - Why did the author decide to make a custom Arduino clone instead of buying one?
The author only had one Arduino UNO available for another project, creating a huge need for a stand-alone clone board. - What method was used to create the custom PCB for the Arduino clone?
The method involved using Oracal 641 paper, a laser printer, a clothes iron, ferric chloride etchant, and a copper-covered board. - Does the project require expensive proprietary hardware to function?
No, the project is based on open-source knowledge and uses affordable parts like a 40 dollar GSM shield from eBay to avoid prohibitive prices. - Is the LED module mandatory for the project to work?
No, the LED module is optional if you have a Chinese relay module that already has built-in LEDs. - What is the primary goal of this graduation project?
The goal was to create a jaw-dropping, useful prototype that demonstrates how to turn ideas into real things and show that hobbyists can replicate it.