Summary of Hacking a Sonoff to Work With Home-Assistant and MQTT
This article details how to hack an original Sonoff WiFi smart switch (ESP8266-based) for use with Home Assistant and MQTT. The process involves disassembling the device, soldering a 5-way header to the PCB, uploading custom firmware via an Arduino Uno or FTDI, configuring network settings using WiFiManager, and integrating the device into Home Assistant.
Parts used in the Hacking a Sonoff:
- Sonoff FT or Arduino Uno with DIL Atmega chip
- 4 Jumper leads (Red, Black, Yellow, Orange)
- Phillips screwdriver
- Spudger
- Soldering iron and solder
- Large blob of Bluetac
- 5 Way header
- Magnifying glass/helping hands
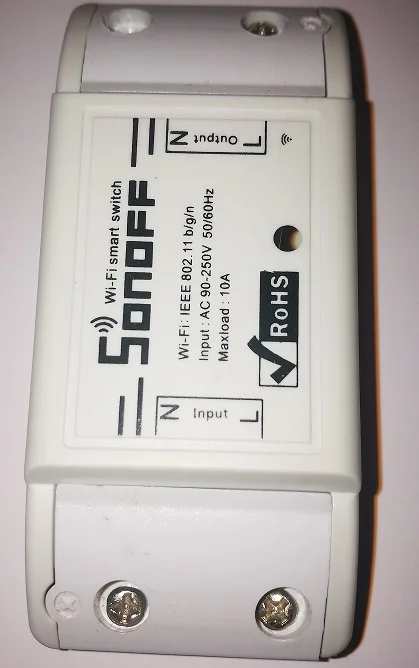
OK So my third Instructable and here we’re dealing with another Sonoff device, the original Sonoff WiFi smart switch. Theses devices are again based around the ESP8266 and are easily hacked. The devices can switch up to 10A @ 240V so are ideal for switching lights, TV’s, games consoles etc. Please don’t try running a kettle through one of theses, it’s not rated for that sort of current and will go pop, or more likely BANG!
Step 1: What You’re Going to Need
- Sonoff
- FTDI or and Arduino Uno with a DIL Atmega chip
- 4 Jumper leads, Red, Black, Yellow, Orange
- Phillips screwdriver
- Spudger
- Soldering iron and solder
- A large blob of Bluetac
- 5 Way header
- Magnifying glass/helping hands
Arduino IDE install and ready to go
Overview of Arduino install for ESP8266 by TrakerJ
The following libraries will also be needed to be installed in your Arduino IDE
WifiManager by tzapu
PubSubClient by Nick O’Leary
Installing Arduino Libraries by MertArduino
Step 2: Dismantling the Sonoff
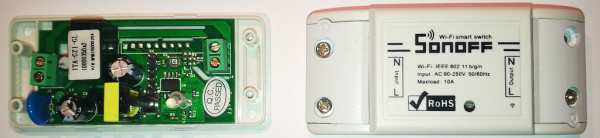
Remove the four screws and set them aside in a safe place.
Using the spudger gently pry the bottom of the case away from the top
When you have split the case carefully remove the top section and set aside, then lift the pcb out of the bottom half of the case and set the bottom aside.
Step 3: Modifying the PCB
We now need to solder a 5 way header onto the board, plug your iron in and while we wait insert the header into the board.
Now take that blob of Bluetac and push it onto the header so squidged down enough to hold the header in place but still sticks proud of the other components.
Flip the board over and push it down so that the Bluetac hold the board steady.
You now have a nice stable board and the header held in place making it easier to solder.
Once your Iron is hot enough, solder a single pin, either Gnd or 3v3 once the solder has cooled you can remove the Bluetac and carry on soldering the rest of the board, I don’t like leaving it there while I solder the rest of the board as it can get a bit stinky if it gets hot.
Step 4: Hook It Up to Your FTDI/Uno
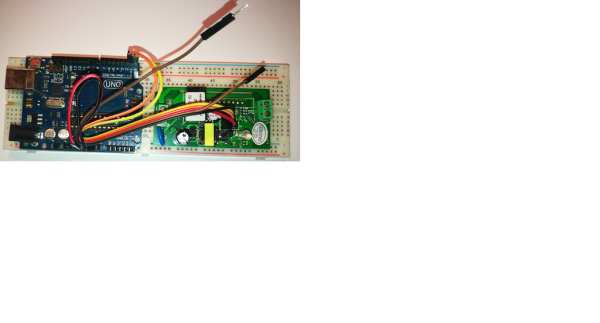
As I’ve said before, I use an Uno instead of an FTDI, using an FTDI is no different, I just can’t be asked to hunt one out when I need it.
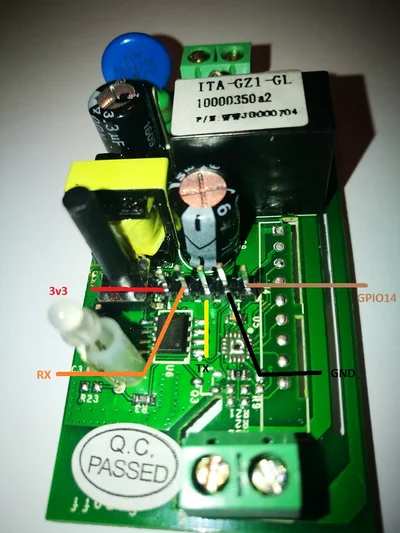
So with your Dupont wires, hook them up as follows.
Header Colour Arduino
3V3 Red 3V3
RX Orange TX
TX Yellow RX
GND Black GND
Check your connections over paying particular attention to the Red lead, make absolutely sure it’s connected to 3V3 as connecting to 5V will likely kill the ESP8266.
Step 5:
Download the Sonoff.ino sketch and save it to a folder called Sonoff.
Load it into your Arduino IDE and edit the following lines:
Line 25:
const PROGMEM char* MQTT_CLIENT_ID = “sonoff”;
Change “sonoff” to something suitable for your installation.
Line 26:
const PROGMEM char* MQTT_USER = “MQTT User”;
Change “MQTT User” to the user name used to connect to your MQTT server and
Line 27:
const PROGMEM char* MQTT_PASSWORD = “MQTT Password”;
Change “MQTT Password” to your MQTT servers password
Lines 28 and 29:
const char* MQTT_LIGHT_STATE_TOPIC = “room/sonoff/status”;
const char* const char* MQTT_LIGHT_COMMAND_TOPIC = “room/sonoff/switch”;
Set the state and command topics inline with your naming conventions
Line 79:
WiFi.hostByName(“your_mqtt.server.co.uk”, MQTT_SERVER_IP);
Change “your_mqtt.server.co.uk” to the fully qualified domain name of your MQTT server.
Give your changes the once over to make sure they are correct then verify the sketch correcting any Issues.
Once all issues are fixed, hold down the button on the Sonoff and connect your USB lead, this puts it into flash mode ready to receive the sketch.
Make sure your IDE is connected to the right port and send the sketch over.
Step 6: Connect the Sonoff to the Wireless Network
Open up the Serial Monitor in the Arduino IDE, change the baud to 115200
If this Sonoff has never had a sketch uploaded to it using the WiFiManager library you should be seeing something similar to this…
Ver: 1.3
*WM:
*WM: AutoConnect
*WM: Connecting as wifi client…
*WM: Using last saved values, should be faster
*WM: Connection result:
*WM: 0
*WM: SET AP STA
*WM:
*WM: Configuring access point…
*WM: ThingMaBob
*WM: AP IP address:
*WM: 192.168.4.1
*WM: HTTP server started
If not and you would like to start from scratch, you will need to uncomment line 63: //wifiManager.resetSettings(); resend the sketch to the Sonoff, then comment the line out again and resend once more to the Sonoff.
Now we are set to connect the Sonoff to your local wireless network.
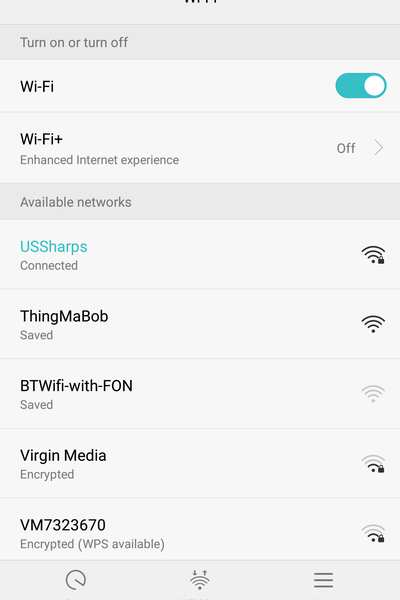
Using a smartphone or a pc with a WiFi adapter bring up the list of available networks.
Click on the network named ThingMaBob and connect to it.
You will then need to Authenticate, on Android clicking the Authenticate icon at the top of the screen will take you to the pages built into the WiFiManager, you can now select your local network and then enter your wifi key.
When you click save the settings will be written back to the Sonoff so that it will automatically connect on boot. The Sonoff will now reboot and connect to your local WLAN and attempt to connect to the MQTT server.
Step 7: Adding the Sonoff to Home Assistant
I separate all of my devices into separate files which I then include in the main configuration.yaml.
Please add the device to wherever you keep yours.
platform: mqtt
name: “sonoff”
state_topic: “room/sonoff/status“
command_topic: “room/sonoff/switch“
payload_on: “ON”
payload_off: “OFF”
optimistic: false
You can alter the names to whatever you like, but you must make sure state_topic and command_topic match what you entered in the sonoff sketch on lines 28 and 29.
Finally run a test to make sure everything is ok with your new entry
/usr/local/bin/hass -c ./ –script check_config
If all appears ok restart hass service
hass-daemon restart
You should now see the new switch in the home assistant gui. Check you can toggle the switches from within Home assistant.
Now you can hook your device up to the switch and reassemble the case. Please make sure if there is an earth wire in the cable that continue the earth. I just join the earth together with a chocolate block
Source: Hacking a Sonoff to Work With Home-Assistant and MQTT
- What is the maximum current rating for the Sonoff switch?
The device can switch up to 10A @ 240V. - Can I run a kettle through this Sonoff device?
No, it is not rated for that sort of current and will likely fail dangerously. - Which component holds the header in place during soldering?
A large blob of Bluetac is used to hold the header steady. - Why must the Red lead be connected to 3V3 specifically?
Connecting the Red lead to 5V will likely kill the ESP8266 chip. - How do you put the Sonoff into flash mode?
You must hold down the button on the Sonoff while connecting your USB lead. - What network name appears when configuring the Sonoff?
The network named ThingMaBob appears if no previous settings exist. - What command checks the configuration before restarting Home Assistant?
You should run /usr/local/bin/hass -c ./ --script check_config. - What happens after clicking save in the WiFiManager interface?
The settings are written back to the Sonoff so it automatically connects on boot.