I learnt about Arduino 2 years ago.So I started playing around with simple stuff like LEDs,buttons,motors etc.Then I thought wouldn’t it be cool to connect to do stuff like displaying the day’s weather,stock prices ,train timings on an LCD display.I found that this could be done by sending and receiving data through the internet.So the solution was connecting to intenet. There began my search on how to connect the Arduino to internet and send and receive data.I learnt about wifi modules on the internet and found them to be very costly.Then I learnt of the ESP8266.
I read a lot on the internet on the ESP8266 module about a year ago and bought one but got about to work with them just last month.At the time there was no extensive information available.However now a lot of documentation,videos are are available on the internet regarding firmware,AT commands,projects etc.So I decided to get started.
I wrote this instructable as a beginner’s guide as I faced a lot of problems in wiring up and getting started with the ESP8266.So I decided to write this Instructable so that other people who encounter problems with their modules can resolve them faster
In this Instructable I will try to show
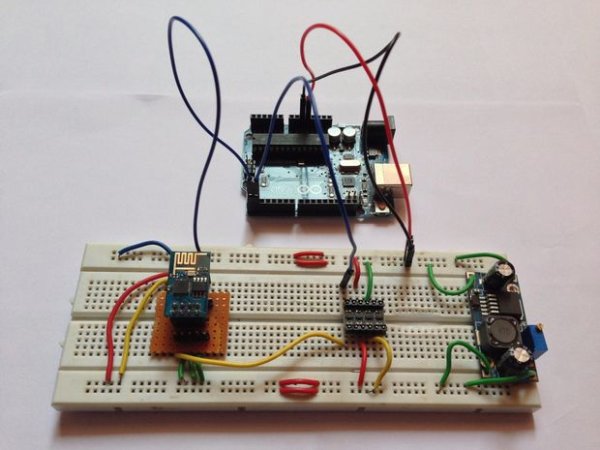
- How to hookup an ESP8266 and communicating with it through Arduino Uno.
- I will also try to show how a tweet can be sent through it using Thingspeak.
What can the ESP8266 do?It is limited by your imagination.I have seen projects and tutorials on the internet showing how to fetch a city’s temperature, stock prices,sending and receiving emails ,making phone calls and much much more.I will show in this Instructable how to send a tweet.
Step 1: Things You Will Need
Here are the things you will need.Most of these may be bought from any electrical store or online(I have provided the links for reference).
- 1xESP8266(ESP-01) –ebay
- 1xBreadboard adapter(learn how to make one here or use some jumper wires)
- 1xLM2596 –ebay
- 1xLogic level converter –ebay
- 1xArduino Uno
- USB cable for Arduino Uno
- 1xBreadboard –ebay
- Wires –ebay
- Arduino IDE
- An account with Thingspeak
The total cost will be around Rs 600(about $9).I have excluded the cost of Arduino Uno as it depends on whether you want an original or a clone.The cheapest clones are available at around Rs 500(about $4).
Step 2: Some Info on ESP8266
ESP8266 was launched in 2014 just a year ago so it is quite new.The chips are manufactured by Espressif .
Advantage
The greatest advantage of ESP8266 is perhaps its cost.It is quite cheap and you can buy a couple of these at a single go.Before I came to know about it I couldn’t even think of buying a wifi module.They were too costly. New versions of ESP8266 are being released quite frequently and the latest one is ESP 12.However in this Instructable I will focus only on ESP 01 which is quite popular.Moreover when you buy the ESP8266 it comes pre loaded with the default AT firmware.So you are good to get started as soon as you buy one..Also as you will see from this instructable it is quite easy to interface them.
Read more: Guide to ESP8266 and Tweeting Using ESP8266