We all are familiar with the word ‘Automation’, where the human interaction is minimal and things can be controlled automatically or remotely. Home automation is very popular and demanding concept in the field of Electronics, and we are also making our best efforts to make this concept easily understandable and manageable as Electronics Projects. We have previously developed several types of Home Automation Projects with a working Video and Code, please check: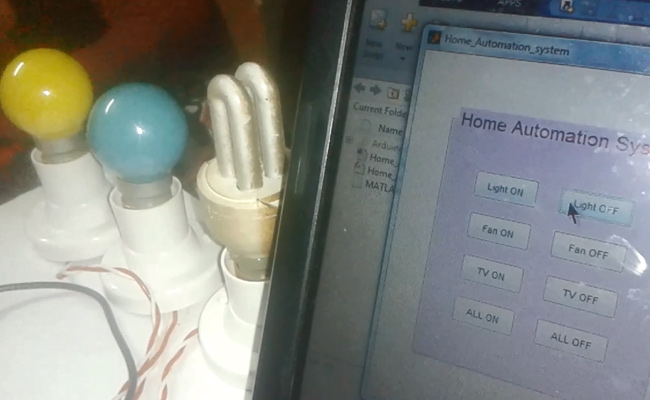
- DTMF Based Home Automation
- GSM Based Home Automation using Arduino
- PC Controlled Home Automation using Arduino
- Bluetooth Controlled Home Automation using 8051
- IR Remote Controlled Home Automation using Arduino
And in this project, we are going to build our next home automation project using MATLAB and Arduino, which is GUI Based Home Automation System Using Arduino and MATLAB
Components:
- Arduino UNO
- USB Cable
- ULN2003
- Relay 5 volt
- Bulb with holder
- Connecting wires
- Laptop
- Power supply
- PVT
Working Explanation:
In this project, we are using MATLAB with Arduino to control the Home appliances, through a Graphical User Interface in Computer. Here we have used wired communication for sending data from computer (MATLAB) to Arduino. In computer side, we have used GUI in MATLAB to create some buttons for controlling home appliances. For communication between Arduino and MATLAB, we first need to install the “MATLAB and Simulink Support for Arduino” or “Arduino IO Package”. To do so follow the below steps or check the video below:
- Download the Arduino IO Package from here. You need to Sign up before download.
- Then Burn/upload the adioe.pde file to the Arduino using Arduino IDE. This adioe.pde file can be found in Arduino IO Package – ArduinoIO\pde\adioe\adioe.pde
- Then open the MATLAB software, go through the Arduino IO folder, open the install_arduino.m file and Run it in Matlab. You will see a message of “Arduino folders added to the path” in command window of MATLAB, means MATLAB path is updated to Arduino folders.
That’s how we make the Arduino, communicate with MATLAB. Above method is suitable for “MATLAB R2013b or earlier versions”, if you are using the higher version of MATLAB (like R2015b or R2016a), you can directly click on Add-ons Tab in MATLAB and then click “Get Hardware Support Packages”, from where you can install Arduino packages for MATLAB.
After installing files, now you can create a GUI for Home Automation Project. Basically in GUI, we are creating Push Buttons for controlling the home appliances from computer. Buttons can be created by going into “Graphical User Interface” in “New” menu in MATLAB. Further we can set the name and colours of these buttons, we have created 8 buttons, in which six to ON and OFF three home appliances and two buttons to ON and OFF all the appliances simultaneously.
Now after creating the buttons, when you click on Run button in that GUI window, it will ask you to save this GUI file (with extension .fig), also known as ‘fig file’. As soon you saved the file, it will automatically create a code file (with extension .m), also known as ‘M file’ (see below screen shot), where you can put the Code (given in Code section below). You can download the GUI file and Code file for this project from here: Home_Automation_system.fig and Home_Automation_system.m (right click and select Save link as…), or you can create them yourself like we have explained.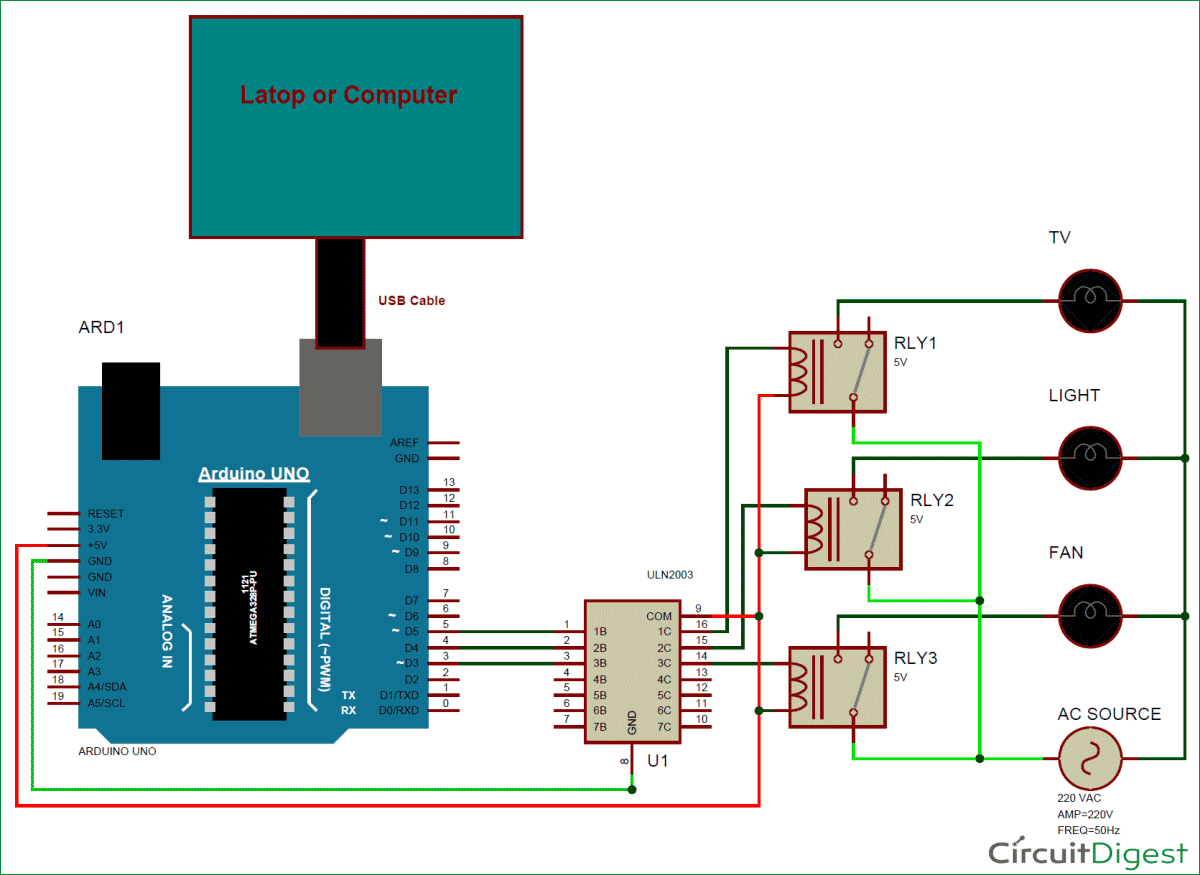
Programming Explanation:
When we press any button from the GUI window then it sends some commands to Arduino and then Arduino do that operation. After installing Arduino MATLAB IO support package, we can access Arduino from the MATLAB by using the same Arduino functions, with some little variation, like:
For making a pin HIGH in Arduino we write code as digitalWrite(pin, HIGH)
In MATLAB we will use this function with the help of an object or variable like,
a.digitalWrite(pin, HIGH);
and likewise so on.
Before doing this we have to initialise variable like this:
a = Arduino(‘COM1’); // change COM1 according to your port
In this project, there is no Arduino code except the Arduino MATLAB support package code or file. As explained earlier that code file (.m file) is automatically generated while saving the GUI file (.fig file). There is already some code prewritten in .m file. Basically these are Callback functions for Push buttons, means we can define what should happen on clicking on these Push Buttons.
In MATLAB code, first we initialise serial port and make it an object by using a variable. And then we can start programming like Arduino using the variable.
clear ar;
global ar;
ar=arduino('COM13');
ar.pinMode(3, 'OUTPUT');
ar.pinMode(4, 'OUTPUT');
ar.pinMode(5, 'OUTPUT');
ar.pinMode(13, 'OUTPUT');
In the call back function of each button, we have written the related code for On or OFF the respective Home Appliances, connected to Arduino via Relay. Like for example, Callback function for Light ON is given below:
function light_on_Callback(hObject, eventdata, handles)
% hObject    handle to light_on (see GCBO)
% eventdata  reserved - to be defined in a future version of MATLAB
% handles    structure with handles and user data (see GUIDATA)
global ar;
ar.digitalWrite(3, 1);
ar.digitalWrite(13, 1);
Likewise we can write the code in the Callback functions of all the buttons, to control the other connected Home Appliances, check the full MATLAB Code below (.m file).
Read More: GUI Based Home Automation System using Arduino and MATLAB