
Summary of Get Sensor Data From Arduino To Smartphone Via Bluetooth
This article details a project by Hariharan Mathavan that transmits temperature and humidity data from an Arduino to a smartphone using Bluetooth. The system utilizes an HC-05 module to wirelessly send readings from a DHT-11 sensor, which are processed by Arduino code and displayed via a custom Android application developed in Android Studio.
Parts used in the Arduino Bluetooth Sensor Project:
- Arduino Uno
- Android Smartphone with Bluetooth
- HC-05 Bluetooth Module
- Android Studio
- USB cable for programming and powering
- DHT-11 temperature and humidity sensor
- DHT library by Adafruit
Hariharan Mathavan at allaboutcircuits.com designed a project on using Bluetooth to communicate with an Arduino. Bluetooth is one of the most popular wireless communication technologies because of its low power consumption, low cost and a light stack but provides a good range. In this project, data from a DHT-11 sensor is collected by an Arduino and then transmitted to a smartphone via Bluetooth.
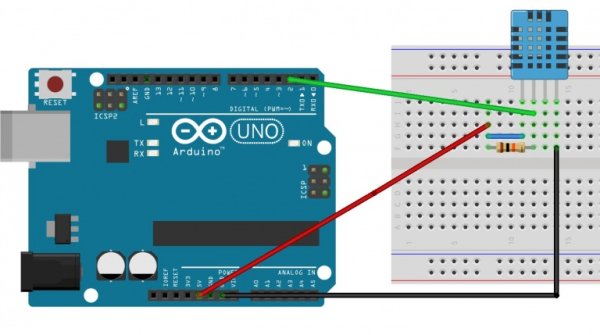
Required Parts
- An Arduino. Any model can be used, but all code and schematics in this article will be for the Uno.
- An Android Smartphone that has Bluetooth.
- HC-05 Bluetooth Module
- Android Studio (To develop the required Android app)
- USB cable for programming and powering the Arduino
- DHT-11 temperature and humidity sensor
Connecting The Bluetooth Module
To use the HC-05 Bluetooth module, simply connect the VCC to the 5V output on the Arduino, GND to Ground, RX to TX pin of the Arduino, and TX to RX pin of the Arduino. If the module is being used for the first time, you’ll want to change the name, passcode etc. To do this the module should be set to command mode. Connect the Key pin to any pin on the Arduino and set it to high to allow the module to be programmed.
To program the module, a set of commands known as AT commands are used. Here are some of them:
| AT | Check connection status. |
| AT+NAME =”ModuleName” | Set a name for the device |
| AT+ADDR | Check MAC Address |
| AT+UART | Check Baudrate |
| AT+UART=”9600″ | Sets Baudrate to 9600 |
| AT+PSWD | Check Default Passcode |
| AT+PSWD=”1234″ | Sets Passcode to 1234 |
The Arduino code to send data using Bluetooth module:
//If youre not using a BTBee connect set the pin connected to the KEY pin high
#include <SoftwareSerial.h>
SoftwareSerial BTSerial(4,5);
void setup() {
 String setName = String("AT+NAME=MyBTBee\r\n"); //Setting name as 'MyBTBee'
 Serial.begin(9600);
 BTSerial.begin(38400);
 BTSerial.print("AT\r\n"); //Check Status
 delay(500);
 while (BTSerial.available()) {
 Serial.write(BTSerial.read());
 }
 BTSerial.print(setName); //Send Command to change the name
 delay(500);
 while (BTSerial.available()) {
 Serial.write(BTSerial.read());
 }}
void loop() {}
Connecting The DHT-11 Sensor
To use the DHT-11, the DHT library by Adafruit is used. Go here to download the library. When the letter “t” is received, the temperature, humidity, and heat index will be transmitted back via Bluetooth.
circuit to connect DHT-11 with Arduino
The code used to read data from the DHT sensor, process it and send it via Bluetooth:
#include "DHT.h"
#define DHTPIN 2
#define DHTTYPE DHT11
DHT dht(DHTPIN, DHTTYPE);
void setup() {
 Serial.begin(9600);
 dht.begin();}

void loop()
{ char c;
if(Serial.available())
 {
 c = Serial.read();
 if(c=='t')
 readSensor();
 }}
void readSensor() {
 float h = dht.readHumidity();
 float t = dht.readTemperature();
 if (isnan(h) || isnan(t)) {
 Serial.println("Failed to read from DHT sensor!");
 return;
 }
 float hic = dht.computeHeatIndex(t, h, false);
 Serial.print("Humidity: ");
 Serial.print(h);
 Serial.print(" %\t");
 Serial.print("Temperature: ");
 Serial.print(t);
 Serial.print(" *C ");
 Serial.print("Heat index: ");
 Serial.print(hic);
 Serial.print(" *C ");
}
Developing The Android App
The flow diagram of the Android app is illustrated below,
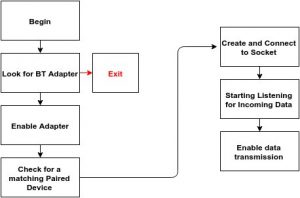
Flow diagram of the Android app
As this app will be using the onboard Bluetooth adapter, it will have to be mentioned in the Manifest.
uses-permission android:name="android.permission.BLUETOOTH"
Use the following code to test if Bluetooth adapter is present or not,
BluetoothAdapter bluetoothAdapter=BluetoothAdapter.getDefaultAdapter();
if (bluetoothAdapter == null) {
Toast.makeText(getApplicationContext(),"Device doesnt Support Bluetooth",Toast.LENGTH_SHORT).show();
}
The following part of the code deals with reading the data,
int byteCount = inputStream.available();
 if(byteCount > 0)
 {
 byte[] rawBytes = new byte[byteCount];
 inputStream.read(rawBytes);
 final String string=new String(rawBytes,"UTF-8");
 handler.post(new Runnable() {
 public void run()
 {
 textView.append(string);
 }
 });
 }
To send data, pass the String to the OutputStream.
outputStream.write(string.getBytes());
The complete source code of the Android application is attached here: Arduino Bluetooth(Source)
Testing
Power up the Arduino and turn on the Bluetooth from your mobile. Pair with the HC-05 module by providing the correct passcode – 0000 is the default one. Now, when “t” is sent to the Arduino, it replies with the Temperature, Humidity, and Heat Index.
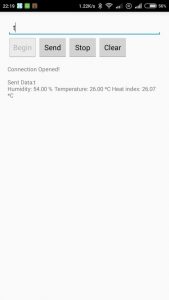
Source: Get Sensor Data From Arduino To Smartphone Via Bluetooth
- How do you connect the HC-05 Bluetooth module to the Arduino?
Connect VCC to 5V output, GND to Ground, RX to TX pin, and TX to RX pin of the Arduino. - What command is used to set the name of the Bluetooth device?
The AT+NAME command followed by the desired name in quotes sets the device name. - Can any Arduino model be used for this project?
Yes, any model can be used, though the provided code and schematics are specifically for the Uno. - What happens when the letter t is received by the Arduino?
The Arduino transmits back the temperature, humidity, and heat index via Bluetooth. - How do you check if the Bluetooth adapter is present on the Android device?
The code uses BluetoothAdapter.getDefaultAdapter() and checks if it is null to determine support. - What is the default passcode for pairing the HC-05 module?
The default passcode is 0000. - Which library is required to use the DHT-11 sensor?
The DHT library by Adafruit is used to interface with the sensor. - How does the Android app handle reading incoming data?
The app reads available bytes from the input stream, converts them to a UTF-8 string, and appends them to a text view.
