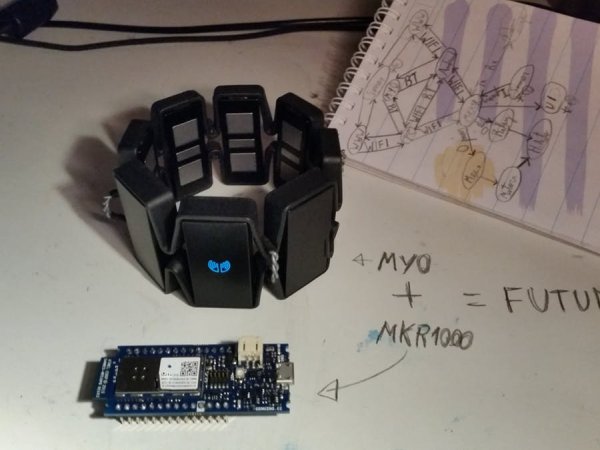
Not only this project has all the Smart Home features but it also includes MYO gesture control, allowing control of lights with your arm.
Things used in this project
Story
Home Automation is the biggest domestic technological improvement of this generation, toe to toe with drones. It can provide full control of every piece of hardware in a house, if done well: from light control to preparing coffee at a specific hour of the day, key-less doors to automatic plant irrigation. There’s truly no limit to Homes Automation, and with such a powerful board as the MKR1000, which itself resolves the WIFI issue, it becomes straightforward to connect an Android device and use it to control the lights, for example. Furthermore, using wifi over Bluetooth for this project overcomes the limitation of the Bluetooth range issue.
The MYO is a gesture control armband that detects EMS data from the muscles in the users arm, therefore it can detect poses he does with his hands, plus it has a built-in accelerometer, which extends the possibilities of control to a great extent. With this sort of technology, there is no need of using your smartphone, just finger spread your hand and voilà: lights turn on and off thanks to it. Wave right twice, once left, double tap your thumb with your middle finger and voilà again, the door unlocks, Jedi style. With this feature, the projects upgrades from Home Automation to Gesture Controlled Home Automation.
But then again, why stop there? In such a world of DIY and constant improving technology, why limit this project to Home Automation if we can turn it into a Gestured Controlled Smart Home project. The arduino MKR1000 keeps track of each user connected to it’s server, therefore, before even entering the house, one could already know who’s already home, and if so, what they are doing.
Smart Homes aren’t only about controlling hardware through digital medias such as computers and smartphones, it’s also about knowing what’s going on inside the users house even before he enters it. It’s about simplifying our daily domestic life.
Last but not least, this concept could have also infinitive uses in the workplace. For instance, during a power point presentation or a business meeting, having this technology to control the lights of the room, the air conditioning, opening the electronic curtains, etc, could prevent the distraction of your audience and clients. This technology has the advantage of allowing discrete control of a room features (with minimal disruption), keeping your audience and clients focus on what truly matters to your company or organisation!
But how does it work?
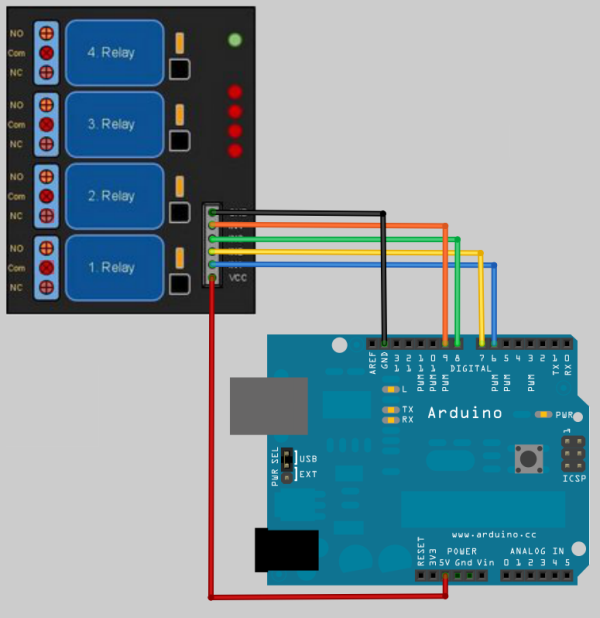
The arduino MKR1000 has an on-board wifi shield that allows other wifi devices to communicate with it, therefore we’re able to use a smartphone or compute to control the hardware connected to the relay. Then, we can connect the MYO to the smartphone through Bluetooth. the same application that sends the commands to the arduino will also listen to the MYO, which itself is reading the EMG (electromyography) data of the user’s arm and, after detecting a valid hand pose(fist, finger spread, wave in, wave out, double tap) it sends the message to the android application. Once the MYO detects the finger spread pose, the app receives the data and resends it to the arduino through a UDP message to the MKR1000. The arduino MKR1000 sends the data through serial communication to a UWA running on the computer. This last analyses the data and resends it to an Arduino Uno, which has a relay connected and therefore is able to control the lights and other pieces of hardware in the house. When the user does a fist pose, the same process takes place, but instead of turning it on, the component turns off. The advantages of using an extra Arduino is that we are able to use more pins to control more hardware, considering the limit number of pins in the MKR1000.

I am still working on a Windows 10 application to also be able to control the house and be part of the project. It will be more like a hub for every user in the environment where the project would be used. As soon as i finish it, i will upload the code.
NB: I didn’t upload a video showing the actual light and other components of the house control because i was missing a relay, as soon as it arrives, i will upload another video.
Schematics
Code
Android Studio
Java
package com.joaquim.udpsender4;

import android.bluetooth.BluetoothAdapter;
import android.content.Intent;
import android.os.AsyncTask;
import android.os.IBinder;
import android.support.v7.app.AppCompatActivity;
import android.os.Bundle;
import android.util.Log;
import android.view.View;
import android.widget.Button;
import android.widget.CompoundButton;
import android.widget.EditText;
import android.widget.Switch;
import android.widget.TextView;
import android.widget.Toast;
import java.net.DatagramPacket;
import java.net.DatagramSocket;
import java.net.InetAddress;
import android.content.Context;
import android.app.Service;
import android.content.Intent;
import android.os.IBinder;
import android.util.Log;
import android.widget.Toast;
import android.widget.ToggleButton;

import com.thalmic.myo.AbstractDeviceListener;
import com.thalmic.myo.DeviceListener;
import com.thalmic.myo.Hub;
import com.thalmic.myo.Myo;
import com.thalmic.myo.Pose;
import com.thalmic.myo.scanner.ScanActivity;

import org.w3c.dom.Text;


public class MainActivity extends AppCompatActivity {
    String host = "192.168.1.121";
    int port = 2390; //Random Port
    private TextView Text;
    private EditText ipAdd ;
    private EditText portAdd;
    private Switch light1;
    private Switch light2;
    private Switch light3;
    private Switch light4;


    private final static int REQUEST_ENABLE_BT = 1;

    private static final String TAG = "BackgroundService";
    String sentMessage = null;
    AsyncTaskRunner connect = new AsyncTaskRunner();
    BluetoothAdapter mBluetoothAdapter = BluetoothAdapter.getDefaultAdapter();


    @Override
        protected void onCreate(Bundle savedInstanceState) {
        super.onCreate(savedInstanceState);
        setContentView(R.layout.activity_main);

         light1 = (Switch) findViewById(R.id.switch1);
         light2 = (Switch) findViewById(R.id.switch2);
         light3 = (Switch) findViewById(R.id.switch3);
         light4 = (Switch) findViewById(R.id.switch4);

        ipAdd = (EditText) findViewById(R.id.editText);
        portAdd = (EditText) findViewById(R.id.editText2);
        Text = (TextView) findViewById(R.id.textView);

        if (!mBluetoothAdapter.isEnabled()) {
            Intent enableBtIntent = new Intent(BluetoothAdapter.ACTION_REQUEST_ENABLE);
            startActivityForResult(enableBtIntent, REQUEST_ENABLE_BT);
        }

        light1.setOnCheckedChangeListener(new CompoundButton.OnCheckedChangeListener() {
            public void onCheckedChanged(CompoundButton buttonView, boolean isChecked) {
                if (isChecked) {// The toggle is enabled
                    sentMessage =  "11111111";
                    connect = new AsyncTaskRunner();
                    connect.execute();
                } else {// The toggle is disabled
                    sentMessage =  "111111111";
                    connect = new AsyncTaskRunner();
                    connect.execute();
                }
            }
        });
        light2.setOnCheckedChangeListener(new CompoundButton.OnCheckedChangeListener() {
            public void onCheckedChanged(CompoundButton buttonView, boolean isChecked) {
                if (isChecked) {// The toggle is enabled
                    sentMessage =  "1111111111";
                    connect = new AsyncTaskRunner();
                    connect.execute();
                } else {// The toggle is disabled
                    sentMessage =  "11111111111";
                    connect = new AsyncTaskRunner();
                    connect.execute();
                }
            }
        });
        light3.setOnCheckedChangeListener(new CompoundButton.OnCheckedChangeListener() {
            public void onCheckedChanged(CompoundButton buttonView, boolean isChecked) {
                if (isChecked) {// The toggle is enabled
                    sentMessage =  "111111111111";
                    connect = new AsyncTaskRunner();
                    connect.execute();
                } else {// The toggle is disabled
                    sentMessage =  "1111111111111";
                    connect = new AsyncTaskRunner();
                    connect.execute();
                }
            }
        });
        light4.setOnCheckedChangeListener(new CompoundButton.OnCheckedChangeListener() {
            public void onCheckedChanged(CompoundButton buttonView, boolean isChecked) {
                if (isChecked) {// The toggle is enabled
                    sentMessage =  "11111111111111";
                    connect = new AsyncTaskRunner();
                    connect.execute();
                } else {// The toggle is disabled
                    sentMessage =  "111111111111111";
                    connect = new AsyncTaskRunner();
                    connect.execute();
                }
            }
        });


        Hub hub = Hub.getInstance();
        if (!hub.init(this)) {
            Log.e(TAG, "Could not initialize the Hub.");
            finish();
            return;
        }
        // Disable standard Myo locking policy. All poses will be delivered.
        hub.setLockingPolicy(Hub.LockingPolicy.NONE);
        // Next, register for DeviceListener callbacks.
        hub.addListener(mListener);
        // Finally, scan for Myo devices and connect to the first one found that is very near.
        hub.attachToAdjacentMyo();


    }
/******************************************Android home automation control***************************************/


/******************************************MYO part*************************************************************/

    private DeviceListener mListener = new AbstractDeviceListener() {

        @Override
        public void onPose(Myo myo, long timestamp, Pose pose) {
            switch (pose) {
                case REST:
                    Text.setText("REST");
                    sentMessage = "1";
                    break;
                case FIST:
                    Text.setText("FIST");
                    sentMessage =  "11";
                    connect = new AsyncTaskRunner();
                    connect.execute();

                    break;
                case WAVE_IN:
                    Text.setText("WAVE_IN");
                    sentMessage =  "111";
                    connect = new AsyncTaskRunner();
                    connect.execute();

                    break;
                case WAVE_OUT:
                    Text.setText("WAVE_OUT");
                    sentMessage =  "1111";
                    connect = new AsyncTaskRunner();
                    connect.execute();

                    break;
                case FINGERS_SPREAD:
                    Text.setText("FINGERS_SPREAD");
                    sentMessage =  "11111";
                    connect = new AsyncTaskRunner();
                    connect.execute();

                    break;
                case DOUBLE_TAP:
                    Text.setText("DOUBLE_TAP");
                    sentMessage = "111111";
                    break;
                case UNKNOWN:
                    Text.setText("UNKNOWN");
                    sentMessage =  "1111111";
                    break;
            }
            host = ipAdd.getText().toString();
            port = Integer.parseInt(portAdd.getText().toString());

        }
    };


        /********************************** Arduino part **********************************************************/
        private class AsyncTaskRunner extends AsyncTask<String, String, String> {


            @Override
        protected String doInBackground(String... params) {

            try {

                byte[] message = new String(sentMessage).getBytes();

                // Get the internet address of the specified host
                InetAddress address = InetAddress.getByName(host);

                // Initialize a datagram packet with data and address
                DatagramPacket packet = new DatagramPacket(message, message.length,
                        address, port);

                // Create a datagram socket, send the packet through it, close it.
                DatagramSocket dsocket = new DatagramSocket();
                dsocket.send(packet);
                System.out.println("Sent");
            } catch (Exception e) {
                System.err.println(e);
            }
            return host;
        }
        @Override
        protected void onPostExecute(String result) {
            // execution of result of Long time consuming operation
        }
        @Override
        protected void onPreExecute() {
            // Things to be done before execution of long running operation. For
            // example showing ProgessDialog
        }

        @Override
        protected void onProgressUpdate(String... text) {

            // Things to be done while execution of long running operation is in
            // progress. For example updating ProgessDialog
        }
    }

}
Arduino mkr1000 code
C/C++
#include <SPI.h>
#include <WiFi101.h>
#include <WiFiUdp.h>

int status = WL_IDLE_STATUS;
char ssid[] = "Viky"; //  your network SSID (name)
char pass[] = "Cure2109";    // your network password (use for WPA, or use as key for WEP)
int keyIndex = 0; // your network key Index number (needed only for WEP)

const int led1 = 6;
const int led2 = 7;
const int led3 = 8;
const int led4 = 9;

const int rest = 1;             //length of the message received from the android app
const int fist = 2;
const int wave_in = 3;
const int wave_out = 4;
const int finger_spread = 5;
const int double_tap = 6;
const int unknown = 7;
const int switch1On = 8;
const int switch1Off = 9;
const int switch2On = 10;
const int switch2Off = 11;
const int switch3On = 12;
const int switch3Off = 13;
const int switch4On = 14;
const int switch4Off = 15;

int ledPosition = 0;
const int maxPosition = 4;
const int minPosition = 1;

int len;
unsigned int localPort = 2390;      // local port to listen on

char packetBuffer[255]; //buffer to hold incoming packet

WiFiUDP Udp;

void setup() {
  //Initialize serial and wait for port to open:
  Serial.begin(9600);
  pinMode(led1, OUTPUT);
  pinMode(led2, OUTPUT);
  pinMode(led3, OUTPUT);
  pinMode(led4, OUTPUT);

  while (!Serial) {
    ; // wait for serial port to connect. Needed for native USB port only
  }

  // check for the presence of the shield:
  if (WiFi.status() == WL_NO_SHIELD) {
    Serial.println("WiFi shield not present");
    // don't continue:
    while (true);
  }

  // attempt to connect to Wifi network:
  while ( status != WL_CONNECTED) {
    Serial.print("Attempting to connect to SSID: ");
    Serial.println(ssid);
    // Connect to WPA/WPA2 network. Change this line if using open or WEP network:
    status = WiFi.begin(ssid, pass);

    // wait 10 seconds for connection:
    delay(10000);
  }
  Serial.println("Connected to wifi");

  Serial.println("\nStarting connection to server...");
  // if you get a connection, report back via serial:
  if(Udp.begin(localPort) == 1) Serial.println("started");
  else Serial.println("failed");

}

void loop() {
  // if there's data available, read a packet
  int packetSize = Udp.parsePacket();
  if (packetSize)
  {

    // read the packet into packetBufffer
    len = Udp.read(packetBuffer, 255);
    if (len > 0) packetBuffer[len] = 0;
    Serial.println(packetBuffer);

    myoControl();
    androidControl();

  }
  minMaxLedPosition();
}


void minMaxLedPosition(){

    if(ledPosition > maxPosition){
        ledPosition = maxPosition;
    }

    if(ledPosition < minPosition){
        ledPosition = minPosition;
    }
}


void myoControl(){
    if(len == wave_in){
       ledPosition ++;
    }
    if(len == wave_out){
       ledPosition --;
    }

    if(len == fist){
        switch(ledPosition){
          case 1:
            digitalWrite(led1, LOW);
          break;
          case 2:
            digitalWrite(led2, LOW);
          break;
          case 3:
            digitalWrite(led3, LOW);
          break;
          case 4:
            digitalWrite(led4, LOW);
          break;
          }
    }

    if(len == finger_spread){
        switch(ledPosition){
          case 1:
            digitalWrite(led1, HIGH);
          break;
          case 2:
            digitalWrite(led2, HIGH);
          break;
          case 3:
            digitalWrite(led3, HIGH);
          break;
          case 4:
            digitalWrite(led4, HIGH);
          break;
          }
      }
}


void androidControl(){

        if(len == switch1On){
          digitalWrite(led1, HIGH);
        }
        else if(len == switch1Off){
          digitalWrite(led1, LOW);
        }

       if(len == switch2On){
          digitalWrite(led2, HIGH);
       }
       else if(len == switch2Off){
          digitalWrite(led2, LOW);
       }
      if(len == switch3On){
          digitalWrite(led3, HIGH);
       }
       else if(len == switch3Off){
          digitalWrite(led3, LOW);
       }
       if(len == switch4On){
          digitalWrite(led4, HIGH);
       }
       else if(len == switch4Off){
          digitalWrite(led4, LOW);
       }
}
Source : Gestured Controlled Smart Home


