Summary of Froggy World 5 The Coffee Gripper
This project demonstrates a "coffee gripper" mechanism for moving an object (a plastic frog) in an orientation-agnostic manner. Inspired by Cornell's research, the system uses a balloon filled with coffee beans to create a vacuum seal when pressed against the target. The assembly involves 3D printed parts, servo motors, and a low-cost vacuum pump to transport the frog from a train car back to a catapult.
Parts used in the Froggy World Coffee Gripper:
- Arduino
- Arduino motor shield
- Hitec HS-645MG ultra torque servo motors (2 units)
- Vacuum pump
- Coffee (Maxwell House original roast)
- 12-inch round balloon
- Lazy Susan bearings
- Cast Acrylic tube
- Two feet of 3/8 inch OD, 1/4 inch ID tubing
- Breadboard
- Various 3D printed parts
- 12 volt 1 amp power supply
- 5 volt 1 amp power supply
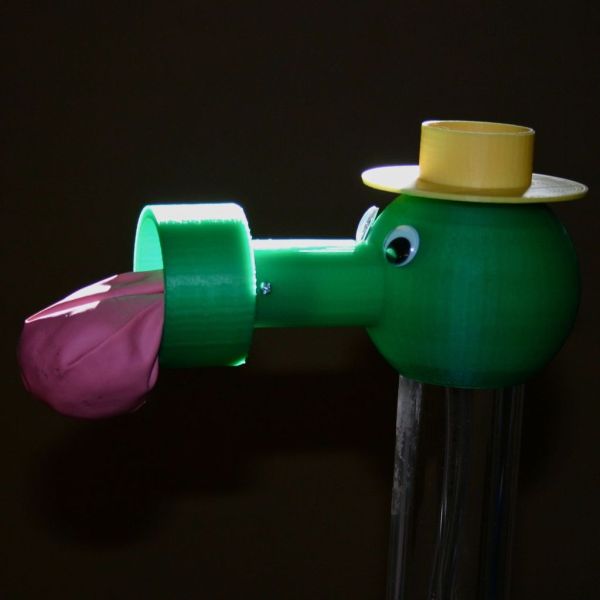
In Froggy World, the amusement park for adventurous plastic frogs, it became necessary to to move the frog from a train car back to the catapult. Because I couldn’t know whether the frog would be upright or sideways–and in what orientation–the gripper was a challenge.
 I read about the “coffee gripper” developed at Cornell and used that technique for transporting the frog.
In the video, I cut out the “20 seconds of vacuum time–caused by my low cost pump” to keep from boring the viewers.
Step 1:
What do we need to build this?
Arduino
Arduino motor shield
(2) Hitec HS-645MG ultra torque servo motors (amazon.com)
Vaccum pump https://www.sparkfun.com/products/10398
Coffee (I used Maxwell house, original roast)
12″ round balloon
Lazy Susan bearings http://www.amazon.com/gp/product/B002TIKEQ6/ref=oh_details_o02_s00_i00?ie=UTF8&psc=1
Cast Acrylic tube http://www.amazon.com/gp/product/B0070ZQGRE/ref=oh_details_o02_s00_i01?ie=UTF8&psc=1
Two feet of 3/8 inch OD, 1/4 inch ID tubing
Breadboard
Various 3D printed parts, design and print files at:
http://www.thingiverse.com/thing:68316
12 volt 1 amp power supply
5 volt 1 amp power supply
Step 2:
To make this work, the coffee filled gripper must be pushed down onto the target.
The more it surrounds the target and the greater the vacuum, the greater the chances for a successful grip.
Since we are working with minimum “push” (servo motor 10 inches away) and low vacuum (low cost pump)–we have to do everything possible to help the system.
Reducing the thickness of the balloon wall is a first step. Blow up a “12 inch” balloon and clamp it in the inflated position overnight. It will stretch.
Step 3:
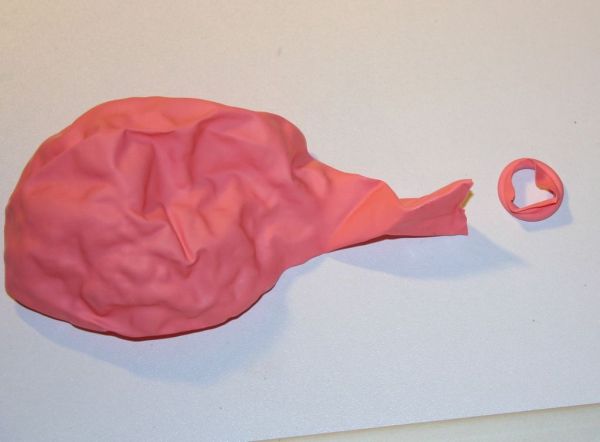
Cut off the lip of the balloon.
Step 4:
Weigh the balloon (around 3 grams) then attach a funnel.
Step 5:
Add 20 grams of coffee. I started with 47 grams and worked my way down–don’t know what the absolute best situation would be.
Step 6:
Insert the tube of the coffee filled balloon through the hole in the printed gripper and wrap it around the top edge of the gripper.
Insert one end of the plastic tube into the top of the printed gripper–it should just press in.
Step 7:
Drill a 1/2 inch hole in the printed head through the snout (I couldn’t figure out how to make the snout hole go all the way into the head when I designed it–so you have to drill about 1/2 inch of plastic).
Step 8:
Insert the gripper into the snout. Drill two small holes and attach the two pieces together with screws.
This will allow removal of the gripper if the balloon fails or if you want to change the amount of coffee contained.
For more detail: Froggy World 5 The Coffee Gripper
- How was the coffee gripper technique developed?
The author read about the coffee gripper developed at Cornell and used that specific technique for transporting the frog. - Why was the video edited to remove 20 seconds of vacuum time?
The author cut this segment because it was caused by a low-cost pump and would have bored the viewers. - What is the best way to prepare the balloon for the gripper?
You should blow up a 12-inch balloon, clamp it in the inflated position overnight to stretch it, and then cut off the lip. - How much coffee should be added to the balloon?
The author suggests weighing the empty balloon first, then adding approximately 20 grams of coffee after testing higher amounts like 47 grams. - How do you attach the coffee-filled balloon to the gripper?
Insert the tube of the coffee-filled balloon through the hole in the printed gripper and wrap it around the top edge. - Can the gripper be removed if the balloon fails?
Yes, drilling two small holes and attaching the pieces with screws allows for removal of the gripper if the balloon fails or to change the coffee amount. - What challenge did the gripper design face regarding orientation?
The gripper had to handle the frog regardless of whether it was upright, sideways, or in any other unknown orientation. - Where can the design and print files for the 3D parts be found?
The files are available at Thingiverse under the link http://www.thingiverse.com/thing:68316.