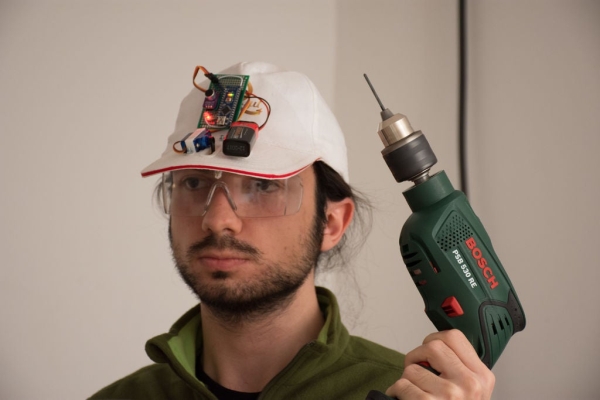
Eye Guardian is an Arduino powered, High-Decibel continuous sound triggered eye protection wear. It detects heavy equipment sound and lowers protective eye goggles while the equipment is in use.
Outline
In the first step, I will explain the Inspiration&Idea behind this project. Next, I will give you a Tools&Parts list that I have used to build this. Then I will explain the design choices I made and give you a guide to 3D print the parts needed for this instructable. After giving you a step by step assembly guide on the electronics and hat assembly I will end the instructable with a troubleshooting guide and a What’s Next section where I will discuss what can be added or changed in the future.
The purpose of this instructable is not just to give you a cookbook. I’ll show you the way I built this project and provide you with open-ended questions, so you can add your own ideas, and take this project even further.
I strongly encourage you to share your build when it’s done!
Let’s get started.
Step 1: Inspiration & Idea
I try to wear eye protection when I use heavy equipment, but with the excitement of building something, I usually forget to wear it. While I was watching Adam Savage’s One Day Builds I saw that I was not the only one. And I thought that many of the people who build things share the same problem with me. So I decided to build a hat that does it for me. The first thing I thought was to use Fourier Analysis to detect specific sounds, but later I decided that the algorithm should be as simple as possible to be used by everyone, It shouldn’t be triggered only by my tools. And everyone should be able to edit the code to their own use. So after that, a prototyping journey has begun…
Step 2: Tools & Parts
All the 3d parts & Code of this project is in the SafetyHat.zip folder attached to this step.
Tools:
- Pliers
- Drill and 3mm Tip
- Diagonal Pliers
- Soldering Equipment
- Basic Sewing Equipment
Note: This project requires some soldering and sewing knowledge, I won’t get into the details, so if you’re new to them I recommend you to check out some tutorials on solderingand sewing first.
Parts:
1 x Electret Microphone Amplifier – MAX4466 with Adjustable Gain
1 x Safety Goggles
1 x Hat
1 x 9g Micro Servo Motor
1 x 9V Battery
1 x Red LED
1 x 220ohm resistor
4 x (8mm m3 bolt&nut)
3cm 0.8 mm brass wire
Step 3: Design & Print
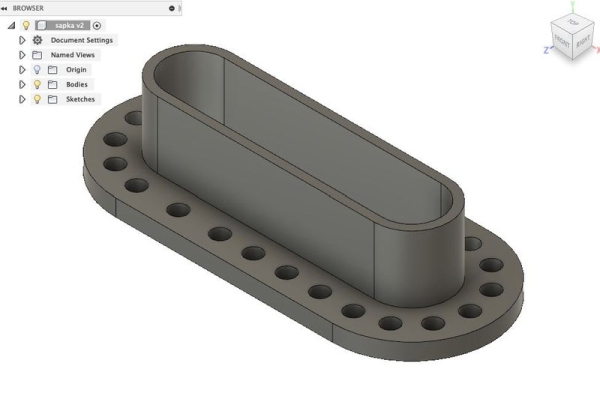
In this step, I will show you how I designed the parts in Fusion 360 in detail. If you just want to print the parts, you can skip this step.
Note: I suggest you read this step in detail before you print anything. I designed the parts according to my dimensions of the hat. So it is best if you design the structure according to your dimensions/parts.
Detailed comments are attached to the images as notes, check them out!
Printing
Printer: Tevo Tornado
I used PLA to print the parts, my settings are:
- 0.4 nozzle
- 50% infill
- temp. 195C
Step 4: Assembly: Electronics
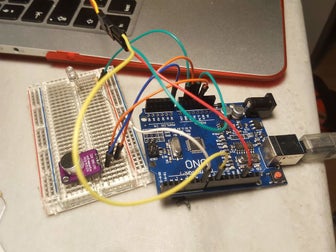
I recommend you to create a prototype first before soldering anything. As seen in the second image some jumper cables and a breadboard is enough to test the setup.
After You’ve assembled the prototype, upload the code to the Arduino and check the serial monitor while using a drill or other loud tool(Dremel etc.). If It doesn’t display drill on the serial monitor while the tool is used, edit the sensitivity value in the code until you are satisfied.
Now you can start soldering!
Note: I didn’t explain the Arduino setup in detail. If you did not use an Arduino board before you can check this tutorial first:
https://www.instructables.com/class/Arduino-Class/
Step 5: Assembly: Sewing
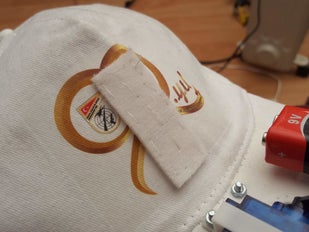
I used Velcro to attach the board and battery to the hat. You can also sew them directly to the hat if you want.
Source: Eye Guardian: Sound Triggered Eye Protection