Summary of Extremely Sensitive Cheap Homemade Seismometer
This article details the construction of a highly sensitive, low-cost homemade seismometer. It explains the conversion of mechanical tremors into digital signals using a permanent magnet and transformer coil, amplified by operational amplifiers and processed by an Arduino microcontroller. The system utilizes specific data acquisition software like NERdaq and Amaseis to visualize seismic activity, successfully recording distant earthquakes comparable to commercial observatories while requiring protection from air currents.
Parts used in the Homemade Seismometer:
- Mechanical tremor detector
- Permanent magnet (movable part)
- Solenoid coil (primary winding of a 1.8 W mains transformer)
- Glued aluminum plate (for Lentz effect damping)
- Low-noise operational amplifier (TL061, NE5534, OP07, OP27, LT1677, or 741)
- Arduino microcontroller
- Data logging software (NERdaq, Amaseis, JAmaseis)
- USB port for data streaming
Step 1: Demonstration of Sensitivity
On the video you can see the manufacturing process and the sensitivity of shocks
Step 2: Components
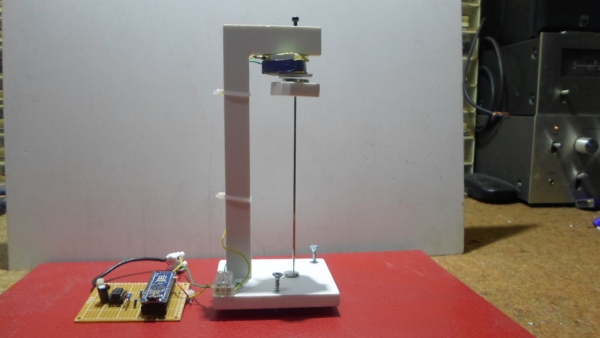
Otherwise, the seismometer itself consists of two parts, a mechanical tremor detector, and an electronic part that turns these tremors into electrical signals, amplified them and converts them into digital signals, which we can then visually monitor on the PC data logging software.
Step 3: Coil

To convert the tremors into electrical signals, a permanent magnet is used as a movable part and a solenoid with many windings for turning the magnet moves into electrical signals. In this particular case, I used the primary winding of a small mains transformer with a power of 1.8 W and a resistance of 1.2 kOhms. At This coil is a glued aluminum plate, which has the function to dump the oscillations of the moving magnet called the “Lentz effect”.
Step 4: Electronic Part
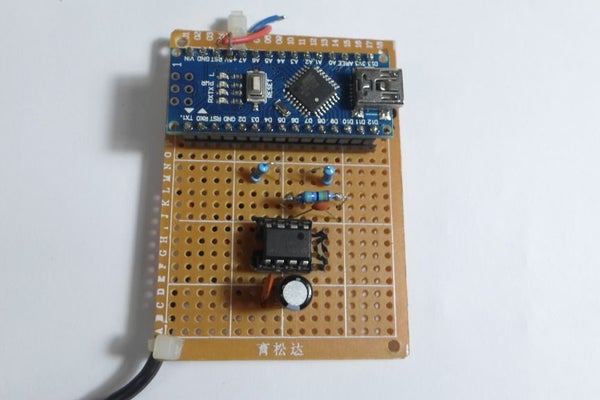
Тhe next module serves to amplify this signal and contains a low-noise operation amplifier(TL061,NE5534..) or instrumental operational amplifier(OP07,OP27,LT1677…), but it works well with the old good 741 with external power supply.Now this enhanced analog signal is taken at the A0 input of the Arduino microcontroller. In fact, the Arduino represents an analog to a digital converter. For test purposes we can use the arduino example for a / d converter called “AnalogInOutSerial”,but of course, the best is the code called “NERdaq”. NERdaq is a data acquisition system developed at New England Research to support slinky-based seismometers in schools. The daq is built around an arduino and streams 16-bit (oversampled) values to a usb port; the data are sampled at about 18.78 samples/second. Arduino codes are provided for unrestricted use, and are also available at http://ru.auckland.ac.nz/files/2014/07/nerdaqII.zip.
Step 5: Compare With Commercial Device
The code contains several filters that have been developed specifically for this purpose.This processed signal through the serial protocol is carried to data logging softwer for storing data and visual representation.
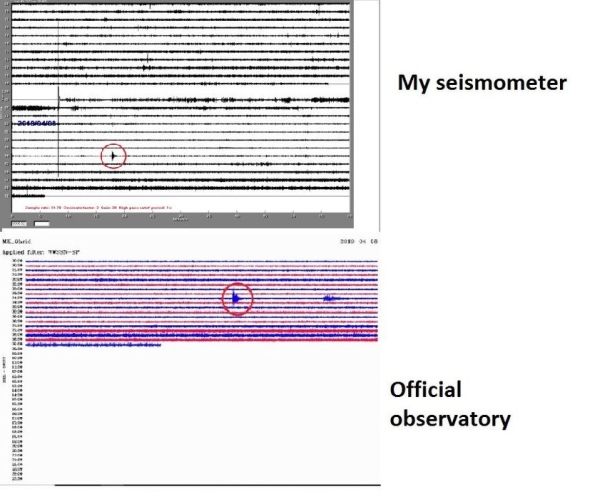
The best free software for this purpose is “Amaseis” and the newest “JAmaseis” (Java Amaseis). These programs can be downloaded to the next links: – http://harvey.binghamton.edu/~ajones/AmaSeis.html – https://www.iris.edu/hq/jamaseis/ With the help of Jameseis, you can upload real-time data on the IRIS server . For example you can see realtime data from my seismometer on: – http://geoserver.iris.edu/content/mpohr In the pictures, you can make a comparison between my seismometer, and that of the official seismological observatory of my city.It’s a very weak tremor and as you can see there is almost no difference between the two seismograms,which is a confirmation of the sensitivity and precision of this homemade cheap seismome.ter
Step 6: Recorded Earthquake
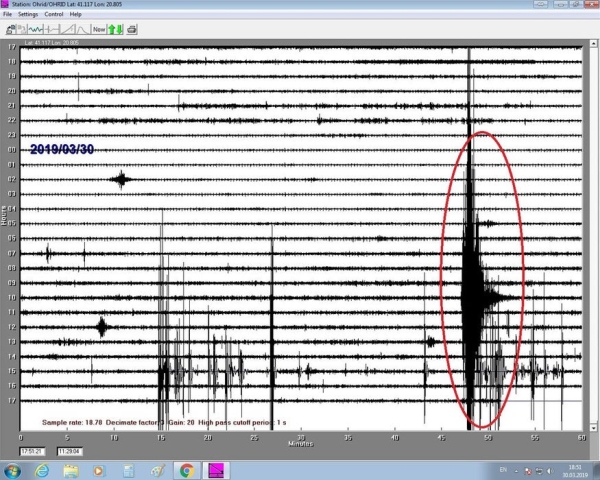
The following picture shows an earthquake in Greece with a magnitude of 5.2 Richter degrees registered on my seismometer at a distance of 220 kilometers from the epicenter.
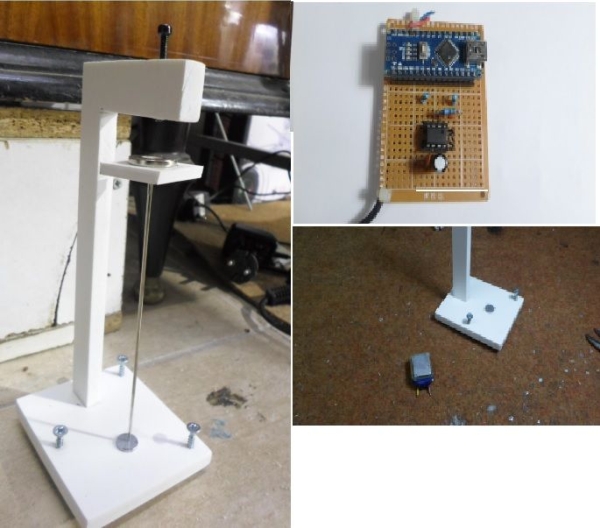
Step 7: Protection From External Influences
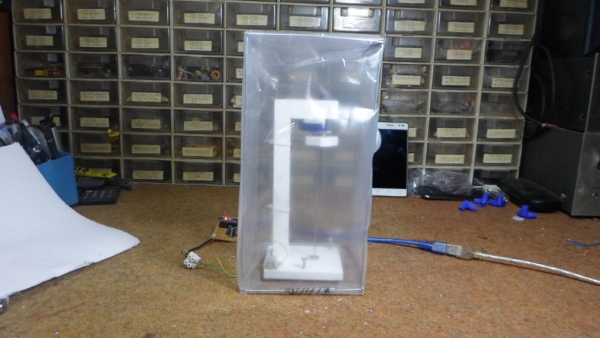
The instrument is very sensitive to air currents, so it must be properly protected.
Step 8: New Design
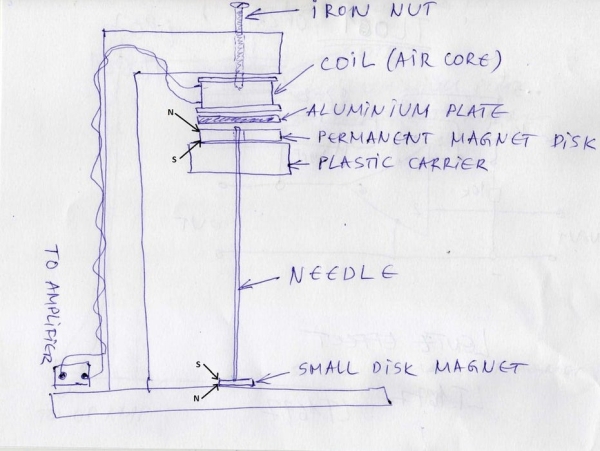
And finally, this is a completely new sensor design invented by me, that is both very sensitive and simple to build.I projected it on the basis of previous experience in making such devices. On my Youtube video channel(https://www.youtube.com/channel/UCHLzc76TZel_vCTy0Znvqyw?) you can see my other pre-made homemade seismometers:
-DIY simple and cheap piezo seismometer
-10$ sensitive seismometer
-DIY Lehman seismometer
-DIY horizontal pendulum seismometer
-DIY AS1 seismometer
-TC1 vertical seismometer
Source: Extremely Sensitive Cheap Homemade Seismometer
- How does the device convert tremors into electrical signals?
A permanent magnet moves within a solenoid coil containing many windings to generate electrical signals. - What component is used to dampen the oscillations of the moving magnet?
An aluminum plate glued to the coil creates the Lentz effect to dump oscillations. - Can I use a standard 741 operational amplifier for this project?
Yes, the 741 works well with an external power supply despite being older technology. - What is the sampling rate of the NERdaq system described?
The system samples data at approximately 18.78 samples per second. - Which free software is recommended for visualizing the seismogram data?
The best free options mentioned are Amaseis and the newer JAmaseis. - Can this homemade device record distant earthquakes accurately?
Yes, it successfully recorded a magnitude 5.2 earthquake in Greece from 220 kilometers away. - What external factor must be avoided to protect the instrument?
The instrument is very sensitive to air currents and requires proper protection from them. - How does the sensitivity of this device compare to commercial ones?
Comparisons show almost no difference between its seismograms and those from official observatories.