Summary of Ever Blooming Mechanical Tulip
Everlasting flower for your everlasting love: a mechanical tulip that opens its six LED-lit petals via a servo-controlled pushrod and responds to touch. Petals each hold five SMD white LEDs and brass vein wiring; the blossom contains NeoPixel RGBs. The base houses an Arduino Nano, TTP223 touch sensor, and servo. The project combines metalwork, LEDs, and simple electronics to create a uniquely crafted, touch-activated blooming lamp.
Parts used in the Ever Blooming Mechanical Tulip:
- 1mm brass rod
- 2mm brass tubing with 1.2mm hole
- 0.3mm copper wire with insulation
- Wood for pedestal/base
- Arduino Nano
- TTP223 touch sensor
- Small hobby servo
- SMD 1206 white LEDs (5 per petal)
- NeoPixel RGB LEDs (7 for the blossom)
- Pushrod (metal rod acting as actuator)
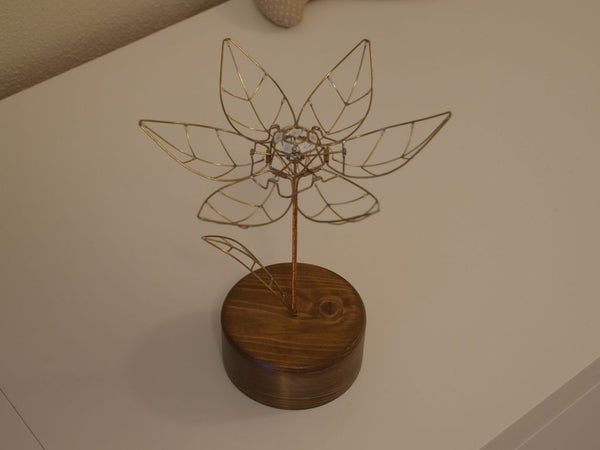
Everlasting flower for your everlasting love. A perfect not-only Valentine’s day gift to your loved one. This mechanical tulip will bloom into any color possible with just gentle touch of your hand. Its six petals will slowly open and light up. When petals are closed they create incredible ambient light with leaf patterns.

Step 1: Watch the Video!
I did not record the original tulip on the camera. But I’ve designed a bit simplified version and shoot a nice video of making these. The concept is the same. You will get an idea of how it works and how it is built. Watch!
Join the community to get in touch with fellow makers to share ideas, experience and improve the design!
Visit everbloomingflower.com if you want to have one!
Step 2: How Does It Work?
But before I will tell you how to create this beauty, let’s talk briefly about how it works. Tulip consists of 6 petals each with 5 SMD white LEDs. Each petal is connected with one of the Arduino output pins. Blossom hides 7 NeoPixel RGB LEDs. From an electrical point of view, the whole flower is ground and veins in petals are a positive voltage. Petals are opened by a pushrod which is going all the way down the stem to the base. The pushrod is controlled by a movement of a small hobby servo. Small leaf on the side of the stem is connected to TTP223 touch sensor inside the base and creates a capacitive touchpad. The wooden base contains a servo motor, touch IC and Arduino Nano. Let’s build one yourself!
What are you gonna need?
- 1mm brass rod
- 2mm brass tubing with 1, 2mm hole
- 0.3mm copper wire with insulation
- Some wood for pedestal
- Arduino Nano
- TTP223 touch sensor
- Small servo
What you need to know before you start
- How to solder brass (great article)
- How to build with Arduino
- How to use servos
- How to use LEDs and NeoPixels
I am not telling you any dimensions of the components and exact shape of the blossom. I think every flower should be a unique one.
Step 3: The Petals (4h)
Let’s start with the most satisfying part first – petals of the blossom. Note that number in the brackets is a time required to do the step.
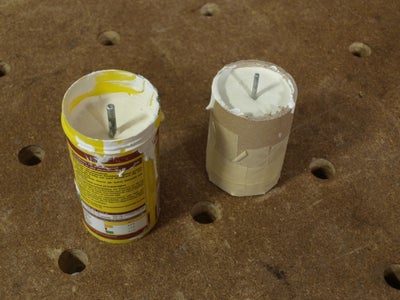
The first thing you need is a template for the blossom. I created mine from plaster poured into tube mold. When it dried I shaped it into a tulip blossom. You can 3D print it as well but I don’t have a 3D printer. The plaster is great because it is easy to machine and a pencil can draw on it. Single petal is 1/4 of the surface of the template so at the end when there are gonna be 6 of them, they will slightly overlap each other creating exact look of a tulip blossom. I draw the petal shape on the surface of the plaster with a pencil. When I was satisfied with the petal shape I carved it into the plaster with a knife to help me hold rods in place while soldering.
Petal consists of 1mm brass rod going all the way around the shape. Inside the petal are 5 SMD 1206 white LEDs and a “vein” structure from the very same wire. First, create the circumferential wire, take your time bending it. Cut a small piece of tubing and pass it on the bottom flat part of the wire – this will be the hinge petal will move around. Solder ends of the wire together, make sure you don’t fill the tubing with solder. It needs to move freely. Finish the petal with LEDs and venous structure. Watch me making a single petal. Shame on me, this is the only footage I have from making the flower.
Now make 5 more of these. All petals need to be exactly the same. It’s really crucial. Otherwise, they would not resemble a nice even tulip shape at the end when closed and may even get stuck.
Source: Ever Blooming Mechanical Tulip
- How does the tulip detect touch?
The leaf on the side of the stem is connected to a TTP223 capacitive touch sensor inside the base, which detects touch. - How are the petals actuated to open and close?
A pushrod running down the stem is moved by a small hobby servo in the wooden base to open and close the petals. - What controls the LEDs and servo?
An Arduino Nano in the wooden base controls the outputs to the petals and the servo, and interfaces with the touch sensor. - How many LEDs are in each petal?
Each petal contains five SMD 1206 white LEDs. - What creates the blossom ambient light and colors?
The blossom hides seven NeoPixel RGB LEDs that provide color and lighting effects. - What materials form the petal structure?
Each petal is made from a 1mm brass rod forming the outline, with veins from 0.3mm copper wire and a small piece of brass tubing acting as a hinge. - Do all petals need to be identical?
Yes, all six petals must be exactly the same to ensure an even tulip shape and prevent sticking when closing. - What preliminary skills are recommended?
You should know how to solder brass, use Arduino, operate servos, and work with LEDs and NeoPixels.