Summary of Ender 3 with Marlin – How to Install Marlin Firmware on Your Ender 3
Marlin is a popular open-source 3D printer firmware. This guide explains flashing a bootloader to an Ender 3 (which lacks one), installing Marlin, and enabling bilinear/automatic bed leveling. Steps cover required wiring to an Arduino Uno, preparing Arduino IDE (libraries and Sanguino board), burning the bootloader, copying Ender 3 example configuration files into Marlin, compiling and uploading firmware, and enabling bed leveling options in configuration.h before final upload.
Parts used in the Ender 3 Marlin:
- Ender 3 3D printer
- Arduino Uno or clone
- Arduino Uno USB cable (to connect to PC)
- 5 female-to-female Dupont wires
- 1 female-to-male Dupont wire
- Windows computer with Arduino IDE installed
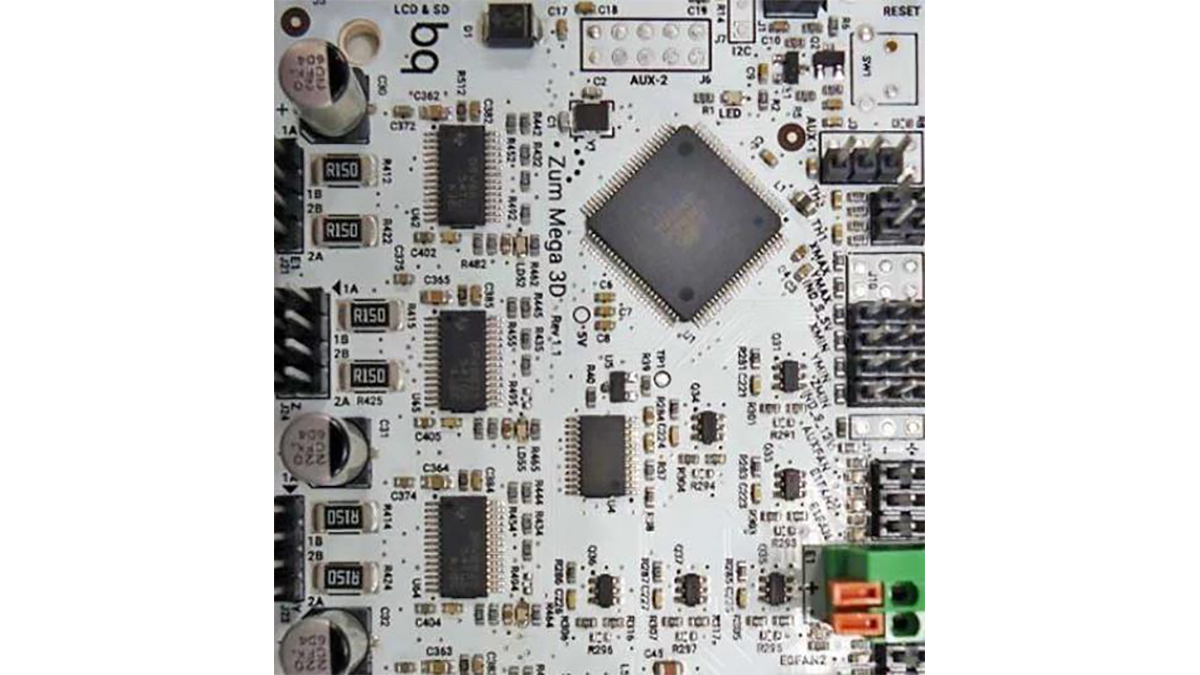
- Creality Melzi controller board (on Ender 3)
- Piece of paper or feeler gauge (for bed leveling)
Ender 3 Marlin
What is Marlin Firmware?
Marlin firmware holds the title of being the most commonly used 3D printer firmware worldwide. Operating on an 8-bit controller board makes it cost-effective, and it is completely open source and available for use at no charge. Companies like Creality, the manufacturer of the Ender 3, benefit greatly from making modifications and additions to their machines.
While the Ender 3 is a great machine – it was even our winter 2018/19 pick for the “Best 3D Printer Under $200” – its lower cost means some extras are not included. But, fear not, this guide will explain how to upgrade your Ender 3 using Marlin.
If you don’t have an Ender printer, check out our general guide on installing firmware.
Ender 3 Marlin
Flashing a Bootloader
As the Ender 3 is an affordable 3D printer, its board lacks a pre-installed bootloader. Therefore, you must install one on your own prior to flashing the firmware via USB.
What You’ll Need
- 5 female to female single Dupont wires
- 1 female to male Dupont wire
- An Arduino Uno (or clone) and cable to connect to a PC
- A Windows computer with the Arduino IDE pre-installed
How To Do It
- Open the Arduino IDE on your computer.
- Go to example sketches, select Arduino ISP and open it up.
- Go to ‘Manage libraries’ and add the U8glib Library (Make sure the library is called U8glib. You may have to scroll down.)
- Then go to board manager and add the Sanguino board.
- Once done, plug in your Arduino Uno. Select Arduino Uno as the port and Arduino Uno as the board, then click ‘Upload sketch’. It should upload successfully.
- Select the Sanguino board from the menu, which you should have added.
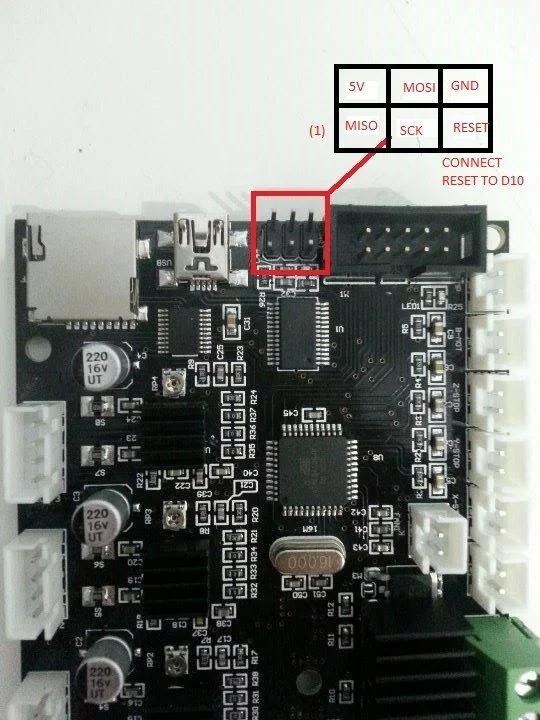
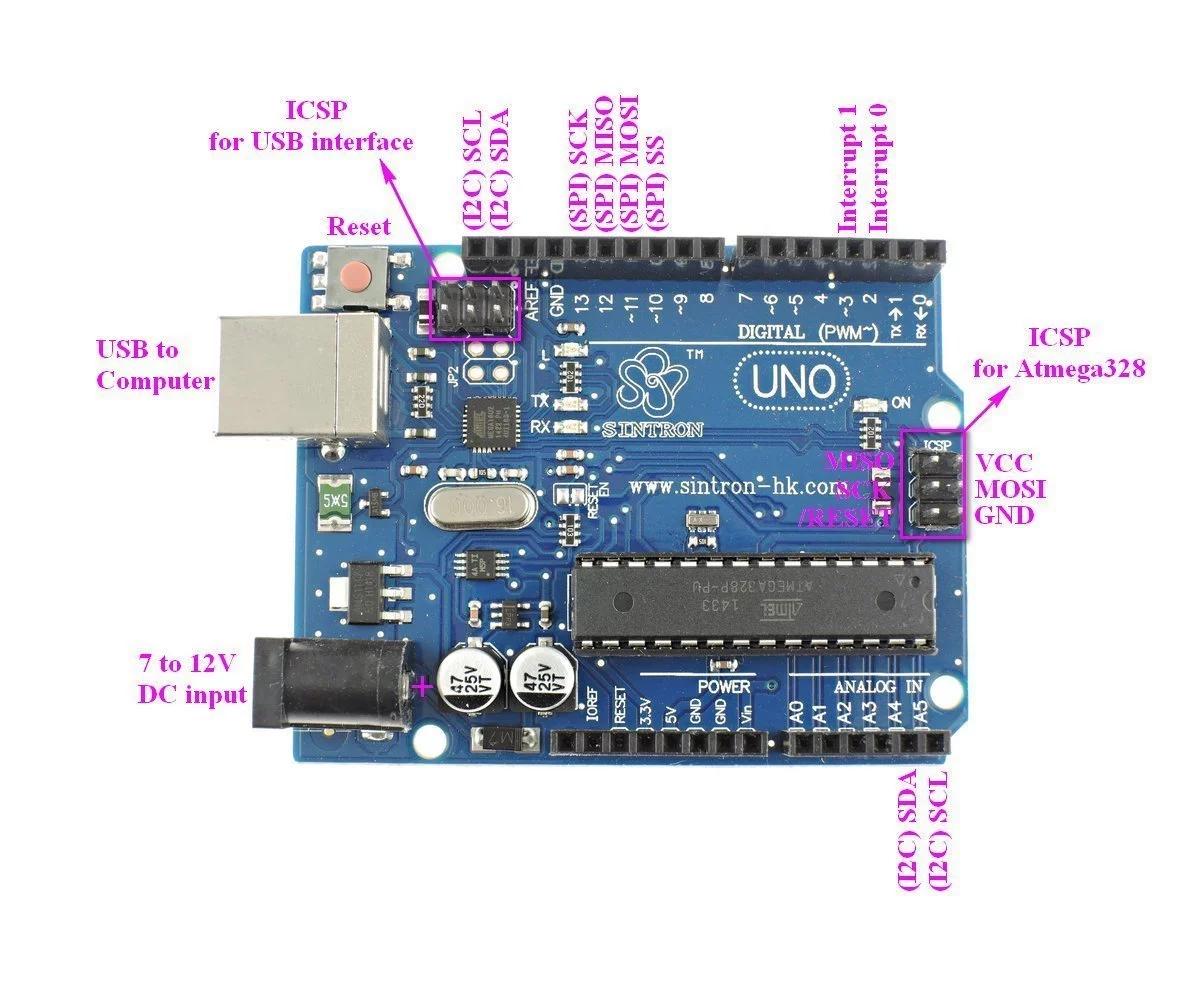
- Open your Ender 3’s control box and wire it up to the Arduino as follows:Melzi — ArduinoMISO — MISO5V — 5VSCK — SCKMOSI — MOSIRESET — Digital Pin 10 (the pin with the ~10 on the Arduino in the row of pins)GND — GND
- If a blue light flashes on the Creality board you have wired it correctly
- Click on the tools tab and click ‘Burn bootloader’. If it says in the shell ‘Output bootloader burned successfully’, you’ve done it.
- Unplug your Dupont connectors from the Ender 3, put the cover back on the board and screw it on.
- Now unplug your Arduino from the computer.
Ender 3 Marlin
Installing Marlin Firmware
Now that the bootloader is flashed, you’re ready to upload the firmware.
- Download the latest version of Marlin firmware.
- Unzip the folder and navigate to the example configurations folder, which is in the Marlin folder. Select the folder that says Ender 3 in example configurations and copy all the files there back into the Marlin folder. When it asks if you want to overwrite what is already there, click ‘yes’.
- Scroll down to the marlin.ino file and click to open it in the Arduino IDE.
- You are now ready to upload. If you wish to add bilinear bed leveling, go to the next step. Otherwise, make sure you have the printer plugged in via USB, the port is correct and the board is Sanguino. Then click the upload button. If that completes in the shell you are finished.
- Unplug the printer from the computer and plug it into the power socket. Be aware the printer may take longer to boot up than usual.
Ender 3 Marlin
Bilinear Bed Leveling

Bilinear bed leveling is having the printer automatically adjust the bed level, eliminating the need for manual adjustment with knobs. By examining the bed at nine different points, the machine adjusts the z-axis incrementally with a dial and a tool such as paper or a feeler gauge, ensuring that the printer compensates for any discrepancies in your prints.
- Open the marlin.ino file select configuration.h.
- Type Ctrl F and search for PROBE_MANUALLY
- Uncomment it by deleting both slashes
- Then search LCD_BED_LEVELING and uncomment it
- Search for AUTO_BED_LEVELING_BILINEAR and click ‘Find’ twice then uncomment what it selects.
- Since the Ender 3 only has 1248kb of storage, search SLIM_LCD and uncomment it.
- Now you are ready to compile.
- Make sure you have the printer plugged in via USB, the port is correct and the board is Sanguino. Then click the upload button. If that completes in the shell you are finished.
- Unplug the printer from the computer and plug it into the power socket. Be aware the printer may take longer to boot up than usual.
ENDER 3: MARLIN
Adding Automatic Bed Leveling
Automatic (bilinear) bed leveling is when the printer levels the bed itself – without you having to manually do it using knobs under the bed. It does this by probing the bed in a set of nine points and, using a piece of paper or feeler gauge, you can use the dial to move the Z-axis up and down in small increments and the printer will automatically account for this in your prints.
- Open the marlin.ino file select configuration.h.
- Type “Ctrl F” and search for PROBE_MANUALLY.
- Uncomment it by deleting the two slashes.
- Then search LCD_BED_LEVELING and uncomment it.
- Search for AUTO_BED_LEVELING_BILINEAR and click “Find” twice. Then, uncomment what it selects.
- Since the Ender 3 only has 1,248 KB of storage, search SLIM_LCD and uncomment it. Now you’re ready to compile.
- Make sure you have the printer plugged in via USB, the port is correct, and the board is Sanguino. Then click the upload button. If that completes, you’re finished!
- Unplug the printer from the computer and plug it into the power socket. Be aware the printer may take longer to boot up than usual.
Source: Ender 3 with Marlin – How to Install Marlin Firmware on Your Ender 3
- What is Marlin Firmware?
Marlin is an open-source, widely used 3D printer firmware that runs on 8-bit controller boards and is free to use. - Why do I need to flash a bootloader on the Ender 3?
Because the Ender 3 board does not include a pre-installed bootloader, you must install one before flashing firmware via USB. - What do I need to flash the bootloader?
You need 5 female-to-female Dupont wires, 1 female-to-male Dupont wire, an Arduino Uno (or clone) with cable, and a Windows PC with the Arduino IDE. - How do I prepare the Arduino IDE to burn the bootloader?
Open Arduino IDE, load the Arduino ISP example sketch, add the U8glib library, add the Sanguino board in Board Manager, select Arduino Uno, upload the sketch, then select Sanguino before burning the bootloader. - How should I wire the Ender 3 board to the Arduino?
Connect Melzi MISO to Arduino MISO, 5V to 5V, SCK to SCK, MOSI to MOSI, RESET to Digital Pin 10 on Arduino, and GND to GND. - How do I install Marlin firmware after burning the bootloader?
Download Marlin, copy the Ender 3 example configuration files into the Marlin folder, open marlin.ino in Arduino IDE, ensure the printer is on USB with Sanguino selected, and click upload. - How do I enable bilinear or automatic bed leveling?
In marlin.ino open configuration.h, uncomment PROBE_MANUALLY, LCD_BED_LEVELING, and AUTO_BED_LEVELING_BILINEAR, and uncomment SLIM_LCD due to storage limits, then compile and upload. - Do I need to change the board selection when uploading firmware?
Yes; ensure Sanguino is selected as the board before uploading. - Will the printer behave differently after firmware upload?
Yes; after uploading it may take longer to boot up than usual.