
Summary of Enabling F-bus communications with Arduino
This article details how to send SMS messages using an Arduino and a Nokia phone via the F-bus protocol. The author leverages existing AVR code and documentation to establish communication, replacing previous unsuccessful attempts with direct keypad wiring. By connecting the phone's TX/RX lines to the Arduino with appropriate voltage level shifting using resistors, users can successfully transmit text messages at 115,200bps.
Parts used in the Arduino F-bus SMS Project:
- Arduino
- Nokia 6150 mobile phone
- 330 ohm resistors
A few months ago I was looking into how to use Fbus with a Nokia phone but didn’t have much luck and instead just wired up the keypad. I decided to revisit Fbus and this time happened to find some AVR code which could send/receive SMS’s so now I’m able to send an SMS using the Arduino and I’ll explain how we do this.
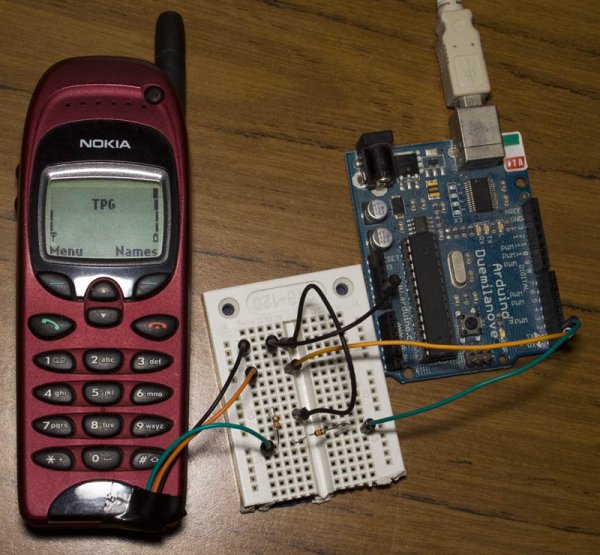
Before I go any further the 3 resources I used were:
Embedtronics – F-bus packet explanation with some examples of a packet
Avr and nokia3310 interface(sms) project on AVRfreaks – Code for an AVR to send/receive SMS
Gnokii – F-bus documentation and code to run on a computer
Firstly you need a Nokia phone which the F-bus commands are known, the best documentation is available for the Nokia 6110 and derivatives (Nokia 6130, 6150, 6190, 5110, 5130, 5150, 5190, 3210, 3310) – this was found in \gnokii-0.6.31\Docs\protocol\nk6110.txt
I was able to purchase a Nokia 6150 from Ebay for under $20. You can search up the Nokia pinout for your mobile phone – I found the TX, RX and GND for my phone.
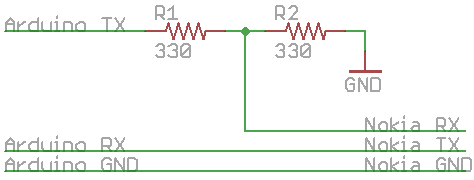
The F-bus protocol uses 115,200bps so we can easily use the Arduino’s serial function to communication with the phone. All you need to is hook up the phones TX to the Arduino’s RX and then use a resistor divider (I choose 330 ohm resistors) to connect the Arduino’s TX to the phones RX as shown above.
For more detail: Enabling F-bus communications with Arduino
- Which Nokia phones support the F-bus commands mentioned?
The best documentation is available for the Nokia 6110 and derivatives including models like 6130, 6150, 6190, 5110, 5130, 5150, 5190, 3210, and 3310. - How much did the author pay for the Nokia phone?
The author purchased a Nokia 6150 from Ebay for under $20. - What baud rate does the F-bus protocol use?
The F-bus protocol uses 115,200bps. - How should the Arduino TX line be connected to the phone RX line?
You must use a resistor divider, specifically choosing 330 ohm resistors, to connect the Arduino TX to the phone RX. - What resources were used to complete this project?
The three resources used were Embedtronics for packet explanation, an AVRfreaks project for code, and Gnokii for documentation and computer-side code. - Where can I find the specific protocol documentation for the Nokia 6110?
The documentation was found in the gnokii-0.6.31 Docs folder at the path protocol/nk6110.txt. - Can the Arduino serial function be used for this communication?
Yes, because the F-bus uses 115,200bps, you can easily use the Arduino serial function to communicate with the phone.
